Getting Started
3-10
1. Press OPEN ALL to ensure that the instrument is in
the idle state.
2. Press SCAN CONFIGURATION. The CONFIG-
URE SCAN menu will be displayed.
3. Place the cursor on SCAN-CONTROL and press
ENTER. The SCAN CONTROL menu will be dis-
played.
4. Place the cursor on SCAN-SPACING and press
ENTER. The SELECT SCAN SPACING menu will
be displayed.
SELECT SCAN SPACING
TIMER EXTERNAL GPIB MANUAL
5. Place the cursor on TIMER and press ENTER. The
timer interval (in seconds) will be displayed.
INTERVAL = 00000.001
6. Use the keypad to key in an interval of 20 seconds.
INTERVAL = 00020.000
7. Press ENTER. The display will return to the SCAN
CONTROL menu.
8. Press EXIT twice to exit from the CONFIGURE
SCAN menu and return to the channel status dis-
play.
9. To start the scan, press STEP. The first scan will
start immediately and stop after the 20th channel
closes. After 10 additional seconds expires (20 sec-
onds after the start of the scan), the next scan will
start.
10. When finished, press OPEN ALL.
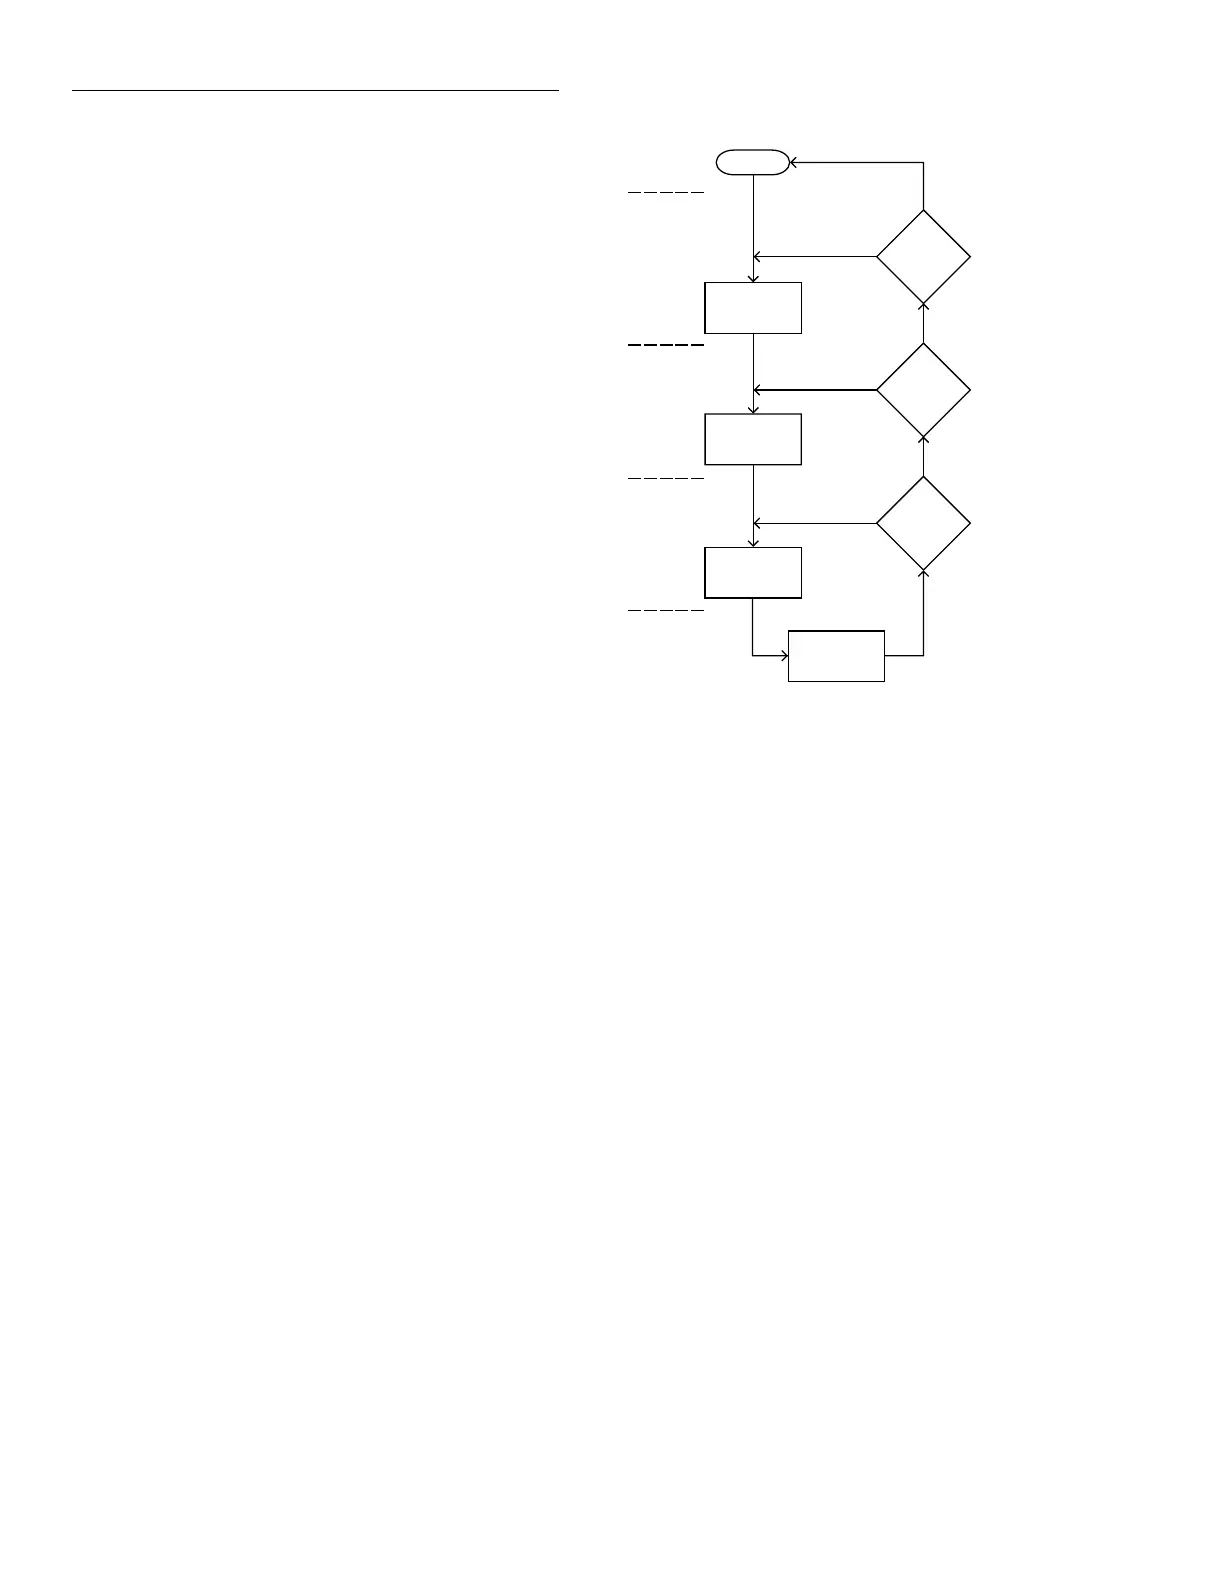
3.4 Overview of scan process
The following overview is intended to acquaint you
with the basic scan fundamentals without overwhelm-
ing you with the details of enhanced capabilities. This
brief overview is sufficient to support the operation ex-
amples in paragraphs 3.5 (front panel) and 3.6 (IEEE-
488 bus). For a complete explanation on all aspects of
the scan process, see paragraph 4.5.4.
The simplified model for scan operation is shown in
Figure 3-6. As shown, scan operation consists of three
layers; the arm layer, scan layer and channel layer.
Idle
The instrument is considered to be in the idle state
whenever it is not operating within one of the layers of
the model. The front panel ARM indicator is off when
the instrument is in the idle state.
When the Model 7001 is taken out of the idle state by
pressing STEP (or sending the :INIT or :INIT:CONT
ON command over the IEEE-488 bus), the ARM indica-
tor turns on and operation proceeds into the arm layer.
Arm layer
In general, the instrument requires an arm event to al-
low operation to proceed to the scan layer. With Imme-
diate arm spacing selected, operation immediately
proceeds to the next layer when the instrument is taken
out of the idle state. With one of the other arm spacing
events selected, the instrument will wait until the ap-
propriate event occurs.
Figure 3-6
Simplified model of scan operation
Arm
Layer
Idle
Scan
Layer
Channel
Layer
Yes
No
Arm
Count
Another
Arm
?
Another
Scan
?
Number of
Scans
Another
Channel
?
Number of
Channels
Channel
Event
Arm
Event
Scan
Event
Yes
No
Yes
No
Scan
Channel
Artisan Scientific - Quality Instrumentation ... Guaranteed | (888) 88-SOURCE | www.artisan-scientific.com
 Loading...