Home
Lightware
Transmitter
UMX-TPS-TX100 Series
Lightware UMX-TPS-TX100 Series User Manual
4
of 1
of 1 rating
183 pages
Give review
Manual
Specs
To Next Page
To Next Page
Loading...
UMX
-TPS-TX120, -TX130, -TX140, -TX140K, -TX140-Plus
FP-UMX
-TPS-TX120, -TX130
WP-UMX
-TPS-TX120-US Black, White
WP-UMX
-TPS-TX130-US Black, White
WP-UMX
-TPS-TX130-Plus-US Black, White
HDBaseT
TM
Multimedia Extender
User’
s Manual
v3.0
18-05-2021
2
Table of Contents
Table of Contents
4
Introduction
8
Description
9
Box Contents and Optional Accessories
10
Features
11
List of Features (in Alphabetical Order)
11
Feature Availability
12
Model Comparison
13
Typical Application
14
Product Overview
15
Front View - UMX-TPS-TX100 Series
16
Rear View - UMX-TPS-TX100 Series
17
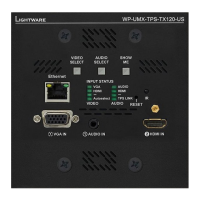
Rear View - WP-UMX-TPS-TX100 Series
18
Front View - WP-UMX-TPS-TX100 Series
18
Front View - FP-UMX-TPS-TX100 Series
19
Rear View - FP-UMX-TPS-TX100 Series
20
Front Panel Leds
20
Rear Panel Leds
21
Front Panel Buttons
22
Video Select Button
22
Audio Select Button
22
Programmable Show Me Button
22
Reseting the Device
23
Entering Firmware Update Mode
23
Controllock
23
Reset to Factory Default Settings
23
Programmable Show Me Button
23
Special Functions
23
Enable DHCP (Dynamic) IP Address
23
Installation
24
Mounting Options - Standalone Transmitters
25
High Rack Shelf
25
Under-Desk Double Mounting Kit
25
Mounting Options - Floor Plates
26
MKM Mounting Option
26
MKS Mounting Option
28
GES Mounting Option
29
Mounting Options - Wall Plates
32
HDMI Connector
33
DVI-I Connector
33
Displayport Connector
33
Locking 12V DC Connection
33
VGA Connector
33
DC Connection
33
Electrical Connections
33
Analog Stereo Audio (Jack)
34
Analog Stereo Audio (Phoenix)
34
Ethernet Connector (TPS and LAN Ports)
34
Connector
35
IR Connector
35
IR Detector
35
GPIO - General Purpose Input/Output Ports
35
USB Port
35
UMX-TPS-TX100 Series
36
FP/WP-UMX-TPS-TX100 Series
36
Connecting Steps
36
Powering Options
37
Device Concept
38
TPS Extender Concept
39
TPS Interface
39
Port Diagrams
40
Standalone Extenders
40
Wall Plate / Floor Plate Extenders
40
Video Interface
41
Video Input Modes
41
Input Source Selection Modes
41
The Autoselect Feature
41
Audio Options - Example
42
Audio Interface
42
Audio Input Modes
42
Serial Interface
43
Technical Background
43
Signal Transmission - Example
43
Recognizer
44
Ethernet Interface
44
Device Control over Ethernet
44
Wake-On-Lan
44
Tcprecognizer
45
Basic IT Security
45
Batch Commands
45
Technical Background
46
IR Interface
46
Advanced IR Functionality
47
GPIO Interface
47
Description
47
GPIO Options - Example
47
The Event Manager Feature
47
USB Interface (KVM Function)
48
Consumer Electronics Control (CEC) Feature
49
Further Built-In Features
49
Transmitter Cloning - Configuration Backup and Restore
49
Software Control Modes
49
Software Control - Lightware Device Controller
50
Install and Update
51
Running the LDC
51
Connecting to a Device (Device Discovery Window)
52
Ethernet Tab
52
Serial Tab
53
USB Tab
53
Further Tools
53
Crosspoint Menu
54
Port Properties Windows
55
Analog Video Inputs
55
Digital Video Inputs
56
TPS Video Output
56
Analog Audio Inputs
57
Digital Audio Inputs
58
TPS Audio Output
58
The CEC Tool
59
Cable Diagnostics
60
Diagnostic Tools
60
Test Pattern
61
Frame Detector
62
EDID Menu
62
EDID Operations
63
EDID Summary Window
63
Editing an EDID
64
Creating an EDID - Easy EDID Creator
64
Control Menu
65
Tab
65
Message Recognizer
65
GPIO Tab
66
Ethernet
67
Infra Tab
69
Macros
71
Variables
72
Event Manager
74
The Event Editor
74
Create or Modify an Event
75
Special Tools and Accessories
76
Clear One or more Event(S)
77
Export and Import Events
77
Event Creating - Example
77
Settings Menu
78
Status
78
Network
79
Front Panel
79
System
80
Backup
80
Configuration Cloning (Backup Tab)
81
Steps in a Nutshell
81
Save the Settings of a Device (Backup)
81
Upload the Settings to a Device (Restore)
82
Create and Restore Backups from the Device Memory
82
The Built-In Miniweb
83
Opening the Miniweb
83
Miniweb Customization
84
Advanced View Window
85
Lw2 Programmer's Reference
86
LW2 Protocol Description
87
Instructions for the Terminal Application Usage
87
Compile Time
88
List of All Available LW2 Commands
88
View Firmware Version of the CPU
88
Connection Test
88
General LW2 Commands
88
Query Control Protocol
88
Device Label Query
88
View Product Type
88
View Serial Number
89
View Installed Board
89
View Firmware for All Controllers
89
Query Health Status
89
Restart the Device
89
Restore Factory Default Settings
89
Unmute Output
90
Lock Output
90
AV Port Settings
90
Mute Output
90
Switch an Input to the Outputs
90
Unlock Output
91
View Connection State on the Output
91
View Crosspoint Size
91
Change the Video Autoselect Mode
91
Change the Audio Autoselect Mode
92
Change the Video Input Priorities
92
Change the Audio Input Priorities
92
Set the Subnet Mask
93
Set the Gateway Address
93
Apply Network Settings
93
Set the IP Address
93
Query the Current IP Status
93
Network Configuration
93
Enable/Disable the Ethernet Port
94
Settings
94
Mode Setting
94
Parameters Settings
94
Control Protocol Port Setting
95
Serial Port Format Setting (Link Port)
95
Serial Port Protocol Setting (Link Port)
95
GPIO Port Configuration
95
Setting the Level and Direction for each Pins
95
LW2 Commands - Quick Summary
96
Lw3 Programmers' Reference
98
LW3 Tree Structure and Command Structure (Examples)
99
General Rules
99
Overview
99
Protocol Rules
99
Instructions for the Terminal Application Usage
99
Legend for the Control Commands
100
Command Types
100
Prefix Summary
100
Error Messages
100
Escaping
101
Signature
101
Subscription
101
Notifications about the Changes of the Properties
101
Query the Firmware Version
102
Restore the Factory Default Settings
102
Resetting the Device
102
Query the Product Name
102
Query the Serial Number
102
Set the Device Label
102
System Commands
102
Lock the Front Panel Buttons
103
Disable the Default Function of the Front Panel Buttons
103
Darkmode
103
Dark Mode Delay
103
Enable the Cleartext Login Function
104
Logout from the Device
104
Cleartext Login Protection
104
Login the Device
104
Setting the Login Password
104
Running a Macro
104
Query the Status of Source Ports
105
Video Port Settings
105
Query the Status of Destination Port
106
Query the Video Crosspoint Setting
106
Disconnect Video Input
106
Switching Video Input
106
Querying the Connected Input Port Number
106
Query the Input Port Priority
107
Change the Input Port Priority
107
Change the Autoselect Mode
107
Query the Video Autoselect Settings
107
Unmute an Input Port
108
Lock an Input Port
108
Unlock an Input Port
108
Mute Output
108
Unmute Output
108
Lock Output
108
Unlock Output
108
Mute an Input Port
108
HDCP Setting (Input Port)
109
Test Pattern Generator Mode
109
Test Pattern Color
109
Test Pattern Resolution
109
TPS Mode Settings
110
Color Space Setting (Output Port)
110
HDMI Mode Settings (Output Port)
110
HDCP Setting (Output Port)
110
Audio Port Settings
111
Query the Status of Source Ports
111
Query the Status of Destination Port
112
Query the Audio Crosspoint Setting
112
Switching Audio Input
112
Query the Audio Autoselect Settings
112
Change the Autoselect Mode
113
Query the Input Port Priority
113
Change the Input Port Priority
113
Unlock an Input Port
114
Unmute Audio Output
114
Unlock Output
114
Lock Output
114
Lock an Input Port
114
Mute Audio Output
114
Unmute an Audio Input
114
Mute an Audio Input
114
Analog Audio Input Level Settings
115
Volume
115
Balance
115
Event Manager Basics
116
How to Arrange an Event
116
Setting a Condition by Linking Another Condition
116
Setting a Condition by Linking more Conditions
116
Event Manager Tool Kit
117
Setting the Delay
117
Setting an Action by Specifying a Direct Path
117
Setting an Action by Linking a Macro
117
Setting an Action by Linking Another Action
117
Setting the Name of the Event
118
Enable the Event
118
Triggering a Condition
118
Querying the Condition Counter
118
Querying the Condition Trigger Counter
119
Testing an Action
119
Variable-Management
119
Value Assignment
119
Addition and Subtraction (Add Method)
119
Addition and Subtraction (Cycle Method)
120
Value Change with Intervals (Case)
121
Scan and Store
121
Reformatting a Value
122
Ethernet Port Configuration
122
Set the DHCP State
122
Change the IP Address (Static)
122
Change the Subnet Mask (Static)
123
Change the Gateway Address (Static)
123
Apply Network Settings
123
Ethernet Tool Kit
123
Device Filter Based on MAC Address
123
Setting the Host Name
124
Powering on a Computer over Ethernet (Wake-On-LAN)
124
HTTP Post Receiving Blocking
124
LW2 Control Port Blocking
124
HTTP Port Blocking
124
Ethernet Message Sending
125
Sending a TCP Message (ASCII-Format)
125
Sending a TCP Text (ASCII-Format)
125
Sending a TCP Binary Message (HEX-Format)
125
Sending a UDP Message (ASCII-Format)
125
Setting the Target IP Address
126
Setting the TCP Port
126
Setting the Target Path
126
HTTP Messaging
126
Sending a UDP Binary Message (HEX-Format)
126
Sending a UDP Text (ASCII-Format)
126
Setting the Message Header
127
Sending a Post Message
127
Sending a Put Message
127
TCP Message Recognizer
127
Setting the IP Address of the TCP Server
127
Setting the TCP/IP Port Number of the TCP Server
128
Connecting to a TCP Server
128
Disconnecting from a TCP Server
128
Setting the Delimiter Hex
128
Setting the Timeout
128
Querying the Last Recognized Message (String)
128
Running an Immediate Event Action
129
Set the Active Timeout
129
Querying the Last Recognized Active Message (String)
129
Querying the Last Recognized Active Message (Hex)
129
Clearing the Last Recognized Stored Message
129
Querying the Last Recognized Message (Hex)
129
Protocol Setting
130
BAUD Rate Setting
130
Databits Setting
130
Port Configuration
130
Stopbits Setting
131
Parity Setting
131
Operation Mode
131
Command Injection Enable
131
Sending a Text (ASCII-Format) Via RS-232
132
Using Hexadecimal Codes
132
Sending a Message (ASCII-Format) Via RS-232
132
Message Sending
132
Sending a Binary Message (HEX-Format) Via RS-232
132
Message Recognizer
133
Enable the Recognizer
133
Set the Delimiter Hex
133
Set the Timeout
133
Querying the Last Recognized Message (String)
134
Querying the Last Recognized Message(Hex)
134
Clearing the Last Recognized Stored Message
134
Querying the Last Recognized Active Message (String)
134
Querying the Last Recognized Active Message (Hex)
134
Set the Active Timeout
135
Running an Immediate Event Action
135
Sending an OSD String
136
Sending CEC Commands
136
Further Commands
136
Press&Release Commands
136
Sending CEC Commands in Hex Format
137
Querying the Last Received CEC Message
137
Infrared Port Configuration
137
Enable Command Injection Mode
137
Enable/Disable Output Signal Modulation
137
Infrared Message Sending
138
Sending Pronto Hex Codes in Little-Endian Format Via IR Port
138
Sending Pronto Hex Codes in Big-Endian Format Via IR Port
138
Query the Emulated Edids
139
EDID Management
139
Set the Output Level of a GPIO Pin
139
Toggle the Level of a GPIO Pin
139
Set the Direction of a GPIO Pin
139
GPIO Port Configuration
139
Query the Validity of a Dynamic EDID
140
Query the Preferred Resolution of an User EDID
140
Emulating an EDID to an Input Port
140
Emulating an EDID to All Input Ports
140
Copy an EDID to User Memory
140
Deleting an EDID from User Memory
140
Resetting the Emulated Edids
140
LW3 Commands - Quick Summary
141
Firmware Update
147
LDU2 Installation
148
Preparation
148
About the Firmware Package (LFP2 File)
148
Introduction
148
Running the Software
149
LDU2 Interfaces
149
The Updating Steps
150
Updating Via GUI
151
Command Line Interface (CLI)
152
How to Run
152
How to Use
153
CLI Commands
153
Help
153
LDU2 Version
153
Check for New LDU2 Version
153
Device Info
154
Update
154
Restore
155
Package Options
155
Complex Examples
156
Exit Codes
157
If the Update Is Not Successful
157
Troubleshooting
158
Use Cases
159
How to Speed up the Troubleshooting Process
160
Technologies
161
EDID Management
162
Understanding the EDID
162
Advanced EDID Management
162
Disable Unnecessary Encryption
163
Protected and Unprotected Content
163
HDCP Management
163
Pixel Accurate Reclocking
164
Appendix
165
Specifications
166
Factory Default Settings
169
Content of the Backup File
170
Cable Wiring Guide
171
Serial Ports
171
Audio Ports
171
Mechanical Drawings
172
UMX-TPS-TX100 Series
172
WP-UMX-TPS-TX100 Series
173
FP-UMX-TPS-TX100 Series
173
Umx-Tps-Tx120
174
Umx-Tps-Tx130
174
Wp-Umx-Tps-Tx120-Us
174
WP-UMX-TPS-TX130-US / WP-UMX-TPS-TX130-Plus-US
174
Port Numbering
174
UMX-TPS-TX140 / UMX-TPS-TX140-Plus
175
Fp-Umx-Tps-Tx120
175
Fp-Umx-Tps-Tx130
175
Maximum Extension Distances
175
Factory EDID List
176
Applied Ports (Network Settings)
177
Release Notes of the Firmware Packages
178
Hashtag Keyword List
182
Further Information
183
Other manuals for Lightware UMX-TPS-TX100 Series
Quick Start Guide
2 pages
4
Based on 1 rating
Ask a question
Give review
Questions and Answers:
Need help?
Do you have a question about the Lightware UMX-TPS-TX100 Series and is the answer not in the manual?
Ask a question
Lightware UMX-TPS-TX100 Series Specifications
General
Brand
Lightware
Model
UMX-TPS-TX100 Series
Category
Transmitter
Language
English
Related product manuals
Lightware UMX-TPS-TX130
183 pages
Lightware UMX-TPS-TX140
183 pages
Lightware DVI-OPT-TX110
2 pages
Lightware DVI-OPT-RX110
2 pages