UMX-TPS-TX100 series – User's Manual 76
Video Port Settings
INFO: Video port numbering can be found in the Port Numbering section.
Command and Response
Î
Í <in1_state>;<in2_state>;<…>; <in#_state>
the next four characters represent a 2-byte HEX code showing the current state of the input ports.
Example
Î
Í
Parameters
Letter (Character 1)
Mute state Lock state
T
Unmuted Unlocked
L
Unmuted Locked
M
Muted Unlocked
U
Muted Locked
Mute / Lock status
Reserved character, always 0.
Reserved character, always 0.
Embedded audio / HDCP status
Signal present / Connection status
Letter
Byte 1
Byte 2
0 0 A A
Byte 1 Byte 2
Character 2 Character 3 Character 4 Character 5
BIT 7-6 BIT 5-4 BIT 3-2 BIT 1-0 BIT 7-6 BIT 5-4 BIT 3-2 BIT 1-0
Reserved Reserved Reserved Reserved
Embedded
audio status
HDCP status
Signal
present
status
Connection
status
0 0
Reserved Reserved Reserved Reserved
Unknown
0 1
Reserved
1 0
No
embedded
audio
Not
encrypted
No signal
Not
connected
1 1
Embedded
audio
presents
Encrypted
Signal
presents
Connected
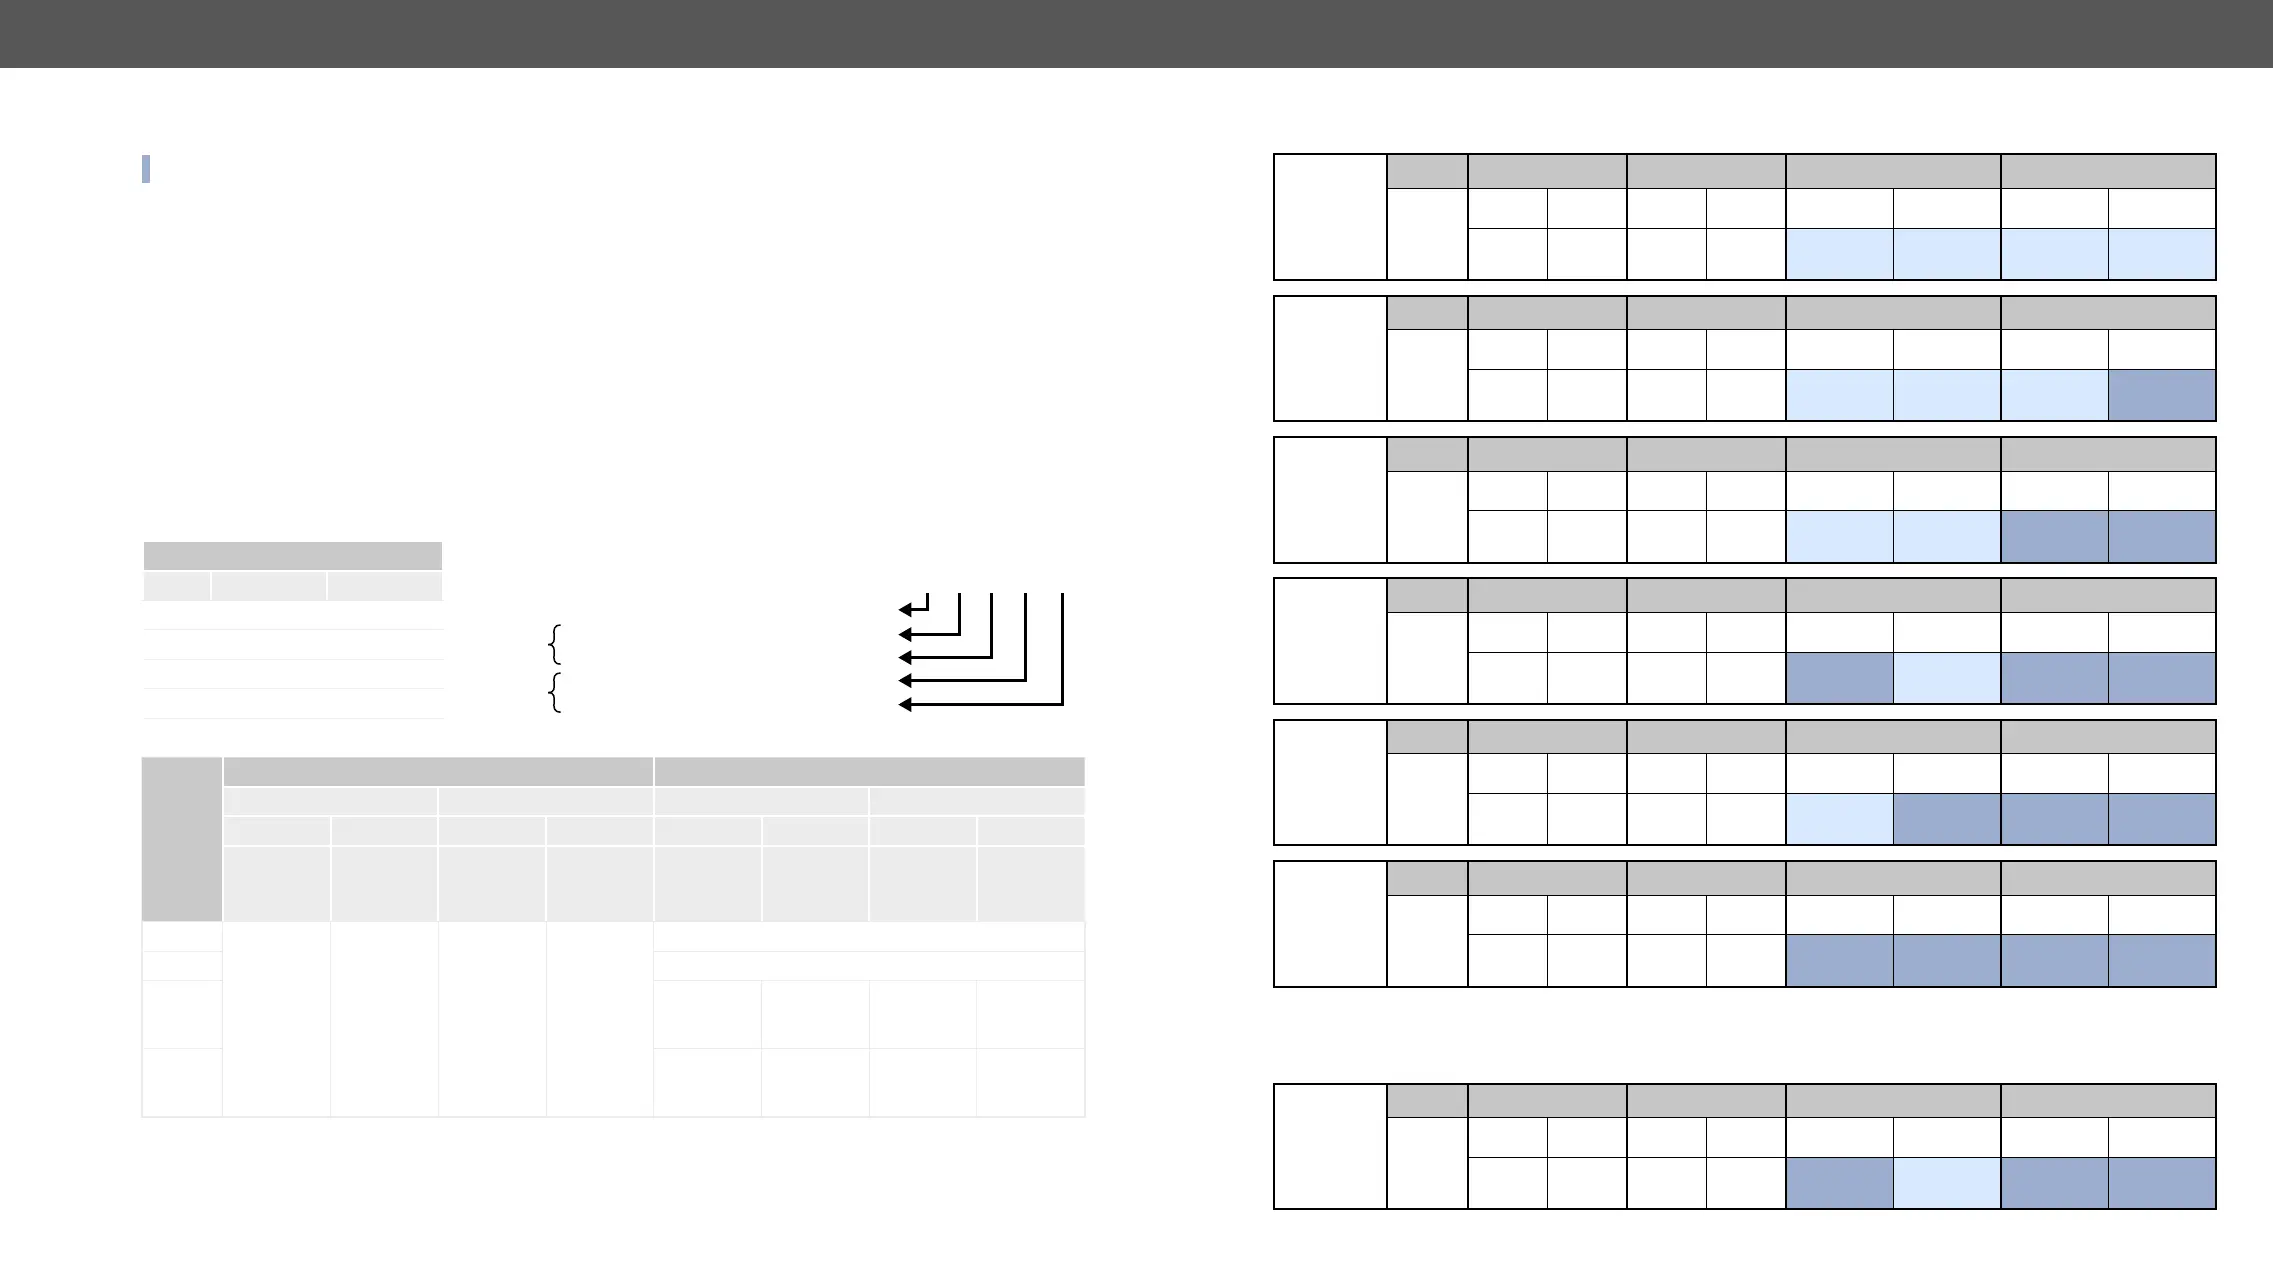
The Most Common Received Port Status Responses
T00AA
T 0 0 A A
Unlocked,
Unmuted
0 0 0 0 0 0 0 0 1 0 1 0 1 0 1 0
Reserved Reserved Reserved Reserved
No embedded
audio
Not
encrypted
No signal
Not
connected
T00AB
T 0 0 A B
Unlocked,
Unmuted
0 0 0 0 0 0 0 0 1 0 1 0 1 0 1 1
Reserved Reserved Reserved Reserved
No embedded
audio
Not
encrypted
No signal Connected
T00AF
T 0 0 A F
Unlocked,
Unmuted
0 0 0 0 0 0 0 0 1 0 1 0 1 1 1 1
Reserved Reserved Reserved Reserved
No embedded
audio
Not
encrypted
Signal
presents
Connected
T00EF
T 0 0 E F
Unlocked,
Unmuted
0 0 0 0 0 0 0 0 1 1 1 0 1 1 1 1
Reserved Reserved Reserved Reserved
Embedded
audio presents
Not
encrypted
Signal
presents
Connected
T00BF
T 0 0 B F
Unlocked,
Unmuted
0 0 0 0 0 0 0 0 1 0 1 1 1 1 1 1
Reserved Reserved Reserved Reserved
No embedded
audio
Encrypted
Signal
presents
Connected
T00FF
T 0 0 F F
Unlocked,
Unmuted
0 0 0 0 0 0 0 0 1 1 1 1 1 1 1 1
Reserved Reserved Reserved Reserved
Embedded
audio presents
Encrypted
Signal
presents
Connected
Only for analog video ports: Character 5 is E (11 10) which means signal is present but the cable is not
connected. The explanation is analog video ports have no hotplug signal which indicates the connection
status.
T00EF
T 0 0 E F
Unlocked,
Unmuted
0 0 0 0 0 0 0 0 1 1 1 0 1 1 1 1
Reserved Reserved Reserved Reserved
Embedded
audio presents
Not
encrypted
Signal
presents
Connected