Maintenance
CALIBRATION
The reference sources used in this procedure should nor-
mally be between
90
kHz
and 100
kHz.
100
kHz
(nomi-
nal) is recommended. For special applications,
performance may
be
optimized at other frequencies. See
Optimizing AC Calibration at Other Frequencies, later
in
this section.
To perform High-Frequency AC Calibration, proceed
as
follows:
1.
Ensure Offset and
Gain
Calibration has been com-
pleted for the VAC function.
2.
Select the High-Frequency AC Calibration procedure
by pressing the HF AC button. The 8840A will dis-
play the first prompt (100
mV
AC).
The
"U"
in the
display indicates the High-Frequency AC Calibration
procedure has been selected.
3.
Each time the 8840A prompts you for a reference
amplitude, apply this amplitude to the
HI
and
LO
INPUT terminals, and press the STORE button. When
STORE is pressed, the numeric display field
blanks
while the 8840A performs the necessary calculations.
(Do not change the reference source while the display
is biank.) The 8840A then displays the next prompt.
For reference, all prompts are shown in Table
6-11.
NOTE
To
use
reference amplitudes that differ from
the prompted values, see Storing Variable
Inputs later in this section.
4.
After the last range is calibrated, the 8840A
begins
taking reading in the highest range so that you may
verify its calibration. To verify the calibration for the
other ranges, push the corresponding range button.
The
CAL annunciator remains on.
5.
The calibration procedure is now completed. Exit the
calibration mode by pressing the CAL ENABLE
switch, and attach a calibration certification sticker
over the CAL ENABLE switch.
6-1
5.
Advanced Features and
Special
Considerations
The
8840A
has
several advanced calibration features
which are not necessary for the basic calibration proce-
dure, but which can make calibration easier. The following
paragraphs describe these features and also discuss special
considerations for optimizing the performance of the
8840A in special situations.
6-16.
STORING VARIABLE INPUTS
As
a convenience, the
VAR
IN
(variable input) feature lets
you calibrate the 8840A using reference source values
which differ from the values prompted by the 8840A. For
example, you may want to calibrate the
20052
range using
a
reference resistor with a precisely known value of
99.87551,
rather than 100Q as prompted. This feature is
not available during
A/D
Calibration.
To use the variable input feature, proceed
as
follows:
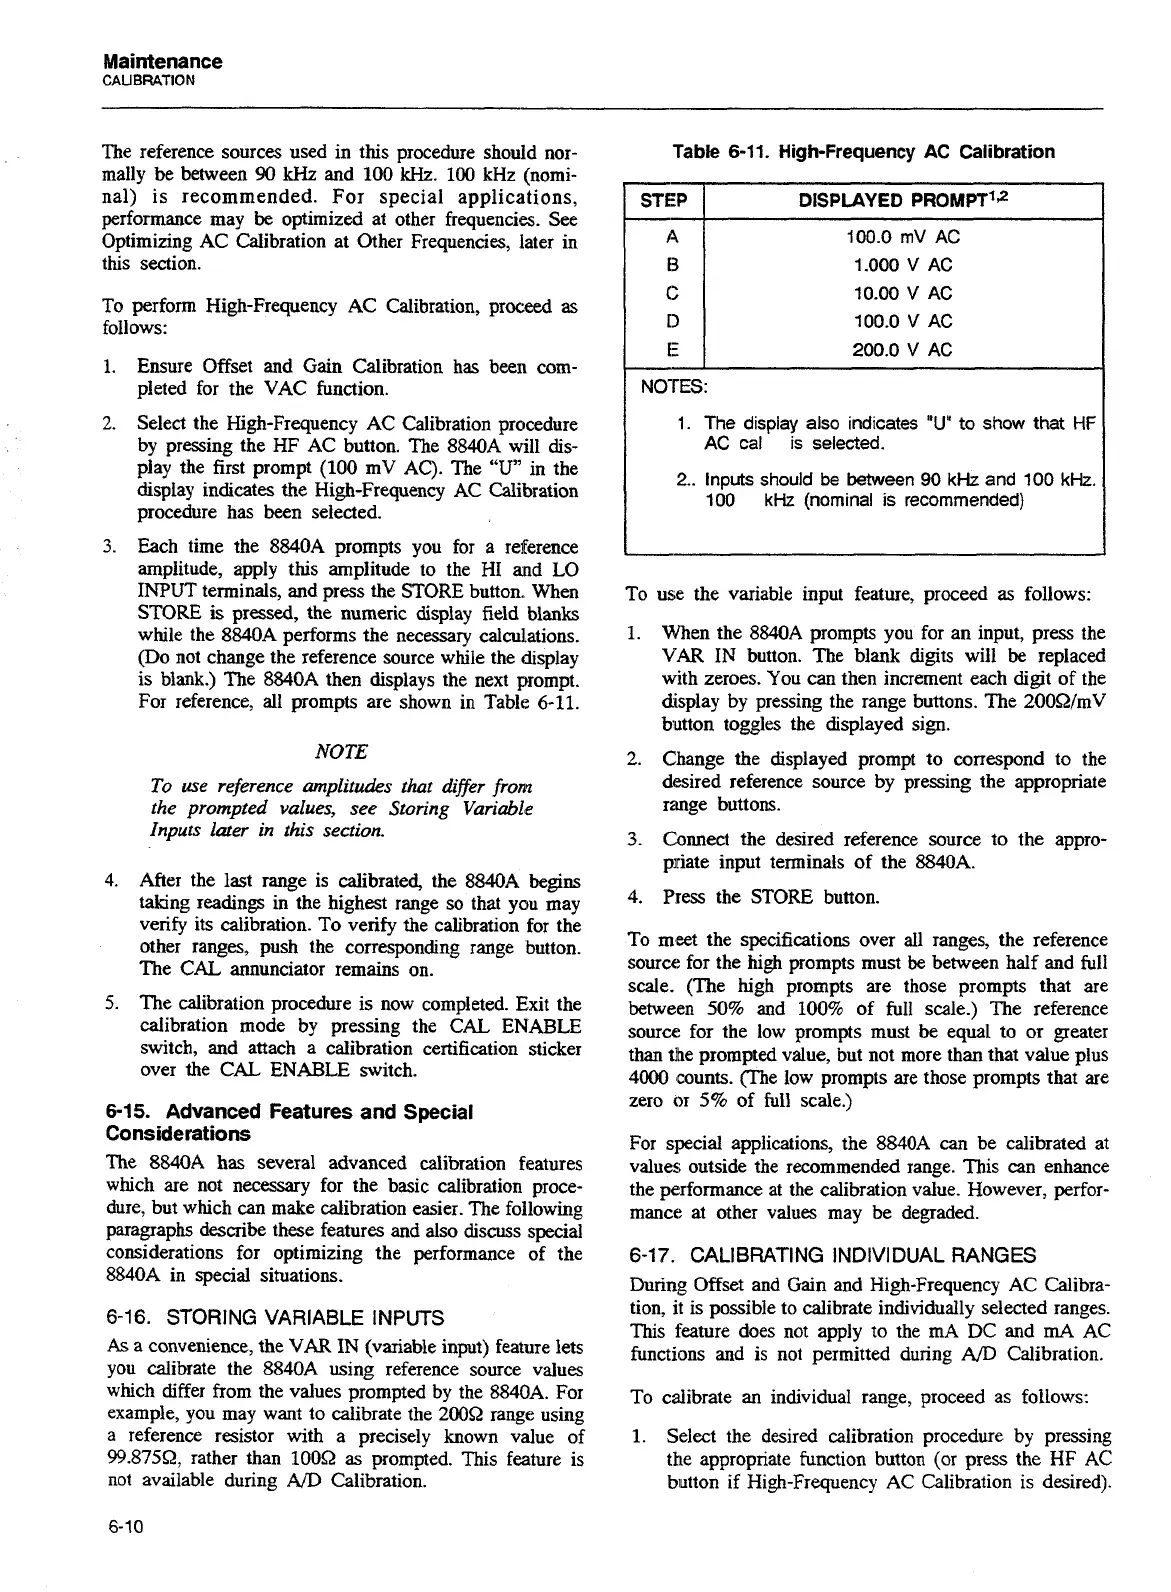
Table
6-1
1.
High-Frequency
AC
Calibration
1.
When the 8840A prompts you for an input, press the
VAR
IN
button. The blank digits will
be
replaced
with zeroes. You can then increment each digit of the
display by pressing the range buttons. The 200Q/mV
button toggles the displayed sign.
-
STEP
A
13
(2
11
fE
2.
Change the displayed prompt to cox~espond to the
desired reference source by pressing the appropriate
range buttons.
DISPLAYED
PROMPT'^
100.0
rnV
AC
1.000
V
AC
10.00
V
AC
100.0
V
AC
200.0
V
AC
3.
Connect the desired reference source to the appro-
priate input terminals of the 8840A.
NOTES:
1.
The display also indicates
"U"
to
show
that
HF
AC
cal is selected.
2..
Inputs should be between
90
kHz
and
100
kHz.
100
kHz
(nominal
is
recommended)
4.
Press the STORE button.
To meet the specifications over all ranges, the reference
source for the high prompts must
be
between half and full
scale. (The high prompts are those prompts that are
between 50% and 100% of full scale.) The reference
source for the low prompts must be equal to or greater
than the prompted value, but not more than that value plus
4000 counts. (The low prompts are those prompts that are
zero
or
5%
of full scale.)
For special applications, the 8840A can be calibrated at
values outside the recommended range. This
can
enhance
the performance at the calibration value. However, perfor-
mance at other values may be degraded.
6-17.
CALIBRATING INDIVIDUAL RANGES
During Offset and
Gain
and High-Frequency AC Calibra-
tion, it is possible to calibrate individually selected ranges.
This feature does not apply to the
mA DC and
rnA
AC
functions and is not permitted during
AD
Calibration.
To calibrate
an
individual range, proceed as follows:
1.
Sdect the desired calibration procedure by pressing
the appropriate function button (or press the
HF
AC
button
if
High-Frequency AC Calibration is desired).
Artisan Technology Group - Quality Instrumentation ... Guaranteed | (888) 88-SOURCE | www.artisantg.com
 Loading...