3.29
Engine/Cooling/Exhaust
3
Cylinder Head/Cylinder/Piston Notes
800 pistons feature two different rings thicknesses. The
upper ring is 1.8mm thick, while the lower ring is 1.5mm
thick.
Some 800 DC-CFI-2 engines feature a coolant bypass
n
ozzle on the cylinder head. Reference table below.
800 DC-CFI-2 Cylinder Head/Cylinder/
Pistons Disassembly/Assembly
1. Remove the coolant from the engine using a siphon,
wet/dry vac, or drain pan.
2. Remove the air box, exhaust pipe and resonator from
th
e engine compartment.
3. Remove the high tension wires and spark plugs from
the
cylinder head.
4. Remove the thermostat housing outlet cooling hose
fro
m the housing.
5. Loosen all, then remove all head cover fasteners.
Clea
n the fastener threads to remove any thread
locking residue.
6. Discard the head cover and cylinder head o-rings.
Always us
e new o-rings during assembly.
7. Inspect the cylinder head / combustion domes for any
da
mage. Measure cylinder head flatness. Replace
cylinder head if required.
8. Remove the fuel rail and fuel injectors from cylinder.
See “Fuel Rail/Injector Remova
l and Installation” on
page 4.27.
NOTE: Leave the exhaust Y-pipe attached to the
cylinder assembly. Remove Y-pipe after
removing
cylinder from crankcase.
9. Loosen all, then remove the cylinder bolts. Clean the
b
olt threads to remove any thread locking residue.
10. Carefully pull the cylinder upwards taking care not to
d
rop the pistons and rods abruptly against the
crankcase.
11. Remove the cylinder base gasket. Use a gasket
scra
per to clean the gasket residue from the
crankcase and cylinder base.
12. Inspect the cylinder walls. Nicasil cylinders can only
b
e lightly honed using a 320 grit stone. Damage that
cannot be removed with a light hone requires cylinder
replacement or re-chroming.
13. Inspect the crankcase and cylinder mating surfaces
fo
r warping.
14. The assembly process is the reverse of disassembly.
15. Always use new gaskets and o-rings during
a
ssembly. Liberally coat the inside of each cylinder
bore and the outside of each piston with Polaris two-
stroke engine oil.
16. Always refresh the cylinder crosshatch pattern using
a
320 grit stone. See “Cylinder Honing” on page 3.14.
17. When installing a piston into a
cylinder, verify each
piston ring opening is located at each piston ring
locating pin. Squeeze the top ring, then carefully slide
the cylinder over the compressed ring. Do the same
with the bottom ring.
18. Follow the torque specifications and torque
se
quences located at beginning of chapter when
tightening fasteners.
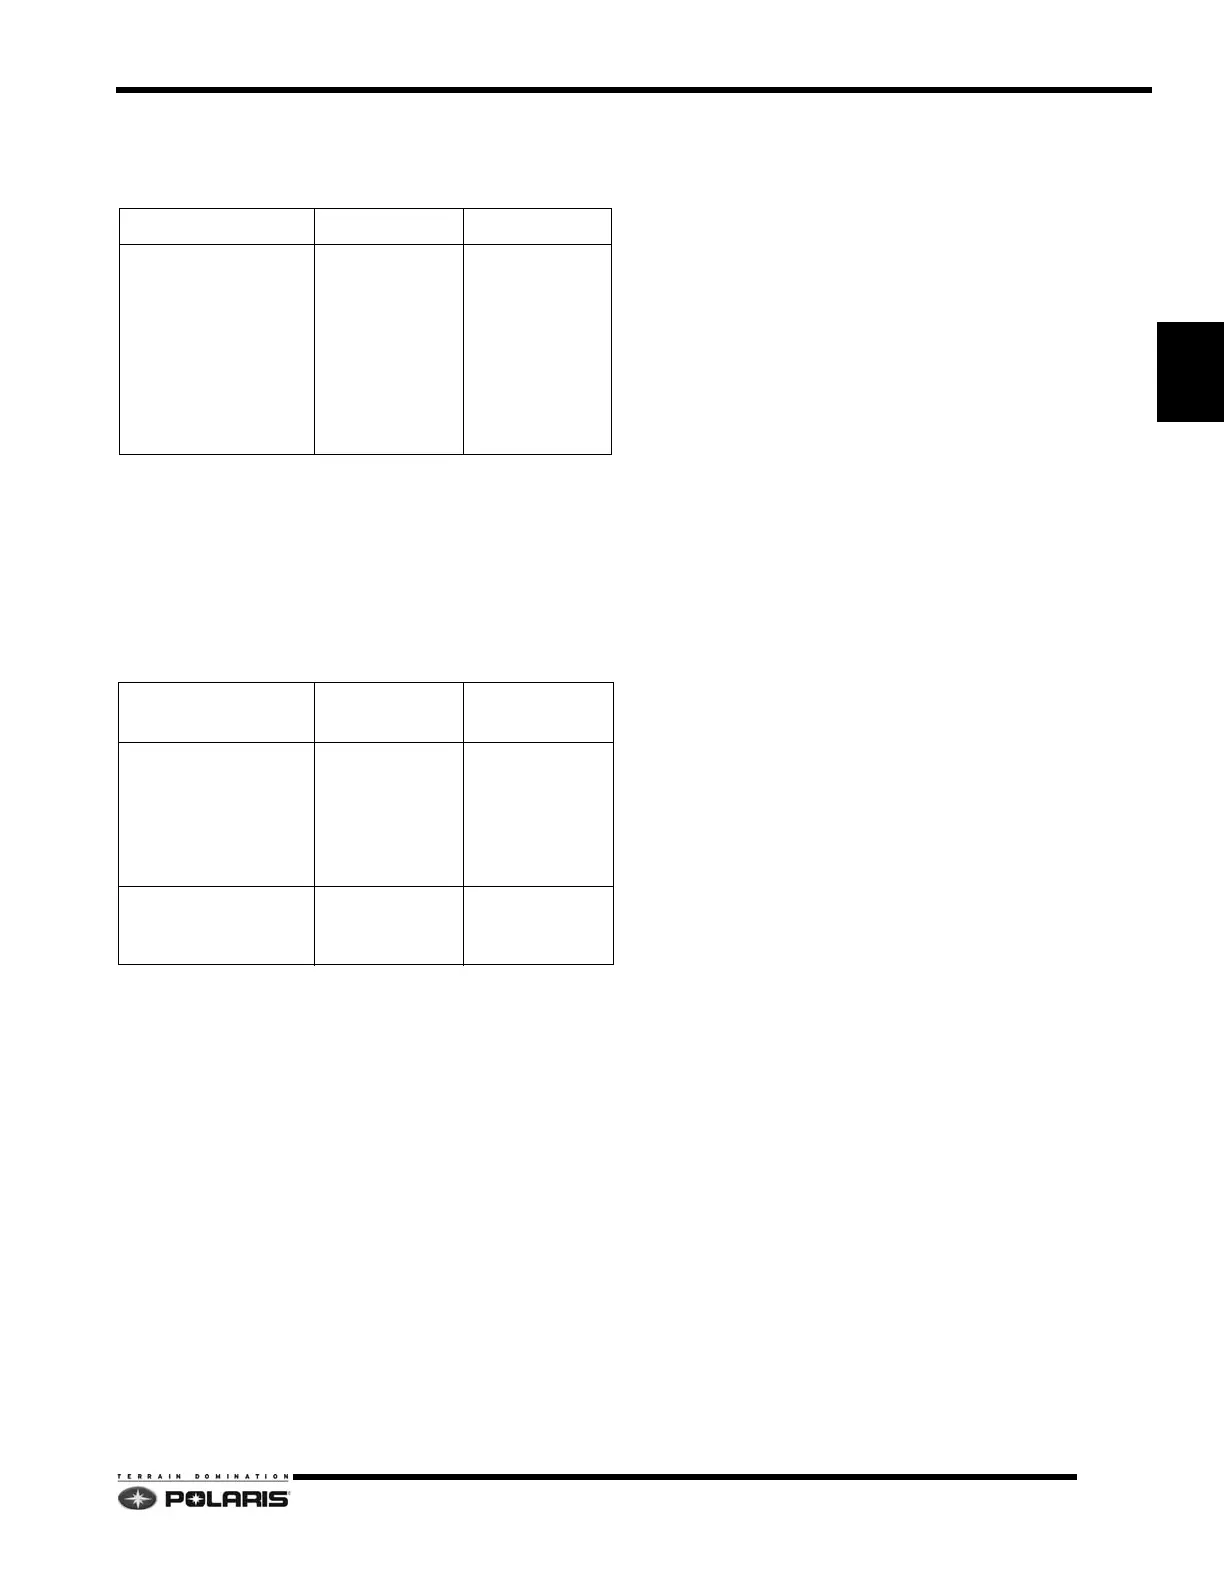
Piston Matrix
Engine Model Piston PN Piston ID
S4139-8044-OO8G
S4229-8044-OO8G
S4092-8044-OO8G
S4360-8044-OL8G
S4361-8044-OL8G
S4359-8044-OL8G
S4509-8044-0A8G
S4510-8044-0A8G
S4508-8044-0A8G
2204322 3305 or 3335
Plug / Bypass Matrix
Engine Model
Cylinder Head
Plug
Cylinder Head
Byp
ass Nozzle
S4139-8044-OO8G
S4229-8044-OO8G
S4360-8044-OL8G
S4361-8044-OL8G
S4509-8044-0A8G
S4510-8044-0A8G
X
S4092-8044-OO8G
S4359-8044-OL8G
S4508-8044-0A8G
X

 Loading...


