If the registration succeeds, the device is added to the list. If it fails, you will see an error message. If the threat
defense fails to register, check the following items:
• Ping—Access the threat defense CLI, and ping the management center IP address using the following
command:
ping system ip_address
If the ping is not successful, check your network settings using the show network command. If you need
to change the threat defense Management IP address, use the configure network {ipv4 | ipv6} manual
command.
• Registration key, NAT ID, and the management center IP address—Make sure you are using the same
registration key, and if used, NAT ID, on both devices. You can set the registration key and NAT ID on
the management center using the configure manager add command.
For more troubleshooting information, see https://cisco.com/go/fmc-reg-error.
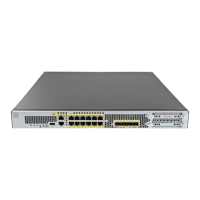
Configure a Basic Security Policy
This section describes how to configure a basic security policy with the following settings:
• Inside and outside interfaces—Assign a static IP address to the inside interface, and use DHCP for the
outside interface.
• DHCP server—Use a DHCP server on the inside interface for clients.
• Default route—Add a default route through the outside interface.
• NAT—Use interface PAT on the outside interface.
• Access control—Allow traffic from inside to outside.
To configure a basic security policy, complete the following tasks.
Configure Interfaces, on page 28.
Configure the DHCP Server, on page 32.
Add the Default Route, on page 34.
Configure NAT, on page 36.
Allow Traffic from Inside to Outside, on page 39.
Deploy the Configuration, on page 40.
Cisco Firepower 2100 Getting Started Guide
27
Threat Defense Deployment with the Management Center
Configure a Basic Security Policy
 Loading...