Home
Ricoh
All in One Printer
Aficio 1075
Ricoh Aficio 1075 User Manual
5
of 1
of 1 rating
776 pages
Give review
Manual
Specs
To Next Page
To Next Page
To Previous Page
To Previous Page
Loading...
Troubl
eshoot
ing
138
6
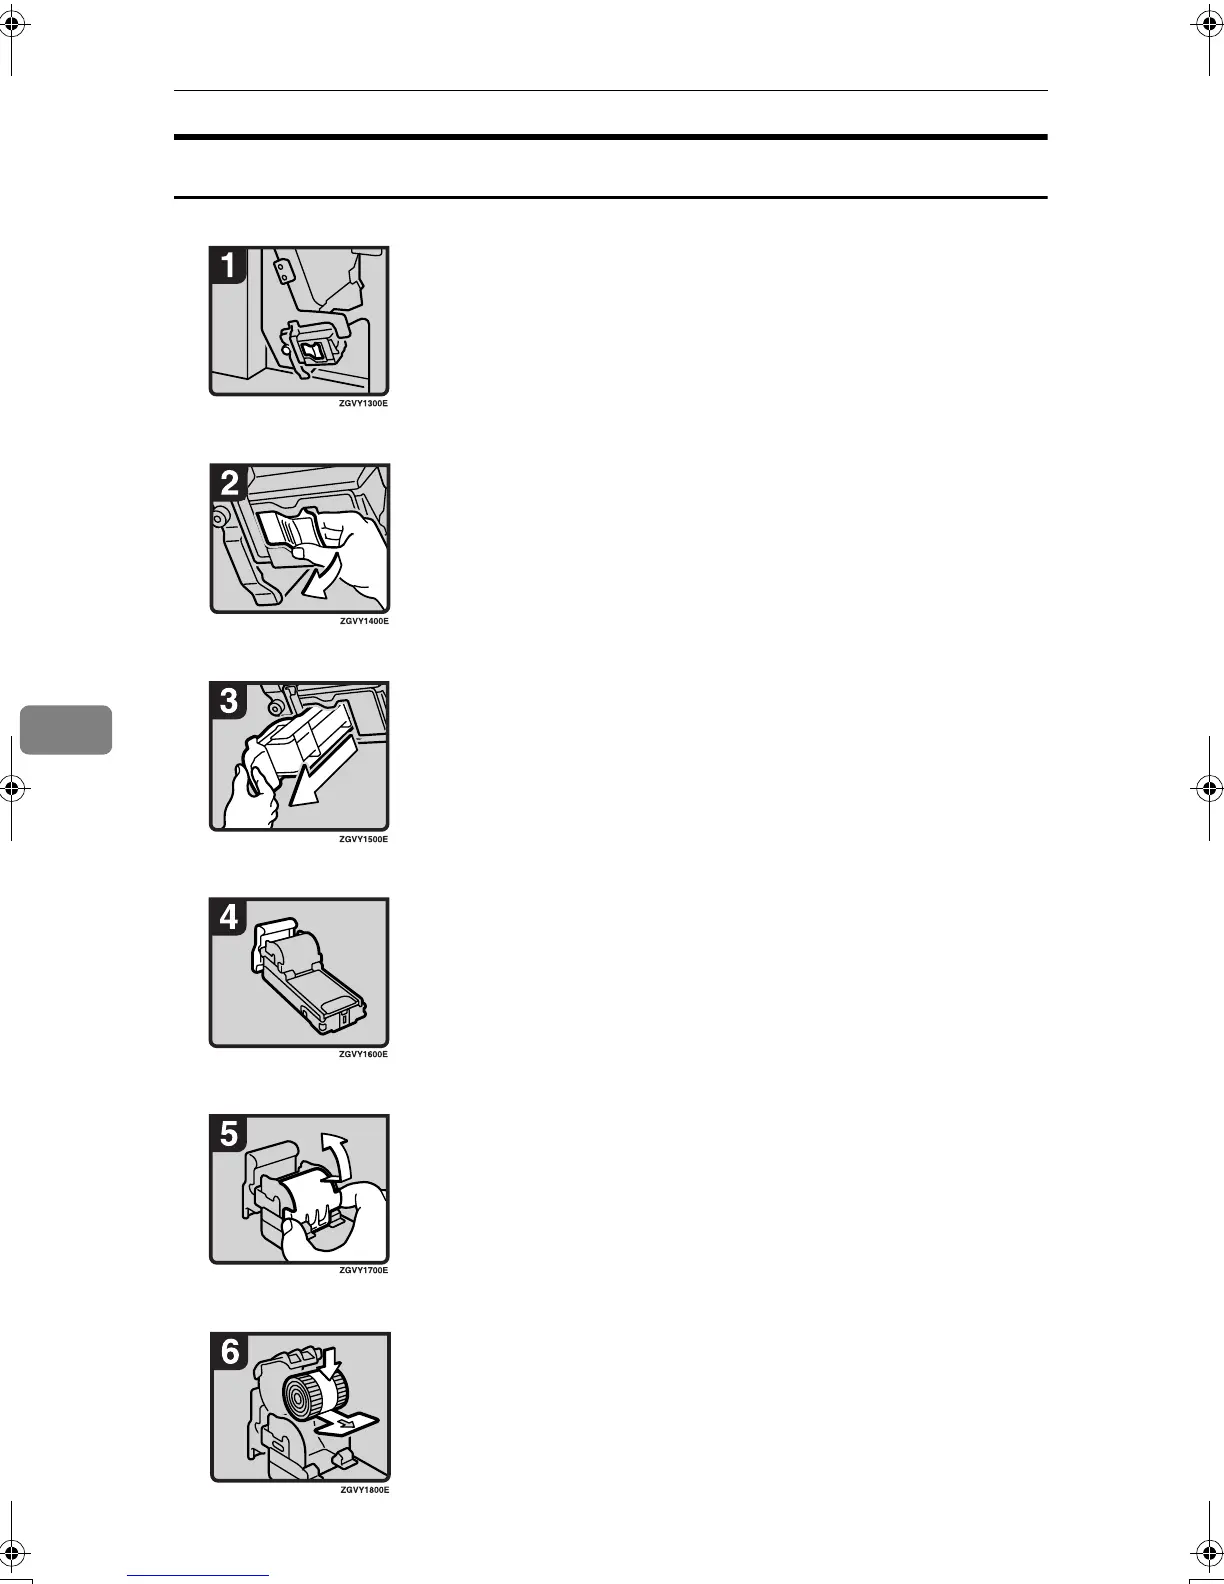
Finisher
3000B
(100-S
heet St
aples)
•
O
pen
th
e fin
ish
er f
ron
t cov
er.
•
Pull out the car
tridge lever
.
•
Pull out the car
tridge.
•
Put the
cartridge down on a level su
rface.
•
Raise the c
over up.
•
Set the new refi
ll.
M
a
rt
i
n
i
C
1_
G
B
z
e
n
2
_
F
M
.
b
oo
k P
a
g
e
13
8 F
r
i
d
a
y
,
A
p
r
i
l
1
9
,
20
0
2
2:
1
8
P
M
281
283
Table of Contents
Table of Contents
6
Default Chapter
1
Operating Instructions
1
What You Can Do with this Machine
3
Copying Book Originals
4
Table of Contents
6
How to Read this Manual
9
Machine Types
10
Functions that Require Options
11
Control Panel
12
Common Key Operations
13
1 Placing Originals
15
Originals
15
Sizes and Weights of Recommended Originals
15
Sizes Detectable by Auto Paper Select
16
Missing Image Area
18
Direction-Fixed Paper or 2-Sided Paper
19
Placing Originals
20
Original Orientation
20
Placing Originals on the Exposure Glass
21
Placing Originals in the Document Feeder
21
2 Copying
25
Basic Procedure
25
Auto Start
26
Interrupt Copy
26
Original Beeper
26
Copy Face up
27
Job Preset
27
Copying Onto Tab Stock
28
Copying from the Bypass Tray
30
Copy Functions
33
Adjusting Copy Image Density
33
Selecting Original Type Setting
34
Selecting Copy Paper
35
Preset Reduce/Enlarge
38
Zoom
39
Auto Reduce/Enlarge
40
Size Magnification
41
Directional Magnification (%)
41
Directional Size Magnification (MM)
42
Sort
43
Stack
45
Staple
45
Original Setting
47
Sample Copy
48
Changing the Number of Sets
48
Punch
49
Duplex
51
Sided Combine
53
Series Copies
56
2 Sided→ → → → 1 Sided
58
Copying Book Originals
58
Image Repeat
61
Double Copies
62
Centering
63
Scanning Position
63
Erase
64
Edges Full Bleed
69
Margin Adjustment
70
Background Numbering
71
Preset Stamp
71
User Stamp
73
Date Stamp
75
Page Numbering
77
Covers
80
Designate
81
Blank Slip Sheets
83
Chapter .................................................................................................................... 74 Blank Slip Sheets
83
Slip Sheets
84
Storing Originals in the Document Server
86
3 Program
87
Programs
87
Storing a Program
87
Deleting a Program
88
Recalling a Program
88
4 Troubleshooting
91
If Your Machine Does Not Operate as You Want
91
When a Message Is Displayed
91
If You Cannot Make Clear Copies
92
If You Cannot Make Copies as You Want
93
When Memory Is Full
95
5 User Tools (Copy/Document Server Features)
97
User Tools Menu (Copier/Document Server Features)
97
Accessing User Tools (Copy/Document Server Features)
104
Exiting from User Tools
104
General Features 2 / 5
105
General Features 3 / 5
105
General Features 4 / 5
105
General Features 5 / 5
107
Reproduction Ratio
108
Reproduction Ratio 2 / 2
108
Edit
109
Edit 2 / 2
109
Stamp
112
Input/Output
114
Input/Output 2 / 2
114
6 Specifications
117
Combination Chart
117
Supplementary Specifications
119
Index
133
Table of Contents
141
Notice
145
Copyrights and Trademarks
146
Trademarks
146
Information about Installed Software
147
How to Read this Manual
150
Safety Information
152
Safety During Operation
152
Positions of Labels and Hallmarks for R
154
R R R R R Caution
154
R WARNING and R
154
ENERGY STAR Program
156
Manuals for this Machine
158
Machine Types
159
Available Functions
161
Copy Mode
161
Printer Mode
161
Scanner Mode
161
Document Server Mode
162
User Management
164
1 What You Can Do with this Machine
161
Guide to Components
165
2 Basics
165
External Options
167
Control Panel
168
Display Panel
170
Connecting the Machine (Network Connections)
171
Requirements
172
When the Wireless LAN Board (Option) Is Installed
173
Connecting the Network Cable to the Network
174
Turning on the Power
176
Turning on the Main Power
176
Turning off the Power
177
Turning off the Main Power
177
Configuring the Network
178
Configuring the Network with the Display Panel
180
Changing Modes
191
Saving Energy
192
Low Power Mode
192
Auto off
192
Job List
193
3 Combined Function Operations
191
Multi-Access
195
Relationship between Document Server and Other Functions
201
Document Server Display
201
4 Document Server
201
Using the Document Server
202
Scanning and Saving Originals
202
Changing a File Name, User Name, or Password
205
Selecting a Document
205
Searching Saved Documents
206
Printing Saved Documents
207
Deleting Saved Documents
210
Settings for the Document Server
211
User Tools Menu (System Settings)
213
5 User Tools (System Settings)
213
Accessing User Tools (System Settings)
218
Changing Settings
218
Exiting from User Tools
218
Settings You Can Change with User Tools
219
General Features
219
Tray Paper Settings
223
Timer Setting
226
Interface Settings/Network
228
Interface Settings/Parallel Interface
230
Interface Settings/Ieee 1394 (Option)
231
Interface Settings/Ieee 802.11B (Option)
232
File Transfer
233
Key Operator Tools
234
User Codes
240
To Register a New User Code
241
Changing a User Code
242
Clearing a User Code
243
Displaying the Counter for each User Code
244
Printing the Counter for each User Code
244
Clearing the Counter
245
E-Mail Destination
246
Registering an E-Mail Destination
246
Changing a Registered E-Mail Destination
248
Clearing a Registered E-Mail Destination
249
Registering E-Mail Destinations to a Group
250
Registering a New Group
250
Registering E-Mail Destinations to a Group
251
Deleting an E-Mail Destination from a Group
251
Displaying an E-Mail Destination
252
Deleting a Group
252
Changing a Group Name
253
Entering Text
254
Available Characters
254
Keys
254
Entering Text
255
If Your Machine Does Not Operate as You Want
257
General
257
Document Server
259
6 Troubleshooting
257
B Loading Paper
260
Loading Paper in Tray 2 and 3
261
Loading Paper in the Large Capacity Tray (LCT)
261
Loading Paper in the Interposer
262
Suspend Copy When Using Finisher 3000B (100-Sheet Staples)
263
D Adding Toner
264
Replacing Toner
265
Clearing Misfeeds
266
Changing the Paper Size
276
Changing the Paper Size in Tray 2 or 3
276
Adding Staples
278
Finisher 3000M (50-Sheet Staples), Booklet Finisher
278
Booklet Finisher (Saddle Stitch)
280
Finisher 3000B (100-Sheet Staples)
282
Removing Jammed Staples
284
Finisher 3000M (50-Sheet Staples), Booklet Finisher
284
Booklet Finisher (Saddle Stitch)
286
Finisher 3000B (100-Sheet Staples)
288
Removing Punch Waste
290
Finisher 3000M (50-Sheet Staples), Booklet Finisher
290
Finisher 3000B (100-Sheet Staples)
291
Do's and Don'ts
293
7 Remarks
293
Toner
294
Handling Toner
294
Toner Storage
294
Used Toner
294
Where to Put Your Machine
295
Machine Environment
295
Moving
296
Power Connection
296
Access to the Machine
297
Maintaining Your Machine
298
Cleaning the Exposure Glass
298
Cleaning the Document Feeder
298
Other Functions
299
Inquiry
299
Changing the Display Language
299
Counter
300
Mainframe
301
Document Server
305
Document Feeder
306
8 Specification
301
Mailbox (Option)
307
Booklet Finisher (Option)
308
Finisher 3000M (50-Sheet Staples) (Option)
311
Finisher 3000B (100-Sheet Staples) (Option)
313
Copy Tray (Option)
315
Large Capacity Tray (LCT) (Option)
316
Interposer (Option)
317
Punch Unit (Option)
318
Others
320
Copy Paper
321
Recommended Paper Sizes and Types
321
Non-Recommended Paper
324
Paper Storage
325
Index
326
Table of Contents
337
Default Chapter
339
Manuals for this Machine
339
How to Read this Manual
340
1 Getting Started
341
Features of this Machine
341
Printer Drivers for this Machine
342
Software and Utilities Included on the CD-ROM
344
Guide to this Machine
346
Control Panel
346
Display Panel
347
Connecting the Machine
350
Requirements
350
Connecting the Machine to the Host Using the Parallel Cable
350
Connecting the Machine to the Host Using the USB Cable
351
Setting Paper on the Bypass Tray
352
Setting the Paper Size on the Display Panel
354
2 Installing the Printer Driver and Software
359
Installation Method
359
Quick Install
362
Installing the PCL 6/5E and RPCS™ Printer Driver
365
Setting up Options
367
Installing the Postscript 3 Printer Driver
369
Windows 95/98/Me - Installing the Postscript 3 Printer Driver
369
Windows 2000/XP - Installing the Postscript 3 Printer Driver
371
Windows NT 4.0 - Installing the Postscript 3 Printer Driver
373
Mac os - Installing the Postscript 3 Printer Driver and Utilities
377
Mac os X - Installing the Postscript 3 Printer Driver
380
Installing the Printer Driver Using USB
381
Windows 98Se/Me - Installing the Printer Driver Using USB
381
Windows 2000/XP - Installing the Printer Driver Using USB
382
Macintosh - Creating a Desktop Printer Icon
383
Installing the Printer Driver Using IEEE 1394
384
Printing with SCSI Print
384
Printing with IP over 1394
386
Installing the Smartnetmonitor for Client/Admin
389
Installing the Agfa Monotype Font Manager 2000
390
Using Adobe Pagemaker Version 6.0, 6.5 or 7.0
391
Index
392
Table of Contents
399
Manuals for this Machine
401
How to Read this Manual
402
Accessing the Printer Properties
403
Windows 95/98/Me - Accessing the Printer Properties
403
Windows 2000/XP - Accessing the Printer Properties
404
Windows NT 4.0 - Accessing the Printer Properties
406
Macintosh - Setting up for Printing
408
1 Setting up the Printer Driver and Cancelling a Print Job
403
Cancelling a Print Job
409
Windows - Cancelling a Print Job
409
Macintosh - Cancelling a Print Job
410
2 Uninstalling the Printer Driver
413
Windows 95/98/Me - Uninstalling the Printer Driver
413
Windows 2000/XP - Uninstalling the Printer Driver
413
Windows NT 4.0 - Uninstalling the Printer Driver
414
Mac os - Uninstalling the Postscript 3 Printer Driver
415
Mac os X - Uninstalling the Postscript 3 Printer Driver
415
Sample Print
417
Printing a Sample Print File
417
Deleting a Sample Print File
420
Checking the Error Log
421
3 Printing with the Control Panel
417
Locked Print
422
Printing a Locked Print File
422
Deleting Locked Print Files
424
Checking the Error Log
425
Accessing the Document Server
427
Error & Status Messages on the Display Panel
429
Machine Status and Configuration
431
4 Troubleshooting
429
Machine Does Not Print
436
Other Printing Problems
439
Adjusting Printer Features
443
Printer Features Menu
443
Accessing the Printer Features
445
Exiting from the Printer Features
445
5 Using the Control Panel
443
Printer Features Parameters
446
Paper Input
446
List/Test Print
446
Maintenance
447
System
448
Host Interface
452
PCL Menu
453
Machine Condition
455
Printing the Configuration Page
455
6 Appendix
457
Finisher
457
Staple
458
Staple Position
458
Punch
461
Punch Position
461
Collate
463
Covers
465
Chaptering
467
Slip Sheets
469
Tab Sheet
471
Spool Printing
472
Specifications
474
Options
475
Table of Contents
483
Manuals for this Machine
487
How to Read this Manual
488
Introduction
489
Setting up the Machine on a Network
491
Windows 95/98/Me, Windows 2000/XP, Windows NT 4.0
491
Netware
492
Macintosh
494
Unix
494
Printing Using the IEEE 802.11B Interface
495
Printing Using the IEEE 1394 Interface
496
Configuring Windows 95/98/Me
497
Printing Without a Print Server
497
Printing with a Windows 2000/XP or Windows NT Print Server
497
1 Windows 95/98/Me Configuration
497
Configuring Protocols
498
Configuring TCP/IP and IPP for Printing
498
Configuring Netbeui for Printing
499
Using Smartnetmonitor for Client
501
Installing Smartnetmonitor for Client
502
Setting up the Printer Driver
503
Changing Port Settings
505
Setting up a Client Computer
506
Configuring Windows 2000
509
Printing Without a Print Server
509
Printing with a Standard TCP/IP Port
509
Printing with a LPR Port
510
Printing with a Windows 2000/XP or Windows NT Print Server
510
2 Windows 2000 Configuration
509
Configuring Protocols
511
Configuring TCP/IP and IPP for Printing
511
Configuring Netbeui for Printing
512
Using Smartnetmonitor for Client
513
Installing Smartnetmonitor for Client
514
Setting up the Printer Driver
515
Changing Port Settings
517
Configuring LPR Port Printing
518
Setting up a Client Computer
519
Configuring Windows XP
521
Printing Without a Print Server
521
Printing with a Standard TCP/IP Port
521
Printing with a LPR Port
522
Printing with a Windows 2000/XP or Windows NT Print Server
522
3 Windows XP Configuration
521
Configuring Protocols
523
Configuring TCP/IP and IPP for Printing
523
Using Smartnetmonitor for Client
525
Installing Smartnetmonitor for Client
526
Setting up the Printer Driver
527
Changing Port Settings
529
Configuring LPR Port Printing
530
Setting up a Client Computer
531
Configuring Windows NT 4.0
533
Printing Without a Print Server
533
Printing with a LPR Port
533
Printing with a Windows 2000/XP or Windows NT Print Server
533
Configuring Protocols
534
Configuring TCP/IP and IPP for Printing
534
Configuring Netbeui for Printing
535
Using Smartnetmonitor for Client
537
Installing Smartnetmonitor for Client
538
Setting up the Printer Driver
539
Changing Port Settings
541
Configuring LPR Port Printing
542
Setting up a Client Computer
543
Installing the NIB Setup Tool
545
Installing Smartnetmonitor for Admin
546
Running the NIB Setup Tool
546
5 Netware Configuration
545
Quick Setup Using the NIB Setup Tool Wizard
547
Netware 3.X, 4.X, 5/5.1- Advanced Settings
550
Setting up as a Print Server
551
Using Pure IP in the Netware 5/5.1 Environment
556
Setting up as a Remote Printer
557
Setting up a Client Computer
563
Windows 95/98/Me
563
Windows 2000/XP, Windows NT 4.0
564
Configuring Macintosh
567
Changing to Ethertalk
568
Configuring the Printer
568
Changing the Printer Name
568
Changing the Zone
568
6 Macintosh Configuration
567
7 Appendix
569
Using Smartnetmonitor for Admin
569
Changing the Network Interface Board Configuration
570
Locking the Operation Panel Menu
571
Selecting the Paper Type
572
Managing the User Information
573
Viewing and Deleting Spool Print Jobs
574
Managing the E-Mail Information
575
Configuring the Energy Save Mode
575
Configuring the Network Interface Board with a Web Browser
576
Going to the Top Page
577
Verifying the Network Interface Board Settings
578
Configuring the Network Interface Board Settings
579
Monitoring and Configuring the Printer
581
Changing Names and Comments
581
Displaying the Status of Printer
584
Using the IEEE 802.11B (Wireless LAN)
587
Setting IEEE 802.11B (Wireless LAN)
587
Using in Infrastructure Mode
588
Using in Ad Hoc Mode
588
Confirming the Connection
589
When Moving the Machine
590
Remote Maintenance by Telnet
591
Using Telnet
591
Commands List
592
Snmp
610
Understanding the Displayed Information
611
Print Job Information
611
Print Log Information
611
Configuring the Network Interface Board
612
Message List
615
System Log Information
615
Precautions
622
Connecting a Dial-Up Router to a Network
622
Postscript Printing from Windows
623
Netware Printing
623
Using DHCP
624
Configuring a WINS Server
625
When Using the NIB Setup Tool
626
When Using IPP with Smartnetmonitor for Client
626
Specifications
627
Table of Contents
637
Setting up Options
639
Job Type
639
Collate
647
Duplex Printing
648
Paper Size
649
Paper Type
650
Paper Source
650
Orientation
650
Destination Tray
651
Resolution
651
Edge Smoothing
651
Toner Saving
652
Staple
652
Punch
653
User Code
653
Smartnetmonitor for Admin
653
Options
654
1 Using Postscript
639
Installing the Printer Utility for Mac
655
2 Printer Utility for Mac
655
Starting the Printer Utility for Mac
656
Printer Utility for Mac Functions
657
Downloading PS Fonts
658
Displaying the Machine's Fonts
659
Deleting Fonts
659
Initializing the Hard Disk
660
Page Setup
660
Printing the Font Catalog
660
Printing Font Samples
661
Renaming the Machine
661
Restarting the Machine
662
Downloading Postscript Files
662
Selecting the Zone
662
Displaying the Machine Status
663
Launching the Dialogue Console
663
Table of Contents
671
How to Read this Manual
673
Symbols
673
Names of Major Options
674
Manuals for this Machine
675
Important
677
Outline
679
Network TWAIN Scanner
679
Network Delivery Scanner
680
E-Mail
681
Document Server
682
1 Network Scanner
679
Names and Functions of Components
683
Control Panel
683
Display Contents
684
Preparation Sequence
687
Using as a Network TWAIN Scanner
687
Using as a Network Delivery Scanner
688
Using E-Mail
689
2 Preparations for Use as a Network Scanner
687
Initial Scanner Setup
690
Default Settings
690
Setting Scanner Features
693
Making Scanner Settings
697
Making Scan Data Subject Settings
701
Making E-Mail Settings
704
Setting Procedure
704
Verification of Settings
705
Installing Software
706
Auto Run Program
706
Software for Using a Network TWAIN Scanner
708
Software for Using a Network Delivery Scanner
709
Desktopbinder V2 Lite
710
Software Supplied on CD-ROM
710
3 Setting Originals
715
Placing the Original on the Exposure Glass
716
Placing the Original in the Automatic Document Feeder (ADF)
717
Placing the Divided Original in the Automatic Document Feeder (ADF)
718
Original Orientation and Scan Area Setting
719
For a Network Delivery Scanner and Document Server
719
For a Network TWAIN Scanner
721
Flow of Operations
723
4 Scanning Originals Using Network TWAIN Scanner
723
Scanning Originals
724
Functions of the TWAIN Driver
726
List Displays of Destinations and Senders
727
5 Delivering Stored Scan Data by the Network Delivery Scanner
727
Delivery Procedure
729
Checking the Status of Delivery
736
Using the Network Delivery Scanner with the Document Server
737
Simultaneous Delivery and Storage
737
Delivering Stored Files
738
List Displays of Destinations and Senders
739
6 Sending Stored Scan Data by E-Mail
739
Procedure for Sending E-Mails
740
Checking the Status of E-Mail
748
Using E-Mail with the Document Server
749
Simultaneous E-Mail and Storage
749
Sending Stored Files
750
Storing Data
751
Storage Procedure
752
7 Using the Document Server
751
Viewing a List of Stored Files
756
Viewing the List
756
Searching for Files
759
Deleting Stored Files
760
Changing File Information
761
8 Appendix
763
The Relationship between the Resolution and the Data Size
763
Troubleshooting
764
When Scanning Is Not Performed as Expected
764
Delivery Function Does Not Work
764
When an Error Message Is Displayed on the Control Panel
765
When an Error Message Is Displayed on the Computer
770
Specifications
772
Other manuals for Ricoh Aficio 1075
Service Manual
1060 pages
5
Based on 1 rating
Ask a question
Give review
Questions and Answers:
Need help?
Do you have a question about the Ricoh Aficio 1075 and is the answer not in the manual?
Ask a question
Ricoh Aficio 1075 Specifications
General
Brand
Ricoh
Model
Aficio 1075
Category
All in One Printer
Language
English
Related product manuals
Ricoh Aficio 1022
313 pages
Ricoh Aficio 1060
776 pages
Ricoh Aficio 1018
32 pages
Ricoh Aficio 1027
313 pages
Ricoh Aficio 1015
32 pages
Ricoh AFICIO 1055
468 pages
Ricoh aficio 1013F
384 pages
Ricoh Aficio SP 100SU e
76 pages
Ricoh Aficio SP 100SF e
140 pages
Ricoh Aficio 1515
68 pages
Ricoh Aficio MP 1600
710 pages
AFICIO 1515 MF - B/W Laser - All-in-One
112 pages

 Loading...


