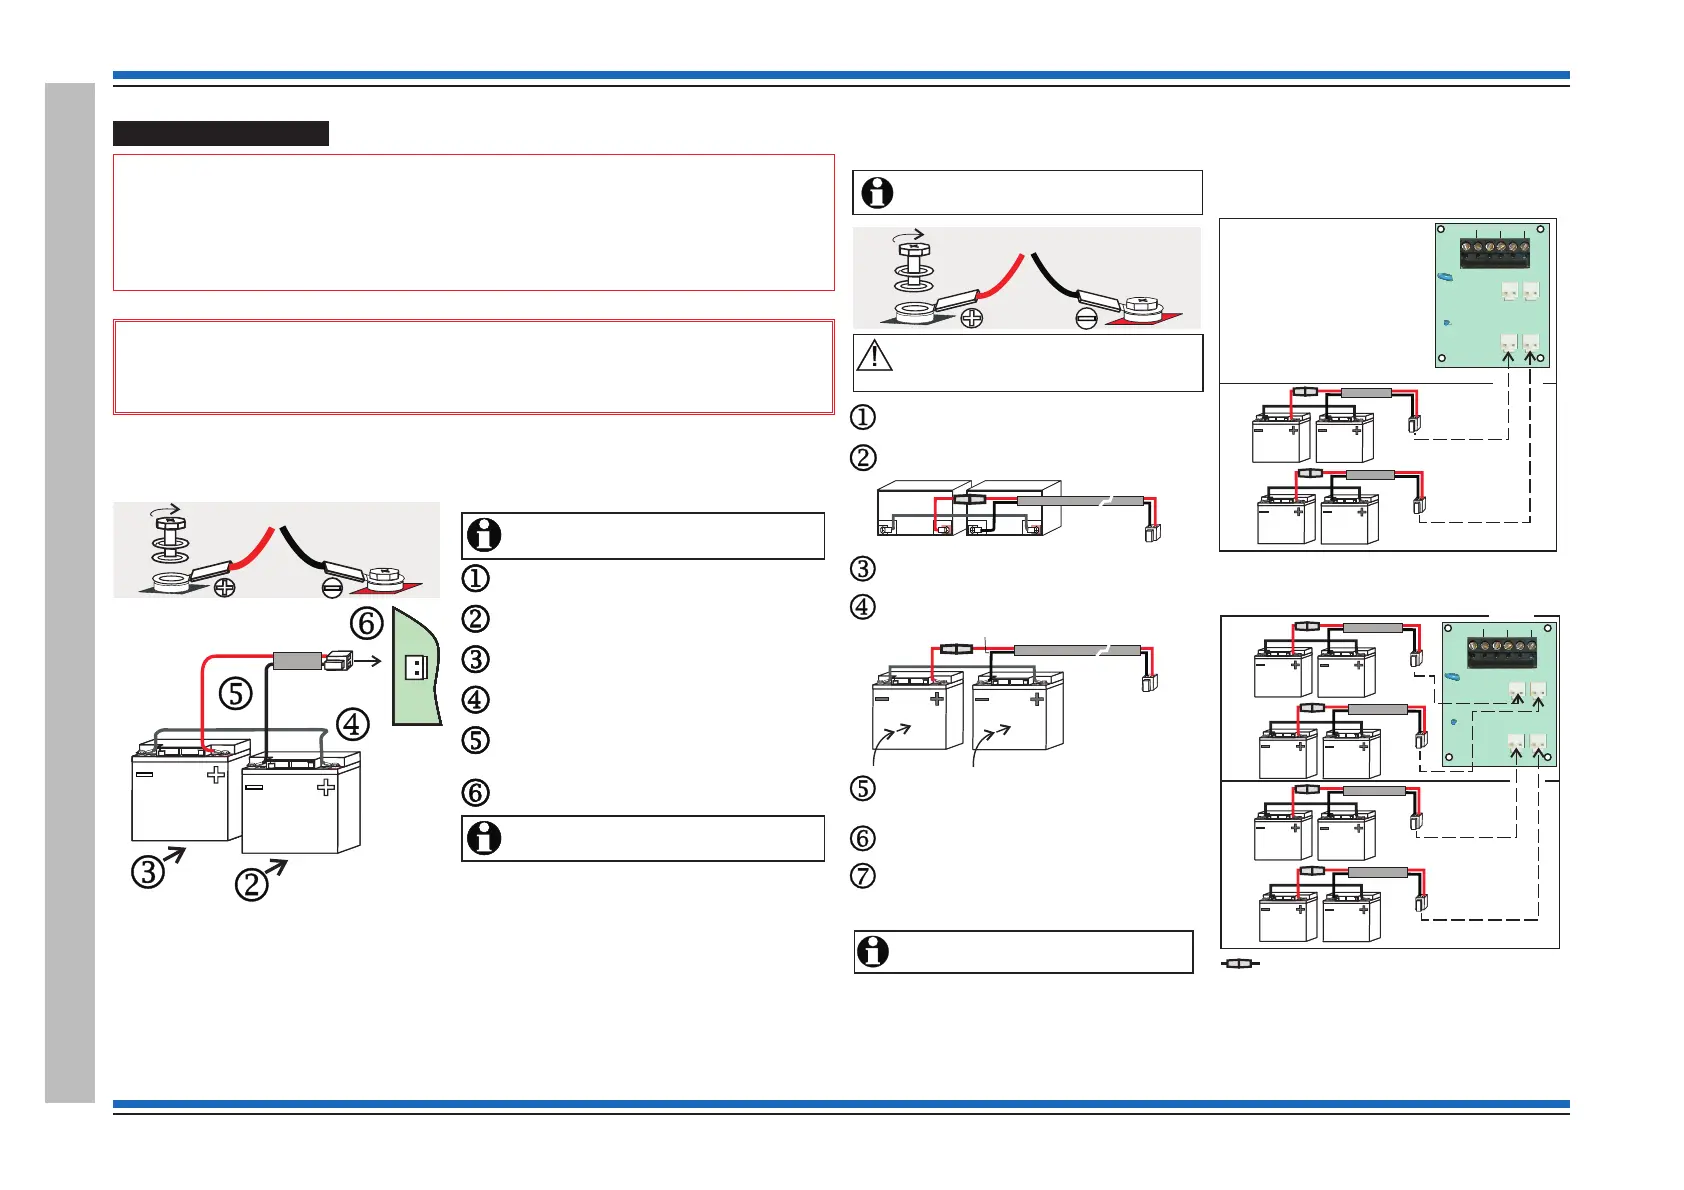
Battery installation
"
The panel makes use of sealed lead acid type batteries which can have a
useful life of 5 years or more from the date of manufacture. It is strongly recommended
that batteries are replaced after 4 years of use. All batteries must be disposed of as per
recommendation made by battery manufacturer.
&
Always use the recommended replacement battery. As there is a risk of
an explosion if incorrect batteries are used.
VIG1-24 panel battery installation
VIG1-72 panel battery installation
Commissioning instructions
30 4188-856_issue 7_07/15_Generic Vigilon (Compact + VA) Comms.
Vigilon 4/6 loop Panels
It is recommended that the mains supply to the panel
is switched during battery installation.Off
Fit the bolt, spade connector, washer, spring washer to
each battery terminal, as shown.
Insert the battery on the right into the back box.
Fit the ‘White’ link lead to outer + and - spade connectors
on the two batteries, as shown.
Fit the battery lead assembly (red & black) to the
remaining + and - spade connectors on the two
batteries, observe polarity.
Insert the battery on the left into the back box.
Plug the plug on the battery lead to connector P20 located
on the bottom left of power supply PCB.
The panel will only power up after the mains supply
is switched On.
P20
BT+ BT-
It is recommended that the mains supply to the panel
is switched during battery installation.Off
Fit the bolt, spade connector, washer, spring washer to
each battery terminal, as shown.
Insert the battery on the right into the back box.
Fit the ‘White’ link lead to outer + and - spade connectors
on the two batteries, as shown.
Fit the battery lead assembly (red & black) to the
remaining + and - spade connectors on the two
batteries, observe polarity.
Insert the battery on the left into the back box.
Plug the plug on the battery lead to connector P20 located
on the bottom left of power supply PCB.
The panel will only power up after the mains supply
is switched On.
Red Black
White
Black
Red
TH-
TH+
BT2-
BT2+BT1+
P4
P3
P2
P1
P6
TH1
BT1-
TH-
TH+
BT2-
BT2+BT1+
P4
P3
P2
P1
P6
TH1
BT1-
In-line fuse rated 10A QB ceramic 20mm x 5mm
8 - 12V 21Ah batteries
Battery Box
A
B
Lower
shelf
A
B
Upper
shelf
4 - 12V 21Ah batteries
Battery Box
Upper
shelf
B
A
Lower
shelf
The panel will only power up after the mains supply
is switched .
On
Route the battery red/black lead through hole in the shelf
of the battery box and fit the connector end of the lead
to the PCB, located on the top right side.
Place two more batteries 'B' onto the lower shelf and
repeat procedures to .
jn
Where required, add further four batteries onto the
upper shelf, use procedures to . The only
exception is that the red/black lead is directly connected
to the respective upper connectors on the PCB.
jo
Red
White.
Black
It is recommended that the mains supply is switched
during battery installation.Off
Fit the bolt, spade connector, washer and spring
washer to each battery terminal as shown above.
Place the two batteries on the lower shelf and lay them
horizontally with terminals facing outwards.
Fit the white link lead and then fit the red/black
fused lead to the battery terminals, as shown above.
White.
Red Black
Raise the two batteries to an upright position
and push them back into the enclosure.
Ensure the batteries are held in place while they
are being wired. Ensure the battery terminals
do not come into contact with the metal enclosure.
Black
Red
 Loading...