Home
Ricoh
All in One Printer
LD320d
Ricoh LD320d User Manual
4
of 1
of 1 rating
710 pages
Give review
Manual
Specs
To Next Page
To Next Page
To Previous Page
To Previous Page
Loading...
vi
❖
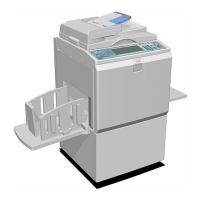
2 Sided 2 Pages
→
Combine 1 Sided 1 Page
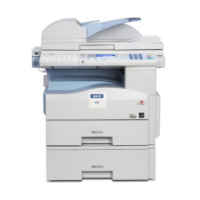
Copying Originals Such as Books
See p.56 “Series Copies”.
❖
Bound Originals
→
1 Sided 2 Pages
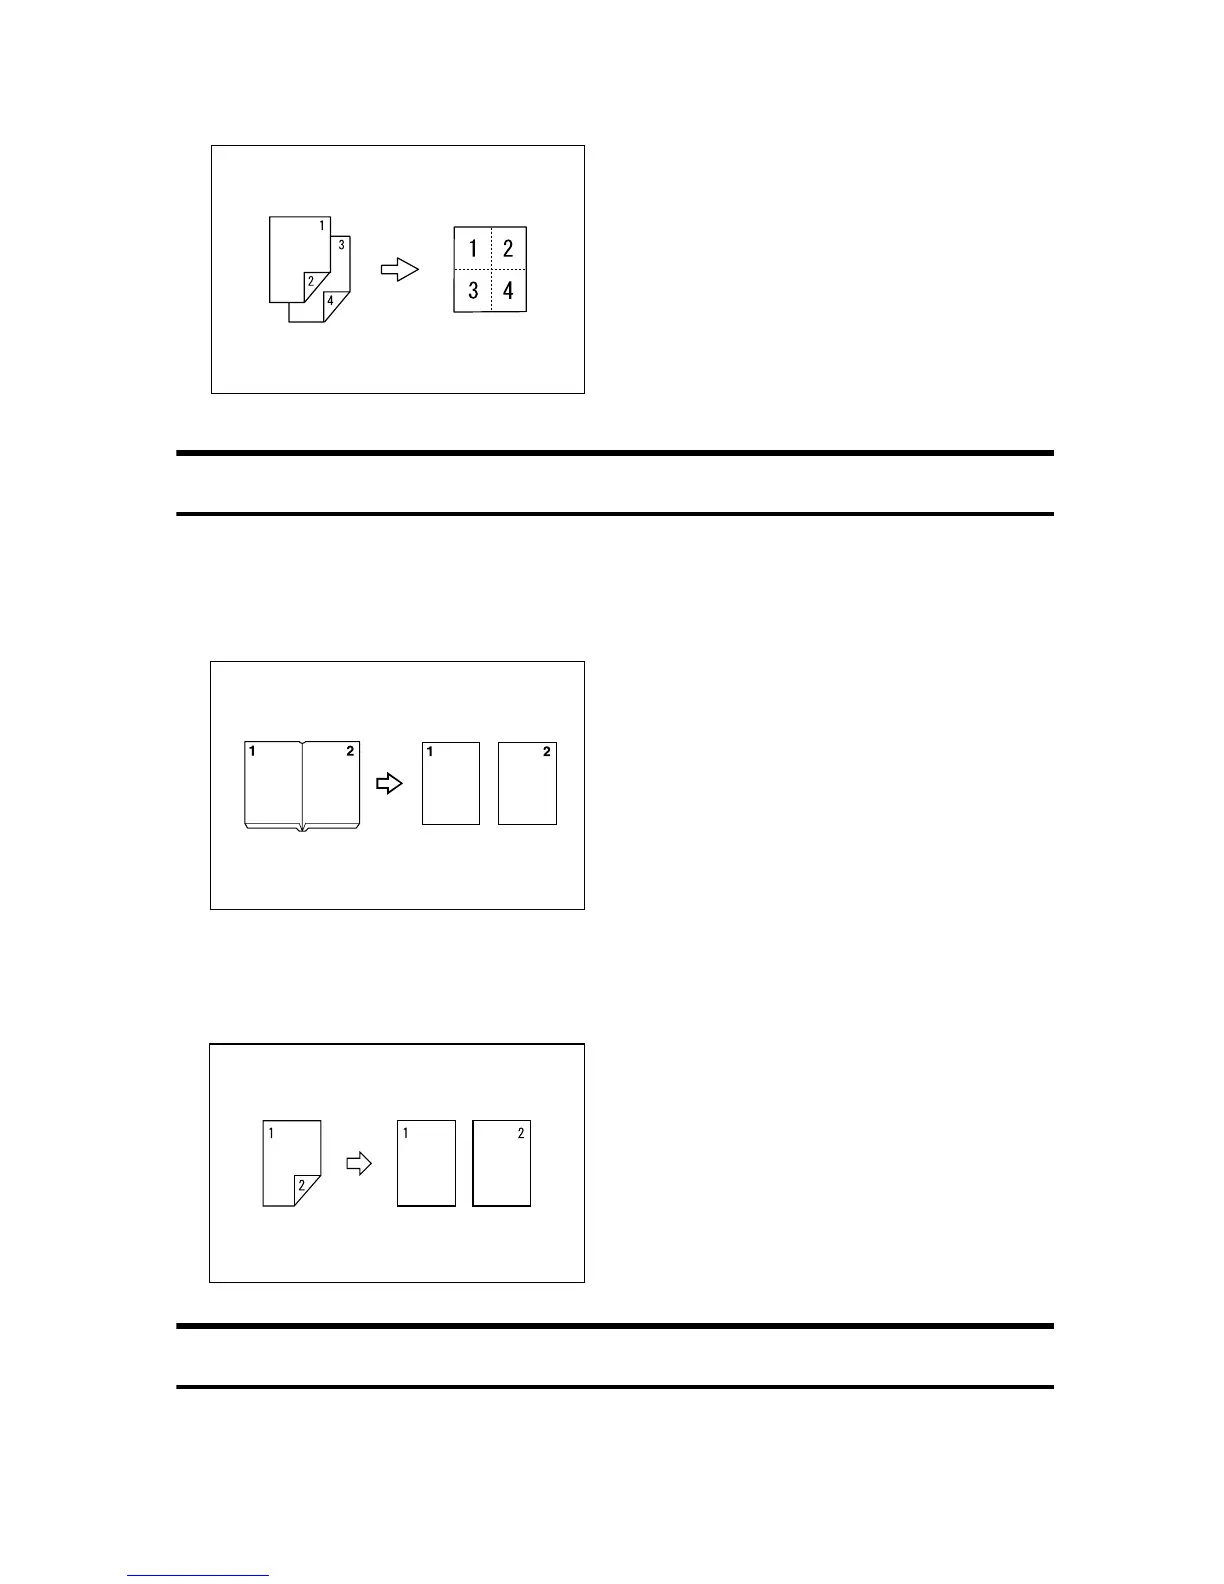
❖
2 Sided 1 Page
→
1 Sided 2 Pages
Copying onto Envelopes
❖
Envelope
See p.32 “When Copying onto Envelopes”.
GCSHVYBJ
CP2B0100
561
563
Table of Contents
Français
11
Default Chapter
1
About this Machine
1
Operating Instructions
1
Manuals for this Machine
3
What You Can Do with this Machine
5
Paperless Fax Transmission
6
Table of Contents
11
Notice
13
Important
13
Notice to Wireless LAN Interface (Option) Users
13
How to Read this Manual
16
Symbols
16
Names of Major Options
16
Safety Information
17
Safety During Operation
17
Positions of RWARNING and RCAUTION Labels
20
ENERGY STAR Program
21
Specifications
22
Recycled Paper
22
Machine Types
23
1 Getting Started
25
Guide to Components
25
Ventilation Holes
26
Operation Switch
26
Right Cover
26
Options
27
Control Panel
29
Display
32
Reading the Display and Using Keys
32
When the Authentication Screen Is Displayed
33
User Code Authentication (Using the Control Panel)
33
User Code Authentication (Using a Printer Driver)
33
Login (Using the Control Panel)
34
Logout (Using the Control Panel)
34
Login (Using a Printer Driver)
35
Login (Using Web Image Monitor)
35
Logout (Using Web Image Monitor)
35
Changing Modes
36
Turning on the Power
37
Turning on the Main Power
37
Turning on the Power
38
Turning off the Power
38
Turning off the Main Power
39
Saving Energy
40
2 Entering Text
41
Available Characters
41
Keys
41
How to Enter Text
42
3 Appendix
51
Dos and Don'ts
51
Software and Utilities Included on the CD-ROM
52
Viewing the Contents of the CD-ROM
52
Printer Drivers for this Machine
53
TWAIN Driver
55
LAN-Fax Driver
55
Desktopbinder Lite
56
Smartdevicemonitor for Admin
57
Desktopbinder-Smartdevicemonitor for Client
58
Installing the Operating Instructions
59
PDF Manuals
60
Opening the Installed Operating Instructions
61
Opening from the Icon
61
Opening from the [Start] Menu
61
Opening from the CD-ROM
62
Specifications for the Main Unit
63
Specifications for Options
67
Exposure Glass Cover
67
Auto Document Feeder (ADF)
67
Auto Document Feeder Capable of Scanning both Sides of a Sheet (ARDF)
68
Internal Tray 2 (1 bin Tray)
68
Paper Tray Unit (1-Tray Type)
69
Paper Trays Unit (2-Tray Type)
69
Copy Paper
70
Recommended Paper Sizes and Types
70
Unusable Paper
73
Paper Storage
74
Index
75
English
85
How to Read this Manual
89
Symbols
89
Display Panel
90
Reading the Display and Using Keys
91
Accessing User Tools
92
Changing Default Settings
92
Exiting User Tools
93
Menu Protect
93
Changing Default Settings Using Web Image Monitor
94
Connecting to the Interfaces
95
Connecting to the Ethernet Interface
96
Connecting to the USB Interface
98
Connecting to the IEEE 1284 Interface
99
Connecting to the IEEE 802.11B (Wireless LAN) Interface
100
1 Connecting the Machine
95
Network Settings
103
Settings Required to Use the Printer/Lan-Fax
103
Settings Required to Use Internet Fax
105
Settings Required to Use E-Mail Function
108
Settings Required to Use Scan to Folder Function
111
Settings Required to Use the Network Delivery Scanner
113
Settings Required to Use Network TWAIN Scanner
115
Using Utilities to Make Network Settings
117
Connecting the Machine to a Telephone Line and Telephone
124
Connecting the Telephone Line
124
Selecting the Line Type
125
Connecting the Optional Handset or an External Telephone
125
General Features
127
Output Tray Settings
129
Tray Paper Settings
130
2 System Settings
127
Timer Settings
133
Interface Settings
135
Network
135
Parallel Interface
138
IEEE 802.11B
139
Print I/F Settings List
140
File Transfer
141
Administrator Tools
145
Program/Change/Delete LDAP Server
149
Programming the LDAP Server
152
3 Copier Features
159
General Settings/Adjust
163
4 Fax Features
163
Reception Settings
165
E-Mail Settings
166
IP-Fax Settings
168
Administrator Tools
171
Registering Fax Information
175
Deleting Fax Information
178
Forwarding
180
Programming an End Receiver
181
Canceling Receiver Settings
182
Printing a Forwarding Mark
183
Parameter Setting
184
Changing the User Parameters
187
Printing the Parameter Settings List
189
Home Position
190
Changing the Home Position
192
Program Special Sender
194
Authorized Reception
195
Forwarding
196
Memory Lock
196
Programming/Changing Special Senders
197
Authorized RX (Authorized Reception)
199
Forwarding
199
Memory Lock
201
Programming Initial Set up of a Special Sender
201
Deleting a Special Sender
202
Printing Special Sender List
204
List/Test Print
205
Printing the List/Test Page
206
5 Printer Features
205
Maintenance
207
System
208
Host Interface
211
PCL Menu
212
PS Menu
214
PDF Menu
215
Scan Settings
217
6 Scanner Features
217
Destination List Settings
219
Send Settings
220
Address Book
223
Managing Names in the Address Book
225
Sending Fax by Quick Dial
225
Sending E-Mail by Quick Dial
226
Sending Scanned Files to a Shared Folder Directly
226
Preventing Unauthorized User Access to Shared Folders from the Machine
227
Managing Users and Machine Usage
227
7 Registering Addresses and Users for Facsimile/Scanner Functions
223
Registering Names
228
Changing a Registered Name
230
Deleting a Registered Name
231
Authentication Information
233
Registering a User Code
233
Changing a User Code
236
Deleting a User Code
239
Displaying the Counter for each User
241
Printing the Counter for each User
242
Printing the Counter for All User
244
Clearing the Number of Prints
246
Fax Destination
249
IP-Fax Destination
262
E-Mail Destination
270
Registering E-Mail Destination
270
Changing a Registered E-Mail Destination
273
Deleting a Registered E-Mail Destination
276
Registering Folders
278
Using SMB to Connect
278
Using FTP to Connect
291
Using NCP to Connect
302
Registering Names to a Group
316
Registering a New Group
316
Registering Names to a Group
318
Adding a Group to Another Group
320
Displaying Names Registered in Groups
322
Removing a Name from a Group
324
Deleting a Group Within Another Group
326
Changing a Group Name
328
Deleting a Group
330
Registering a Protection Code
332
Registering a Protection Code to a Single User
332
Registering a Protection Code to a Group User
335
Registering SMTP and LDAP Authentication
338
SMTP Authentication
338
LDAP Authentication
341
Searching
345
Searching by Name
345
Searching from the List
346
Searching by Registration Number
347
Searching by User Code
348
Searching by Fax Number
349
Searching by E-Mail Address
350
Searching by Destination Folder Name
351
Using Web Image Monitor
352
Changing the Display Language
353
8 Other User Tools
353
Counter
354
Displaying the Total Counter
354
9 Appendix
355
Copyright Information about Installed Software
355
Expat
355
Netbsd
356
Sablotron
358
Jpeg Library
358
Sasl
359
Md4
360
Md5
360
Samba(Ver 3.0.4)
361
Rsa Bsafe
361
Open SSL
362
Open SSH
364
Open LDAP
369
Index
371
Copyrights and Trademarks
383
Trademarks
383
Information about Installed Software
384
How to Read this Manual
389
Names of Major Options
389
ENERGY STAR Program
390
Getting Started
393
Guide to Components
393
Options
395
External Options
395
Control Panel
396
Display
397
Reading the Display and Using Keys
398
Combined Function Operations
399
Changing Modes
399
System Reset
399
Multi-Access
400
Function Compatibility
401
User Tools (System Settings)
403
User Tools Menu (System Settings)
405
Accessing User Tools (System Settings)
405
Changing Default Settings
405
Quitting User Tools
406
Settings You Can Change with User Tools
407
General Features
407
Timer Settings
410
Key Operator Tools
412
Display/Print Counter
413
User Code
415
Registering a New User Code
415
Changing a User Code
416
Deleting a User Code
416
Displaying the Counter for each User Code
417
Printing the Counter for each User Code
418
Clearing the Counter
418
Troubleshooting
419
If Your Machine Does Not Operate as You Want
419
Clearing Misfeeds
421
Changing the Paper Size
424
Changing the Paper Size of the Paper Tray
424
Changing the Paper Size in the Optional Paper Tray Unit
426
Other Functions
429
Displaying the Total Counter
429
Changing the Language
429
Security
431
Primary Security Functions
431
Operating Environment and Notes
432
Operating Environment
432
For Administrator
432
For User
432
Specifications
433
Main Unit
433
Options
437
Exposure Glass Cover
437
Auto Document Feeder (ADF)
437
Auto Document Feeder Capable of Scanning both Sides of a Sheet (ARDF)
438
Internal Tray 2 (1 bin Tray)
438
Paper Tray Unit (1-Tray Type)
439
Paper Tray Unit (2-Tray Type)
440
Copy Paper
441
Unusable Paper
443
Paper Storage
444
How to Read this Manual
453
Symbols
453
Names of Major Options
453
When the Machine Does Not Operate as Wanted
455
Indicators
455
Panel Tone
456
When the Function Status Indicator Lights up in Red
457
When You Have Problems Operating the Machine
458
This Machine
460
When a Job Is Not Performed
461
Troubleshooting When Using the Copy Function
463
When a Message Is Displayed
463
When You Cannot Make Clear Copies
465
When You Cannot Make Copies as Wanted
467
When Memory Is Full
469
Troubleshooting When Using the Facsimile Function
471
Adjusting the Volume
471
When a Message Is Displayed
474
When You Cannot Send or Receive Fax Messages as Wanted
481
When Memory Is Full
485
When an Error Report Is Printed
486
Turning off the Main Power / in the Event of Power Failure
487
When an Error Occurs Using Internet Fax
488
Error Mail Notification
488
Error Report (E-Mail)
488
Server-Generated Error E-Mail
488
Troubleshooting When Using the Printer Function
489
When a Message Is Displayed During Installation of the Printer Driver
489
Windows 95/98/Me, Windows 2000 or Windows NT 4.0
489
Windows XP Professional or Windows Server 2003
489
Windows XP Home Edition
490
When a Message Is Displayed
491
Status Messages
491
Alert Messages
491
Printing the Error Log
493
When You Cannot Print
494
Other Printing Problems
497
Troubleshooting When Using the Scanner Function
505
When Scanning Is Not Done as Expected
505
When You Cannot Send Scanned Files
506
When You Cannot Browse the Network to Send a Scanned File
506
When the TWAIN Driver Cannot be Started
506
The Network Delivery Function Cannot be Used
506
Operations Are Not Possible When Messages Appear
507
When a Message Is Displayed
508
When a Message Is Displayed on the Display Panel
508
When a Message Is Displayed on the Client Computer
512
Adding Paper and Replacing Toner
517
Loading Paper
517
Loading Paper into the Paper Trays
517
Loading Paper into the Optional Paper Tray Unit
519
Orientation-Fixed Paper or Two-Sided Paper
520
Changing the Paper Size
523
Changing the Paper Size in the Paper Tray
523
Changing a Paper Size in the Optional Paper Tray Unit
531
Adding Toner
536
Replacing Toner
537
Sending Fax Messages When Toner Has Run out
538
Waste Toner
538
Replacing the Transmission Stamp Cartridge
539
Clearing Misfeeds
541
Removing Jammed Paper
541
When a Is Displayed
542
When B Is Displayed
542
When P Is Displayed (Ardf)
543
When R Is Displayed
543
When Z Is Displayed
544
Remarks
545
Where to Put Your Machine
545
Machine Environment
545
Moving
546
Power Connection
547
Access to the Machine
548
When Not Used for a Long Time
548
Maintaining Your Machine
549
Cleaning the Exposure Glass
549
Cleaning the Exposure Glass Cover
550
Cleaning the ADF/ARDF
550
Combining Multiple Pages Onto a Single Page
561
Copying Onto Envelopes
562
Index
564
How to Read this Manual
565
Symbols
565
Names of Major Options
565
Functions Requiring Optional Configurations
566
Display
567
Reading the Display
567
Using the Keys on the Control Panel
568
User Tools Menu (Copier Features)
569
Placing Originals
571
Originals
571
Sizes and Weights of Recommended Originals
571
Sizes Detectable by Auto Paper Select
573
Missing Image Area
575
Placing Originals
576
Original Orientation
576
Placing Originals on the Exposure Glass
577
Placing Originals in the ADF or ARDF
578
Specifying the Original Size When a Paper Tray Is Selected
580
Specifying the Original Size When the Bypass Tray Is Selected
582
Copying
587
Basic Procedure
587
Copying from the Bypass Tray
589
Loading Paper on the Bypass Tray
589
When Copying Onto Regular Size Paper
591
When Copying Onto Custom Size Paper
592
When Copying Onto OHP Transparencies
593
When Copying Onto Thick Paper
594
When Copying Onto Envelopes
596
Copy Functions
600
Adjusting Image Density
600
Original Type Setting
601
Selecting Copy Paper
602
Preset Reduce/Enlarge
604
Zoom
606
Auto Reduce/Enlarge
608
Sort
609
Duplex (Type 2 Only)
611
One-Sided Combine
614
Two-Sided Combine (Type 2 Only)
617
Series Copies
620
Combination Chart
623
Supplementary Information
624
Notice
639
How to Read this Manual
641
Names of Major Options
642
Safety Information
643
Safety During Operation
643
Positions of Labels and Hallmarks for RWARNING and RCAUTION Labels
645
Machine Types
646
Control Panel
647
Display
648
Number Keys
648
Sort Key
648
Start Key
648
Reading the Display and Using Keys
649
Turning on the Power
650
Turning on the Main Power
650
Turning off the Power
651
Turning off the Main Power
651
Saving Energy
651
Placing Originals
653
Originals
653
Sizes and Weights of Recommended Originals
653
Sizes Detectable with Auto Paper Select
655
Missing Image Area
656
Placing Originals
657
Original Orientation
657
Placing Originals on the Exposure Glass
657
Placing Originals in the ADF or ARDF
658
Copying
661
Basic Procedure
661
How to Operate
661
Copying from the Bypass Tray
662
Copier Functions
666
Adjusting Image Density
666
Selecting Original Type Setting
666
Selecting Copy Paper
666
Rotated Copy
667
Preset Reduce/Enlarge
668
Zoom
668
Auto Reduce/Enlarge
669
Sort
670
Duplex (Type 2 Only)
672
One-Sided Combine
674
Two-Sided Combine (Type 2 Only)
675
Series Copies
677
Troubleshooting
679
If Your Machine Does Not Operate as You Want
679
When a Message Is Displayed
679
If You Cannot Make Clear Copies
680
If You Cannot Make Copies as You Want
681
When Memory Is Full
682
B Loading Paper
683
Loading Paper
683
Orientation-Fixed Paper or Two-Sided Paper
684
D Adding Toner
686
Handling Toner
686
Toner Storage
686
Used Toner
686
Removing Toner
687
Inserting Toner
688
User Tools (Copier Features)
689
Accessing User Tools (Copier Features)
689
Changing Default Settings
689
Quitting User Tools
690
APS/ Auto R/E Priority
691
Auto Tray Switching
691
Original Type Setting
691
Duplex Mode Priority
692
Orientation
692
Max. Number of Sets
692
Original Count Display
692
Reproduction Ratio
692
Preset R/E Priority
693
Duplex Margin
693
Rotate Sort
693
Rotate Sort:auto Continue
693
Letterhead Setting
693
Remarks
695
Do's and Don'ts
695
Where to Put Your Machine
696
Machine Environment
696
Moving
697
Power Connection
697
Access to the Machine
698
Maintaining Your Machine
699
Cleaning the Exposure Glass
699
Cleaning the Exposure Glass Cover
699
Cleaning the ADF or ARDF
699
Other manuals for Ricoh LD320d
Network Guide
34 pages
4
Based on 1 rating
Ask a question
Give review
Questions and Answers:
Need help?
Do you have a question about the Ricoh LD320d and is the answer not in the manual?
Ask a question
Ricoh LD320d Specifications
General
Brand
Ricoh
Model
LD320d
Category
All in One Printer
Language
English
Related product manuals
Ricoh LD316
710 pages
Ricoh LD316D
710 pages
Ricoh LDD280
459 pages
Ricoh LD620C
172 pages
Ricoh LD625C
172 pages
Ricoh LD220F
404 pages
Ricoh LDD745
88 pages
Ricoh LD015spf
112 pages
Ricoh LD220SPF
404 pages
Ricoh Lanier LD130C
228 pages
Ricoh Lanier LDD 030
128 pages
Ricoh Laser MFP Printer
129 pages
 Loading...