Home
Fuji Xerox
Copier
ApeosPort-IV 3070
Fuji Xerox ApeosPort-IV 3070 User Manual
4
of 1
of 1 rating
425 pages
Give review
Manual
Specs
To Next Page
To Next Page
To Previous Page
To Previous Page
Loading...
Simp
le F
ax
181
Fax
4
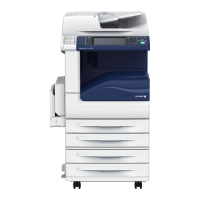
Specifying a Destin
ation Using the Nume
ric Keypad
Specify
a des
tinatio
n using t
he num
eric keyp
ad.
1
Enter
a fax n
umber usi
ng the
numeric
keypad
.
Note
•
If you have en
tered an inc
orrec
t value,
press the
<C (
Clear
)> bu
tton and
enter
the corre
ct val
ue.
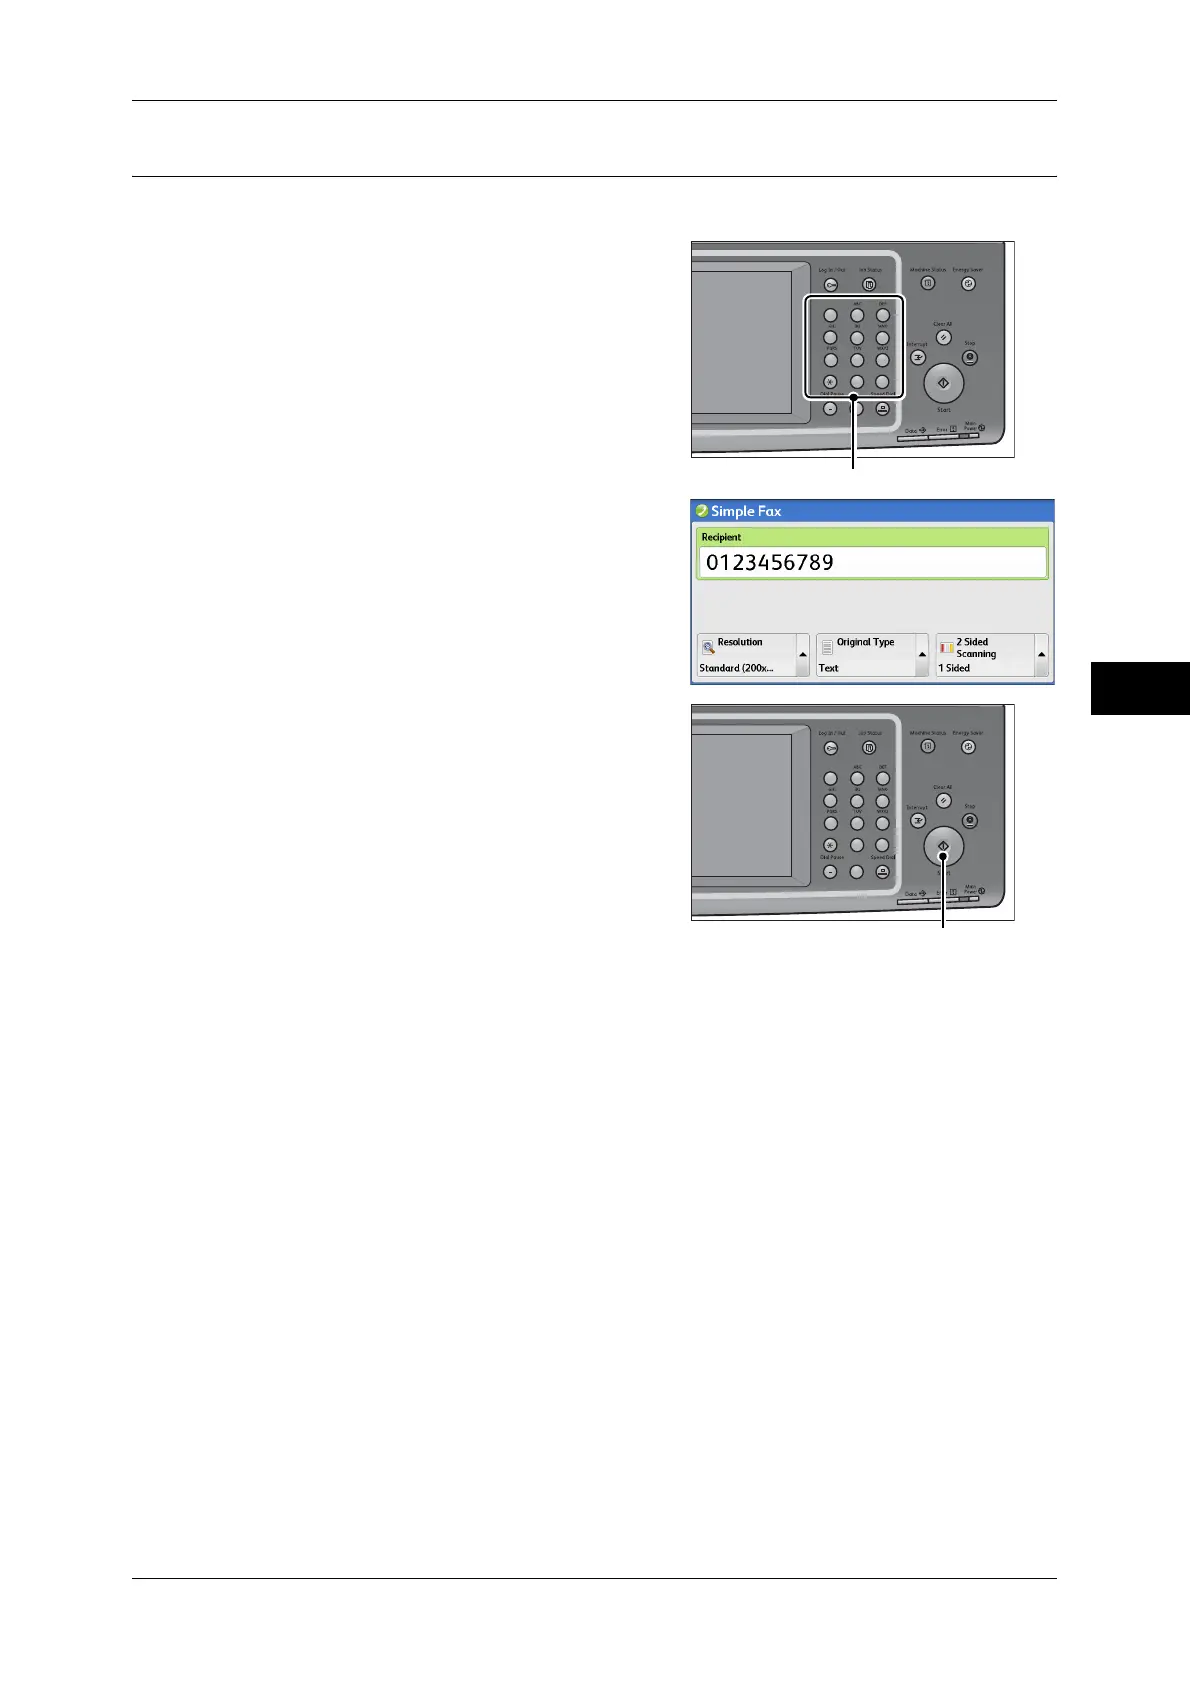
2
Press
the <Start
> butt
on.
12
3
4
56
78
9
0#
C
Numer
ic ke
ypa
d
12
3
4
56
78
9
0#
C
<Start> button
180
182
Table of Contents
Table of Contents
3
Before Using the Machine
13
Preface
14
Types of Manuals
15
Using this Guide
16
Organization of this Guide
16
Conventions
17
Safety Notes
18
Electrical Safety
19
Machine Installation
20
Operational Safety
24
Consumable
27
Location of Warning and Caution Labels
28
Regulation
29
Radio Frequency Emissions (Class B)
29
Product Safety Certification (UL, CB)
29
Regulatory Information for RFID
29
Environment
30
About License
31
Rsa Bsafe
31
Heimdal
31
JPEG Code
31
Libcurl
31
Freebsd
32
Openldap
33
Des
35
Aes
35
TIFF (Libtiff)
35
ICC Profile (Little Cms)
35
XPS (XML Paper Specification)
35
EDICT and COMPDIC
35
Cyrus SASL
36
Legal Notice
37
Product Overview
39
Machine Components
40
Power Source
51
Switching the Main Power on
51
Switching the Power on
52
Switching the Power off
53
Switching the Main Power off
54
Ground Fault Interrupter
55
Energy Saver Mode
57
Entering Energy Saver Mode
58
Exiting Energy Saver Mode
58
Control Panel
59
Screens and Buttons Displayed
63
Message Field
64
About the [Services Home] Screen
64
Activity Report
67
Entering Text
68
Installing the Tray Attachment on Finisher-B1
69
Copy
71
Copying Procedure
72
Step 1 Loading Documents
72
Document Feeder
72
Document Glass
73
Step 2 Selecting Features
74
Step 3 Entering a Quantity
75
Step 4 Starting the Copy Job
76
Step 5 Confirming the Copy Job in Job Status
77
Operations During Copying
78
Stopping the Copy Job
78
Changing the Number of Copies
79
Interrupting the Copy Job
80
Simple Copy
81
Paper Supply (Selecting the Paper for Copying)
81
Reduce/Enlarge (Making Enlarged/Reduced Copies)
82
Sided Copying (Making 2 Sided Copies)
83
Lighten/Darken (Adjusting the Copy Density)
83
Pages Per Side (Copying Two Pages Onto One Sheet)
84
Staple
84
Copy
85
Reduce/Enlarge (Making Enlarged/Reduced Copies)
85
Paper Supply (Selecting the Paper for Copying)
89
Sided Copying (Making 2 Sided Copies)
91
Original Type (Selecting the Document Type)
91
Copy Output (Specifying Finishing Options)
92
Pages Per Side (Copying Multiple Pages Onto One Sheet)
92
Lighten/Darken (Adjusting the Copy Density)
92
Image Quality
93
Original Type (Selecting the Document Type)
93
Select [Copy] on the [Services Home]
93
Image Options (Adjusting Copy Density/Sharpness of Images)
94
Background Suppression (Erasing the Background Color of Documents)
95
Layout Adjustment
96
Sided Copying (Making 2 Sided Copies)
96
Book Copying (Copying Facing Pages Onto Separate Sheets)
98
Sided Book Copying (Making 2 Sided Copies of Facing
99
Original Size (Specifying the Scan Size for the Document)
101
Mixed Size Originals (Scanning Different Size Documents Simultaneously)
102
Edge Erase (Erasing Edges and Margin Shadows of the Document)
103
Image Shift (Adjusting the Image Position)
105
Invert Image (Making Reversed Copies of Images)
107
Original Orientation (Specifying the Orientation of Loaded Documents)
108
Image Rotation (Changing the Orientation of Images)
108
Output Format
110
Sided Copying (Making 2 Sided Copies)
110
Select [Copy] on the [Services Home] Screen
110
Booklet Creation (Creating a Booklet)
111
Covers (Attaching Covers to Copies)
114
Pages Per Side (Copying Multiple Pages Onto One Sheet)
116
Poster (Making Enlarged Copies Spread over Multiple Sheets)
117
Repeat Image (Making Multiple Copies on One Sheet)
118
Annotations (Adding a Comment/The Date/Page Numbers to Copies)
119
Watermark (Printing Control Numbers on the Background of Copies)
126
Secure Watermark (Managing Document Security)
128
Folding (Outputting Bi-Folded)
131
Preset Repeat Image (Making Multiple Copies on a Single Sheet)
132
Transparency Options (Inserting Blank Sheets between Transparencies)
133
Copy Output (Specifying Finishing Options)
135
ID Card Copy (Copying both Sides of an ID Card)
139
Job Assembly
141
Build Job (Processing Documents Scanned with Different Settings as One Job)
141
Select [Copy] on the [Services Home] Screen
141
Copy Output
142
Booklet Creation
142
Sample Job (Checking the Finished Output of the Copy)
145
Combine Original Sets (Adding Originals)
147
Form Overlay (Making Copies to Overlay Documents)
148
Delete Outside/Delete Inside (Deleting Outside or Inside of the Selected Area)
149
Stored Programming (Calling a Stored Program for Build Job)
151
Fax
153
Fax Procedure
154
Step 1 Loading Documents
154
Step 2 Selecting Features
156
Step 3 Specifying Destinations
158
Step 4 Starting the Fax Job
159
Step 5 Confirming the Fax Job in Job Status
160
Operations During Faxing
162
Stopping the Fax Job
162
Changing the Scan Settings
163
About Internet Fax
165
Internet Fax Features
165
Sending an Internet Fax
165
Sending an Internet Fax
167
Receiving an Internet Fax
168
Reception Method
168
Useful Features
169
About IP Fax (SIP)
173
IP Fax (SIP) Features
175
Feature Comparison with Regular Fax
176
Sending an IP Fax (SIP)
177
Receiving an IP Fax (SIP)
177
About Server Fax
178
Sending a Server Fax
178
Simple Fax
180
Specifying a Destination Using the Numeric Keypad
181
Speed Dialing (Specifying a Destination Using an Address Number)
182
Specifying a Destination Using a One Touch Button
183
Resolution (Specifying the Scanning Resolution)
184
Original Type (Selecting the Document Type)
184
Sided Scanning (Transmitting 2-Sided Originals)
185
Fax/Internet Fax
186
Internet Fax/Fax/Ip Fax (SIP) (Selecting Internet Fax/Fax/Ip Fax (SIP))
186
Add (Sending Faxes to Multiple Recipients)
187
Specifying a Destination Using the Address Book
188
Speed Dialing (Specifying a Destination Using an Address Number)
190
Specifying a Destination Using a One Touch Button
191
Specifying a Destination Using the Keyboard Screen
191
Specifying a Destination Using the Redial Feature
192
Specifying a Line (Port)
193
Entering Specific Symbols
193
Removing/Confirming a Recipient
194
Lighten/Darken (Adjusting Fax Density)
195
Sided Scanning (Transmitting 2-Sided Originals)
195
Original Type (Selecting the Document Type)
197
Resolution (Specifying the Scanning Resolution)
197
Layout Adjustment
199
Sided Scanning (Transmitting 2-Sided Originals)
199
Original Size (Specifying the Scan Size for the Original)
199
Select [Fax/Internet Fax] on the
199
Home] Screen
199
Mixed Size Originals (Scanning Different Size Documents Simultaneously)
200
Book Faxing (Scanning Facing Pages Onto Separate Sheets)
201
Reduce/Enlarge (Specifying a Scan Ratio)
202
Stamp (Adding a Stamp When Scanning a Document)
203
Fax/Internet Fax Options
205
Acknowledgement Report (Confirming Transmission Results)
205
Starting Rate (Selecting a Communication Mode)
207
Priority Send/Delay Start (Specifying Send Priority/Send Time)
208
Priority Send
209
Transmission Header Text (Adding Sender Name and Phone Number to Faxes)
210
Cover Page (Transmitting Documents with a Cover Page)
211
Internet Fax Subject (Specifying the Internet Fax Subject)
212
Internet Fax Message (Editing the Internet Fax Mail Contents)
213
Recipient Print Sets (Printing Multiple Sets at the Remote Machine)
214
Pages Per Side (Combining Multiple Pages into One Sheet)
214
Remote Folder (Using Remote Folder)
215
F Code (Using F Code Transmission)
218
Internet Fax Profile (Specifying Internet Fax Profiles)
222
Encryption (Sending an Internet Fax Encrypted by S/MIME)
223
Digital Signature (Sending an Internet Fax with a Digital Signature by S/MIME)
223
More Options
225
Remote Polling (Retrieving Files from Remote Machines)
225
Select [Fax/Internet Fax] on the [Services Home] Screen
225
Store for Polling
227
(Storing Files on the Machine that a Remote Machine Can Retrieve)
227
On-Hook (Confirming Remote Machine Response Prior to Transmission)
229
Broadcast
231
Broadcast Send (Transmitting to Multiple Recipients)
231
Relay Broadcast (Transmitting Documents through a Relay Station)
232
Fax Signal Method
232
F Code Method
234
Remote Relay Broadcast (Performing Relay Broadcast to Remote Locations)
235
Receiving Faxes
239
Switching between Auto Receive and Manual Receive
239
Using Auto Receive
240
Using Manual Receive
240
Using Folder Receive
241
Facsimile Information Services
242
Using the Receiver
242
When Not Using a Receiver
242
Scan
245
Scanning Procedure
246
Step 1 Loading Documents
246
Step 2 Selecting the Features
248
Step 3 Starting the Scan Job
251
Step 4 Confirming the Scan Job in Job Status
253
Step 5 Saving the Scanned Data
253
Operations During Scanning
254
Stopping the Scan Job
254
Previewing the Scanned Images During a Scan Job
255
Changing the Scan Settings
256
E-Mail
257
Address Book (Specifying an E-Mail Address)
258
New Recipient (Entering an Address)
260
Add Me (Adding the Sender's Address)
261
Recipient(S) (Editing a Recipient)
262
From (Setting the Sender's Address)
263
Subject (Setting the Subject)
264
Message (Entering the E-Mail Body)
264
Preview (Previewing the Scanned Images During a Scan Job)
264
Color Scanning (Selecting an Output Color)
265
Sided Scanning (Scanning both Sides of a Document)
265
Original Type (Selecting the Document Type)
267
File Format (Selecting a File Format for Output Data)
267
Network Scanning
277
Preview (Previewing the Scanned Images During a Scan Job)
278
Color Scanning (Selecting an Output Color)
278
Sided Scanning (Scanning both Sides of a Document)
278
Original Type (Selecting the Document Type)
278
File Format (Selecting a File Format for Output Data)
278
Scan to PC
279
Transfer Protocol (Selecting a Transfer Protocol)
279
Address Book (Specifying a Destination PC Using the Address Book)
280
Browse (Specifying a Destination PC by Browsing Your Network)
281
Specifying a Destination (Specifying a Destination PC Using the Screen Keyboard)
282
Preview (Previewing the Scanned Images During a Scan Job)
284
Color Scanning (Selecting an Output Color)
284
Sided Scanning (Scanning both Sides of a Document)
284
Original Type (Selecting the Document Type)
284
File Format (Selecting a File Format for Output Data)
284
Store to Folder
285
Color Scanning (Selecting an Output Color)
286
Sided Scanning (Scanning both Sides of a Document)
286
Original Type (Selecting the Document Type)
286
Preview (Previewing the Scanned Images During a Scan Job)
286
Store to USB
287
Save in (Specifying a Storage Location in the USB Memory Device)
290
Details (Displaying the Details of a Storage Location in the USB Memory Device)
291
Preview (Previewing the Scanned Images During a Scan Job)
292
Color Scanning (Selecting an Output Color)
292
Sided Scanning (Scanning both Sides of a Document)
292
Original Type (Selecting the Document Type)
292
File Format (Selecting a File Format for Output Data)
292
Store & Send Link
293
Scan to (Displaying the E-Mail Address of the Authenticated User)
294
From (Displaying the E-Mail Address of the Authenticated User)
294
Subject (Setting the Subject)
294
Message (Entering the E-Mail Body)
294
Color Scanning (Selecting an Output Color)
294
Sided Scanning (Scanning both Sides of a Document)
294
Original Type (Selecting the Document Type)
294
Preview (Previewing the Scanned Images During a Scan Job)
295
File Format (Selecting a File Format for Output Data)
295
Store to WSD
296
Computer (Starting a Scan Job Via Computer Operation)
297
This Device (Storing Data Scanned by the Machine on a Network Computer)
298
Advanced Settings
300
Photographs (Scanning a Color Photograph)
300
Image Options (Adjusting Scan Density and Image Sharpness)
301
Image Enhancement
302
(Erasing the Background Color of Documents/Adjusting Contrast)
302
Shadow Suppression (Suppressing the Document Background)
302
Color Space (Specifying the Color Space)
303
Layout Adjustment
305
Resolution (Specifying a Scanning Resolution)
305
Sided Scanning (Scanning both Sides of a Document)
305
Book Scanning (Scanning Facing Pages on Separate Sheets)
305
Original Size (Specifying a Scan Size)
307
Mixed Size Originals (Scanning Different Size Documents Simultaneously)
308
Edge Erase (Erasing Edges and Margin Shadows in the Document)
309
Reduce/Enlarge (Specifying a Scanning Ratio)
311
Original Orientation (Specifying the Orientation of the Loaded Documents)
311
On the [Services Home] Screen, Select [E-Mail], [Store to Folder], [Network Scanning], [Scan to PC], [Store & Send Link], or [Store to USB]
312
E-Mail Options/Filing Options
313
Quality/File Size (Specifying the Image Compression Ratio When Scanning)
313
Read Receipts (Specifying Read Receipts)
314
Split Send (Sending in Sections)
314
File Name (Specifying a Name for the File to be Sent)
316
Reply to (Specifying a Reply Address)
316
File Name Conflict (Setting the Action to be Taken for File Name Conflict)
316
File Name (Specifying a Name for the File to be Saved)
317
Encryption (Sending E-Mail Encrypted by S/MIME)
317
Digital Signature (Sending E-Mail with a Digital Signature by S/MIME)
317
Login Name
318
Password
318
Meta Data
318
Send from Folder
321
Folder Operating Procedure
322
Step 1 Opening the [Send from Folder] Screen
322
Step 2 Selecting a Folder
323
Step 3 Checking/Selecting Files in a Folder
323
Step 4 Operating Files in a Folder
323
Selecting a Folder
324
Checking/Operating Files in a Folder
325
Batch Print
326
Checking File Details
327
Printing Files in a Folder
328
Configuring/Starting Job Flow
331
[Link Job Flow Sheet to Folder] Screen
333
Job Flow Restrictions
336
Job Flow Sheets
337
Job Flow Procedure
338
Step 1 Opening the [Job Flow Sheets] Screen
338
Step 2 Selecting a Job Flow Sheet
338
Step 3 Confirming/Changing the Job Flow Sheet
339
Step 4 Starting the Job Flow Sheet
339
Selecting/Changing a Job Flow Sheet
340
Change Settings
340
Stored Programming
343
Stored Programming Overview
344
Registering/Deleting/Renaming Stored Programs
345
Registering Stored Programs
346
Notes and Restrictions on Registering Stored Programs
347
Registering Stored Programs for Build Job
348
Deleting Stored Programs
348
Entering/Changing a Stored Program Name
349
Assigning/Changing Icons for Stored Programs
350
Calling a Stored Program
351
Calling a Stored Program for Build Job
352
Web Applications
353
Web Applications Overview
354
Accessing Web Applications
355
Accessing Using Buttons Registered on the [Services Home] Screen
356
Media Print (Text)
357
Media Print Overview
358
Supported File Formats
358
Notes and Restrictions
359
Inserting USB Memory Device
360
Selecting Files
363
[Select from List] Screen
364
Setting the Printing Options
365
Media Print - Text
365
Index Print
366
11 Job Status
367
Job Status Overview
368
Checking Current/Pending Jobs
369
Checking Completed Jobs
371
Printing and Deleting Stored Jobs
372
Secure Print
372
Sample Set
374
Delayed Print
376
Charge Print
378
Private Charge Print
380
Public Folder
382
Undelivered Faxes
383
Printing Pending Jobs
385
Press the <Job Status> Button
385
Handling Error Terminations
386
12 Computer Operations
387
Features Overview
388
Print
389
Print Features
389
Direct Printing
390
Setup
391
Printing
391
E-Mail Printing
392
Setup
392
Receiving E-Mail
392
Sending Fax
394
Registering Destinations
394
Importing Scanned Data
396
Importing to a TWAIN Compatible Application
396
Importing Using Stored File Manager 3
398
Importing Using Centreware Internet Services
401
Importing Using Easyoperator
403
Centreware Internet Services
404
Browser Settings
406
Proxy Server and Port Number
407
Starting Centreware Internet Services
407
13 Appendix
409
Glossary
410
Index
417
Other manuals for Fuji Xerox ApeosPort-IV 3070
Administrator's Manual
675 pages
Quick Reference Notes
5 pages
4
Based on 1 rating
Ask a question
Give review
Questions and Answers:
Need help?
Do you have a question about the Fuji Xerox ApeosPort-IV 3070 and is the answer not in the manual?
Ask a question
Fuji Xerox ApeosPort-IV 3070 Specifications
General
Brand
Fuji Xerox
Model
ApeosPort-IV 3070
Category
Copier
Language
English
Related product manuals
Fuji Xerox ApeosPort-IV 5070
425 pages
Fuji Xerox DocuCentre-IV 4070
675 pages
DocumentCentre C400 Series
483 pages
 Loading...