EasyManua.ls Logo

Imagine Selenio 6800+ User Manual

Default Icon
74 pages
To Next Page IconTo Next Page
To Previous Page IconTo Previous Page
Page #16 background imageLoading...
Page #16 background image
QVM6800+ Installation and Operation Manual 7
Chapter 2
Installation
Overview
This chapter describes the QVM6800+ and QVM6800+ C installation process, including the
following topics:
“Maximum 6800+ Frame Power Ratings” on page 7
“Unpacking the Module” on page 8
“Installing QVM6800+ Series Modules” on page 9
“Building a Cascade System” on page 9
“Cable Requirements” on page 10
“Installing ZConfigurator” on page 10
Caution
Before installing this product, read the 6800+ Series Safety Instructions and Standards
Manual shipped with every frame installation and operation manual. This information is also
available on our website. The safety manual contains important information about the safe
installation and operation of 6800+ series products.
See your frame installation and operation manual for information about installing and operating
an FR6802+ frame and its components.
Maximum 6800+ Frame Power Ratings
The power consumption for the QVM6800+ and QVM6800+ C modules is less than 13 W
each. Table 2-1 shows the maximum allowable power ratings for 6800+ frames. Note the given
maximums before installing any 6800+ and/or QVM6800+ C modules in your frame.
Due to high levels of heat dissipation, the QVM6800+ series modules must not be installed in
frames without fans. The modules cannot be installed in FR6802+DM and 6800/7000 series
frames.
To maintain proper temperatures, ensure that the front panel is closed at all times, and that
the fan module is fully operational.

Table of Contents

Other manuals for Imagine Selenio 6800+

Question and Answer IconNeed help?

Do you have a question about the Imagine Selenio 6800+ and is the answer not in the manual?

Imagine Selenio 6800+ Specifications

General IconGeneral
BrandImagine
ModelSelenio 6800+
CategoryMonitor
LanguageEnglish

Summary

Manual Information

Purpose

Details features, installation, operation, maintenance, and specifications for QVM6800+.

Audience

Target audience for the manual: engineers, technicians, and operators.

Revision History

Records changes made to the manual over time.

Writing Conventions

Explains text formatting and symbols used in the manual for clarity.

Obtaining Documents

Unpacking and Shipping Information

Guidelines for unpacking the product and handling shipping.

Product Servicing

Information on how modules are serviced, requiring return to the service center.

Returning a Product

Procedure for returning a malfunctioning product for servicing.

RoHS Compliance

WEEE Compliance

Safety Precautions

Safety Terms and Symbols

Defines safety terms like WARNING and CAUTION and their meanings.

Chapter 1: Introduction

Overview

Introduces the QVM6800+ series, its features, and system capabilities.

Main Features

Lists key features of the QVM6800+ series, including inputs and module width.

Applications

Describes common use cases for the QVM6800+ series in broadcast and monitoring.

ZConfigurator for QVM6800+

Introduces ZConfigurator as the primary configuration and control application.

Module Description

Front Module

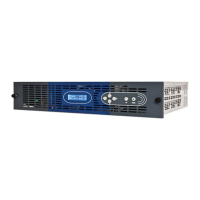
Describes the LEDs and switches on the front panel of the QVM6800+ module.

Back Modules

Illustrates and describes the rear connectors of the QVM6800+ C module.

Signal Flow Diagram

Provides a block diagram illustrating the signal path within the QVM6800+.

Building Cascaded Systems

Explains how to connect multiple QVM6800+ modules to create larger systems.

Chapter 2: Installation

Overview

Outlines the topics covered in the installation chapter, including module and software setup.

Maximum 6800+ Frame Power Ratings

Details power consumption of QVM6800+ modules and frame power limits.

Unpacking the Module

Preparing the Product for Installation

Steps to take before installing the module, including damage checks and list confirmation.

Checking the Packing List

Details the items included in the product package.

Installing QVM6800+ Series Modules

Building a Cascade System

Cable Requirements

Installing ZConfigurator

Chapter 3: Using ZConfigurator

Overview

Introduces how to operate QVM6800+ modules using the ZConfigurator software.

Operating Notes

Important considerations when setting control parameters on QVM6800+ modules.

Adding a License Key

Procedure for adding license keys to enable features like 3G output and cascade.

Connecting to a Module for the First Time

Trouble Shooting Failed Connections

Working with Cascade Systems

Getting started with ZConfigurator

Using Frame View

Using the Cascade Editor

Creating a Cascade from Standalone Cards

Editing QVM 6800+ IP Numbers

Cascade Rules

Getting Started with ZConfigurator

Setting Output Type and Standard

Configuring display output to match the native resolution of the attached display.

UMD and Tally Setup

Configuring Under Monitor Display and tally functionality using external equipment.

Global Alarm Settings

Setting global alarm parameters like sensitivity and delay for all multiviewer alarms.

Using the Layout Editor

Introduction to the Layout Editor for configuring PiP elements like labels, clocks, and alarms.

Introduction to the Layout Editor

Templates, Sources and Elements

Using templates, video sources, and elements to create custom layouts for PiPs.

The PiP Container, Panels and Elements

Adding Audio Panels

Re-positioning Audio Panels

Assigning Audio Source Monitoring to Audio Panels

Configuring QVM6800+ Settings

Configuring DVI Output and Resolution

Setting the DVI output resolution and refresh rate for the display.

UMD and Tally Settings

Selecting the UMD Protocol

Choosing the protocol (TSL, Zandar, etc.) for UMD and tally communication.

Changing the UMD and Tally port

GPI Mapping

Audio Settings

Global Alarm Settings

Enabling Alarms

Audio Alarms

Defining thresholds for audio over and audio under alarms.

Video Alarm Setup

Configuring video alarm triggers and notification options.

Timecode Synchronization

Using SNMP Agents

Checking Installed Cards

System Properties

Restoring Factory Settings

Licensing

Copying Settings to Other Units

Profile Save and Load

Setting Cascade Genlock Source

Setting Master GPI Output Options

Using Bitmap Images

Chapter 4: Hardware Monitoring

Card Edge Controls and LEDs

Details the monitoring LEDs and switches located on the QVM6800+ card edge.

Monitoring LEDs

Module Status LED

Chapter 5: Specifications

Overview

Lists the specification tables covered in this chapter for inputs, outputs, and miscellaneous items.

Inputs

Auto-Sensing Video Inputs

Provides detailed specifications for the auto-sensing video input ports.

GPI Inputs

Specifies the number, type, and connector for GPI inputs.

LTC Input

Details the specifications for the Longitudinal Time Code (LTC) input.

Frame Genlock Input

HD-SDI/3G Output

DVI-D Output

Audio Specifications

GPI Output Specifications

UMD Protocols

Graphics Overlay Features

Propagation Delay

Power Consumption

Operating Temperature

Chapter 6: Troubleshooting

Frequently Asked Questions

Addresses common problems and provides solutions for the QVM6800+.

Chapter 7: Connectors and Cables

DVI Connector

Detailed pinout information for the DVI connector.

Audio/GPI Connector

LTC Connector

RS232 Connector

Chapter 8: Updating Firmware

Using Z_Upgrade

Instructions for using the Z_Upgrade utility to apply firmware updates.

Z_Update FAQ

Related product manuals