6-22 - LOWER UNIT 90-826148R2 MARCH 1997
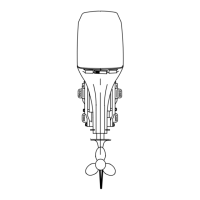
9. Apply Loctite 271 to O.D. of large diameter seal.
10. With seal lip FACING TOWARDS SMALL
SHOULDER of Mandrel 91-817007, press seal
into carrier until mandrel bottoms on carrier.
52863
a
b
a - Seal
b - Mandrel (91-817007)
11. Bearing carrier o-ring should be inspected for
cuts and abrasions.
NOTE: It is a good repair procedure to replace all o-
rings and seals regardless of appearance.
12. Apply2-4-Cw/Teflontoo-ringandinstalloncarri-
er.
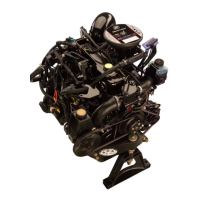
13. Using suitable mandrel, press reverse gear as-
sembly into carrier.
52827
a
b
c
a - O-ring
b - Mandrel (3/4 in. Socket)
c - Reverse Gear Assembly
Gear Housing Reassembly
IMPORTANT: The30/40gear caseassemblydoes
nothavehaveanyshimsforthegearassemblies.
Backlash cannot be adjusted. The mechanic
must verify that all bearing races are firmly
seated in the gear case during reassembly and
that all gear case components are in serviceable
condition. Prior to installing the seal carrier and
water pump assembly on the drive shaft, the
FORWARD gear should be held stationary (with
ascrewdriverorsimilartool).Whilepullingupon
the drive shaft, lightly turn the shaft back and
forth. A light “clicking” sound should be heard
indicating the presence of backlash between
FORWARD and PINION gears. If this backlash is
not present, the pinion gear race and/or forward
gear race are not fully seated. Races should be
removed and inspected for debris. Reinstall
races and check backlash. If backlash is still not
present, replace gear housing.
Shift Shaft Assembly
1. Apply 2-4-C w/Teflon (92-825407A12) to new o-
rings and install o-ringson shift shaft and carrier.
2. Install carrier on shift shaft.
IMPORTANT: When installing shift shaft assem-
bly into gear housing, DO NOT BOTTOM OUT
SHAFT IN HOUSING. Pull up on shift shaft until
shift boot is not deformed. If shaft is bottomed
out, cross pin in clutch dog will be bent by cam
follower when tightening carrier bolts.
3. Installshiftshaft/carrierassemblyintogearhous-
ing.
4. Secure boot to carrier with sta-strap.

 Loading...