EasyManua.ls Logo

Barco DP2K SLP Series User Manual

Barco DP2K SLP Series
175 pages
To Next Page IconTo Next Page
To Previous Page IconTo Previous Page
Page #156 background imageLoading...
Page #156 background image
B. Pin configurations
B.1 About General Purpose Inputs & Outputs (GPIO)
The Barco Cinema Controller and the Barco ICMP are equipped with GPIO ports. The electrical specications
described in this ch apter are the same for both GPIO ports.
General Purpose inputs
The B arco Cinema Controller and the Barco ICMP have each eight (8) opto-isolated general purpose inputs available. These inputs
are us ed to trigger the execution of macro les. For more explanation about the association of a m acro to a GPI, consult the user
guide of the Communicator.
Input v oltage
The inputs can be directly driven from a TTL or CM O S output.
The shape of the pulse must be rectangu lar.
The duration of the pulse must be at least 50 milliseconds (shorter pulses are considered as a switch bounce)
Minimum voltage : V
min
=+5V
Maximum voltage : V
max
= +18V
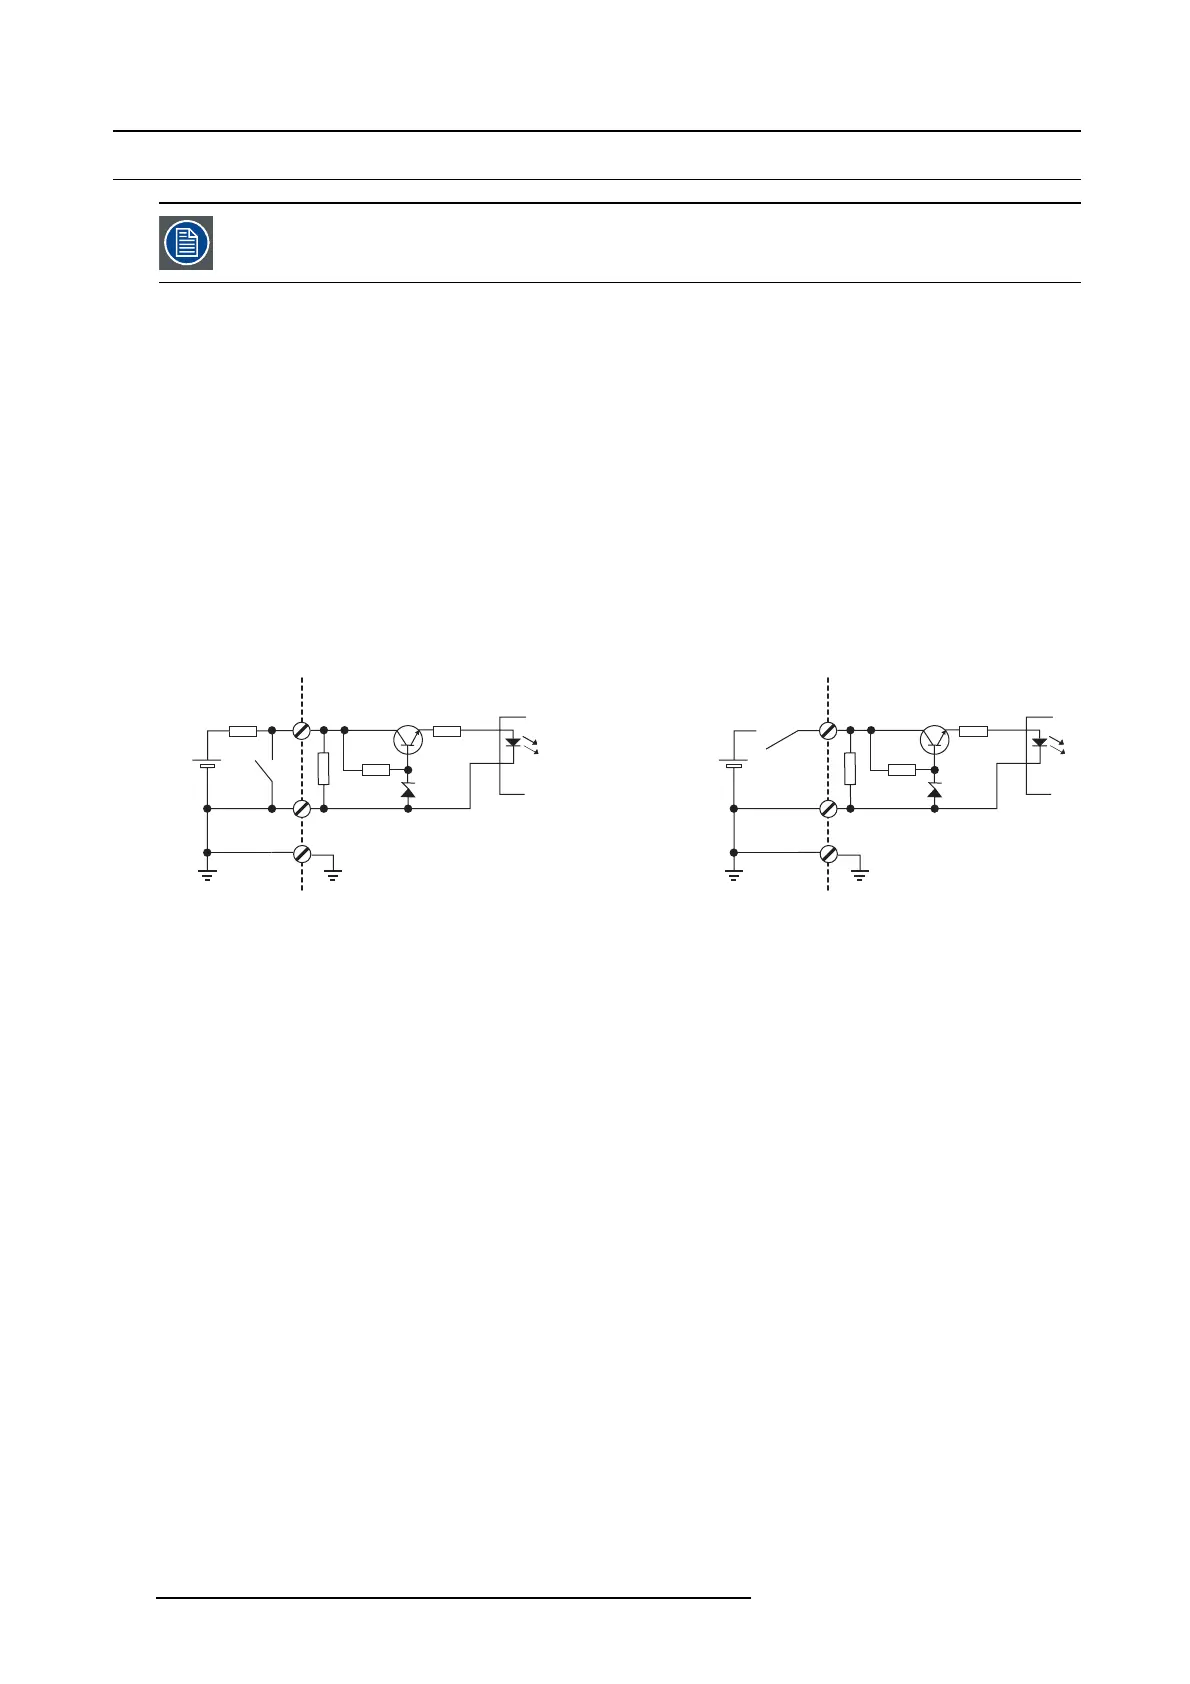
External power supply
When interfacing with contact closure outputs, an external power supply needs to be provided. Depending upon the conguration a
suitable pull-up resistor needs to be add ed as well.
10k
820R
GPIn P
GPIn P
GPIn N
GPIn N
4.7V
Input to projector Internal projector
1k1
+5V
to
+18V
10k
820R
GPIn P
GPIn P
GPIn N
GPIn N
4.7V
Input to projector Internal projector
1k1
+5V
to
+18V
Image B-1
Cables
When long cable connections are required the use of sh ielded cables with twisted pairs is recommended. One twisted pair is to be
assigned to eac h GP Input pair.
How to make the connection
When the power supply used to pro vide the D C voltage
is is olated from ground (for example in the case of an A C adapter) it is
recommended that the minus pole of that power supply is connected t o ground (or to the projector chassis). This will avoid high
common mode voltages at the projector G P Inputs. If that sam e power supply is used for other parts of the system, take care not to
create ground loops. In any c ase when shielded
cables are used that shield should be connected to the projector chassis.
General Purpose outputs
The Barco Cinema C ontroller and the Barco ICMP hav e each eight (8) opto-isolated outputs ava ilable. F our (4) of the outputs on
the Cinema Controller are dedicated for TI. The other general purpose outputs can b e controlled via software.
About an output
The output can generate a falling ed ge, rising edge, toggle or continuous toggle.
Generate Falling Edge generate a falling edge on the external G PO port if the present state of the output is h igh. If the
present state of the external GPO is low, no edge will be generated.
Generate Rising Edge gen erate a rising edge on the external GP O p ort if the present s tate of the output is low. If the p resent
state of the external G P O is high, no edge will be generated.
Generate Toggle ge nerate a toggle on the external GPO port. If the present state of the output is low, a rising edge will be
generated, followed by a falling edge. If the present state of the output is high, a falling edge will be generated, followed b y a
rising edge. P ulse width = 20 milliseconds.
Generate Continuous Toggle - This command w ill generate a continuous toggle of the external GPO port. This toggle will
continue u ntil a G enerate Falling Edge, Generate Rising Edge,orGenerate Toggle com mand is received. The rate of toggle is
24Hz. .
152
R5906847 DP2K SLP SERIES 02/06/2017

Table of Contents

Other manuals for Barco DP2K SLP Series

Question and Answer IconNeed help?

Do you have a question about the Barco DP2K SLP Series and is the answer not in the manual?

Barco DP2K SLP Series Specifications

General IconGeneral
TypeDigital Cinema Projector
TechnologyDLP
Contrast Ratio2, 000:1
Light SourceXenon Lamp
Light Source Life1, 500 hours
Resolution2048 x 1080 pixels
Input ConnectorsHDMI, DVI
Storage Temperature-20 to 60 °C
Lens OptionsVarious lens options available

Summary

SAFETY

Important Safety Instructions

Details crucial instructions to prevent electrical shock, fire, and personal injury.

High Brightness Precautions: Hazard Distance (HD)

Explains hazard distance and restriction zones for high brightness projectors.

HD for Fully Enclosed Projection Systems

Details hazard distance requirements for enclosed rear projection systems.

GETTING STARTED

Installation Requirements

Outlines environmental conditions, power, and weight requirements for installation.

Communicator PC Version

Introduces the PC software for projector configuration and control.

Commander & Web Commander

Describes Barco Alchemy software for projector and screen management.

INSTALLATION PROCESS

Installation Process Overview

Provides a step-by-step overview of the projector setup process.

Software Upgrade

Details the procedure for downloading and installing the latest projector software.

Starting Up and Adjusting the System

Guides through the initial startup and system adjustment procedures.

PHYSICAL INSTALLATION

Positioning the DP2K SLP-series projector at port window

Instructions for mounting and positioning the projector correctly.

Connecting the projector with the power net

Step-by-step guide for securely connecting the projector to the AC power supply.

LENSES & LENS SELECTION

Lens Selection

Guides users on how to select the appropriate lens using the Barco lens calculator.

Lens Installation

Provides detailed steps for safely installing a lens into the projector's lens holder.

Lens Shift, Zoom & Focus

Explains how to adjust lens shift, zoom, and focus using the projector's controls.

INPUT & COMMUNICATION

Local Keypad

Details the identification and functionality of the buttons on the local keypad.

Integrated Cinema Processor (ICP)

Describes the ICP board, its LEDs, ports, and functions.

Cinema Controller

Explains the communication ports and functionality of the Cinema Controller.

ICMP

ICMP Introduction

Describes the ICMP, its purpose, and its placement in the projector.

ICMP HDD

Explains the ICMP's RAID 5 HDD configuration, degraded mode, and recovery.

COMMUNICATOR TOUCH PANEL

STARTING UP

Switching the DP2K SLP-series ON

Details the steps required to safely power on the projector and activate the light source.

Switching the DP2K SLP-series OFF

Provides instructions for safely powering off the projector and entering sleep mode.

SCHEIMPFLUG

Scheimpflug Adjustment

Step-by-step guide for performing Scheimpflug adjustment for image sharpness.

Back Focal Length Adjustment

Guides on checking and adjusting the back focal length for proper focus.

CONVERGENCE

Converging the Blue Pattern onto the Red Pattern

Procedure for aligning the blue color channel with the red pattern.

Converging the Green Pattern onto the Red Pattern

Procedure for aligning the green color channel with the red pattern.

COLOR CALIBRATION

Calibration Process

Outlines the steps for luminance and color calibration using the Communicator.

Color Gamut Calibration

Explains color gamut calibration and the electronic correction process.

MAINTENANCE PROCEDURES

REMOVAL AND INSTALLATION OF THE PROJECTOR COVERS

Related product manuals