•
SD socket 1 is on the top side of the carrier; SD socket 2 is on the underside of the carrier (the same side
as the carrier's motherboard connector).
Step 1
Power off the server and then remove the mini-storage module carrier from the server as described in Replacing a
Mini-Storage Module Carrier, on page 81.
Step 2
Remove an SD card:
a) Push on the top of the SD card, and then release it to allow it to spring out from the socket.
b) Grasp and remove the SD card from the socket.
Step 3
Install a new SD card:
a) Insert the new SD card into the socket with its label side facing up (away from the carrier).
b) Press on the top of the SD card until it clicks in the socket and stays in place.
Step 4
Install the mini-storage module carrier back into the server and then power it on as described in Replacing a Mini-Storage
Module Carrier, on page 81.
Replacing an M.2 SSD in a Mini-Storage Carrier For M.2
This topic describes how to remove and replace an M.2 SATA or NVMe SSD in a mini-storage carrier for
M.2 (PID UCS-MSTOR-M2). The carrier has one M.2 SSD socket on its top and one socket on its underside.
Population Rules For Mini-Storage M.2 SSDs
•
Both M.2 SSDs must be either SATA or NVMe; do not mix types in the carrier.
•
You can use one or two M.2 SSDs in the carrier.
•
M.2 socket 1 is on the top side of the carrier; M.2 socket 2 is on the underside of the carrier (the same
side as the carrier's motherboard connector).
•
Dual SATA M.2 SSDs can be configured in a RAID 1 array through the BIOS Setup Utility's embedded
SATA RAID interface. See Embedded SATA RAID Controller, on page 137.
Step 1
Power off the server and then remove the mini-storage module carrier from the server as described in Replacing a
Mini-Storage Module Carrier, on page 81.
Step 2
Remove an M.2 SSD:
a) Use a #1 Phillips-head screwdriver to remove the single screw that secures the M.2 SSD to the carrier.
b) Remove the M.2 SSD from its socket on the carrier.
Step 3
Install a new M.2 SSD:
a) Insert the new M.2 SSD connector-end into the socket on the carrier with its label side facing up.
b) Press the M.2 SSD flat against the carrier.
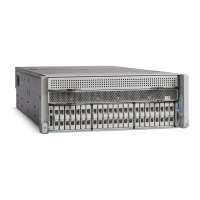
Cisco UCS C240 M5 Server Installation and Service Guide
83
Maintaining the Server
Replacing a Mini-Storage Module
 Loading...