Home
Nilfisk-Advance
Floor Machine
CS7000
Nilfisk-Advance CS7000 Service Manual
5
of 1
of 1 rating
440 pages
Give review
Manual
Specs
To Next Page
To Next Page
To Previous Page
To Previous Page
Loading...
Engine System - LPG
184
Service Manual – CS7000
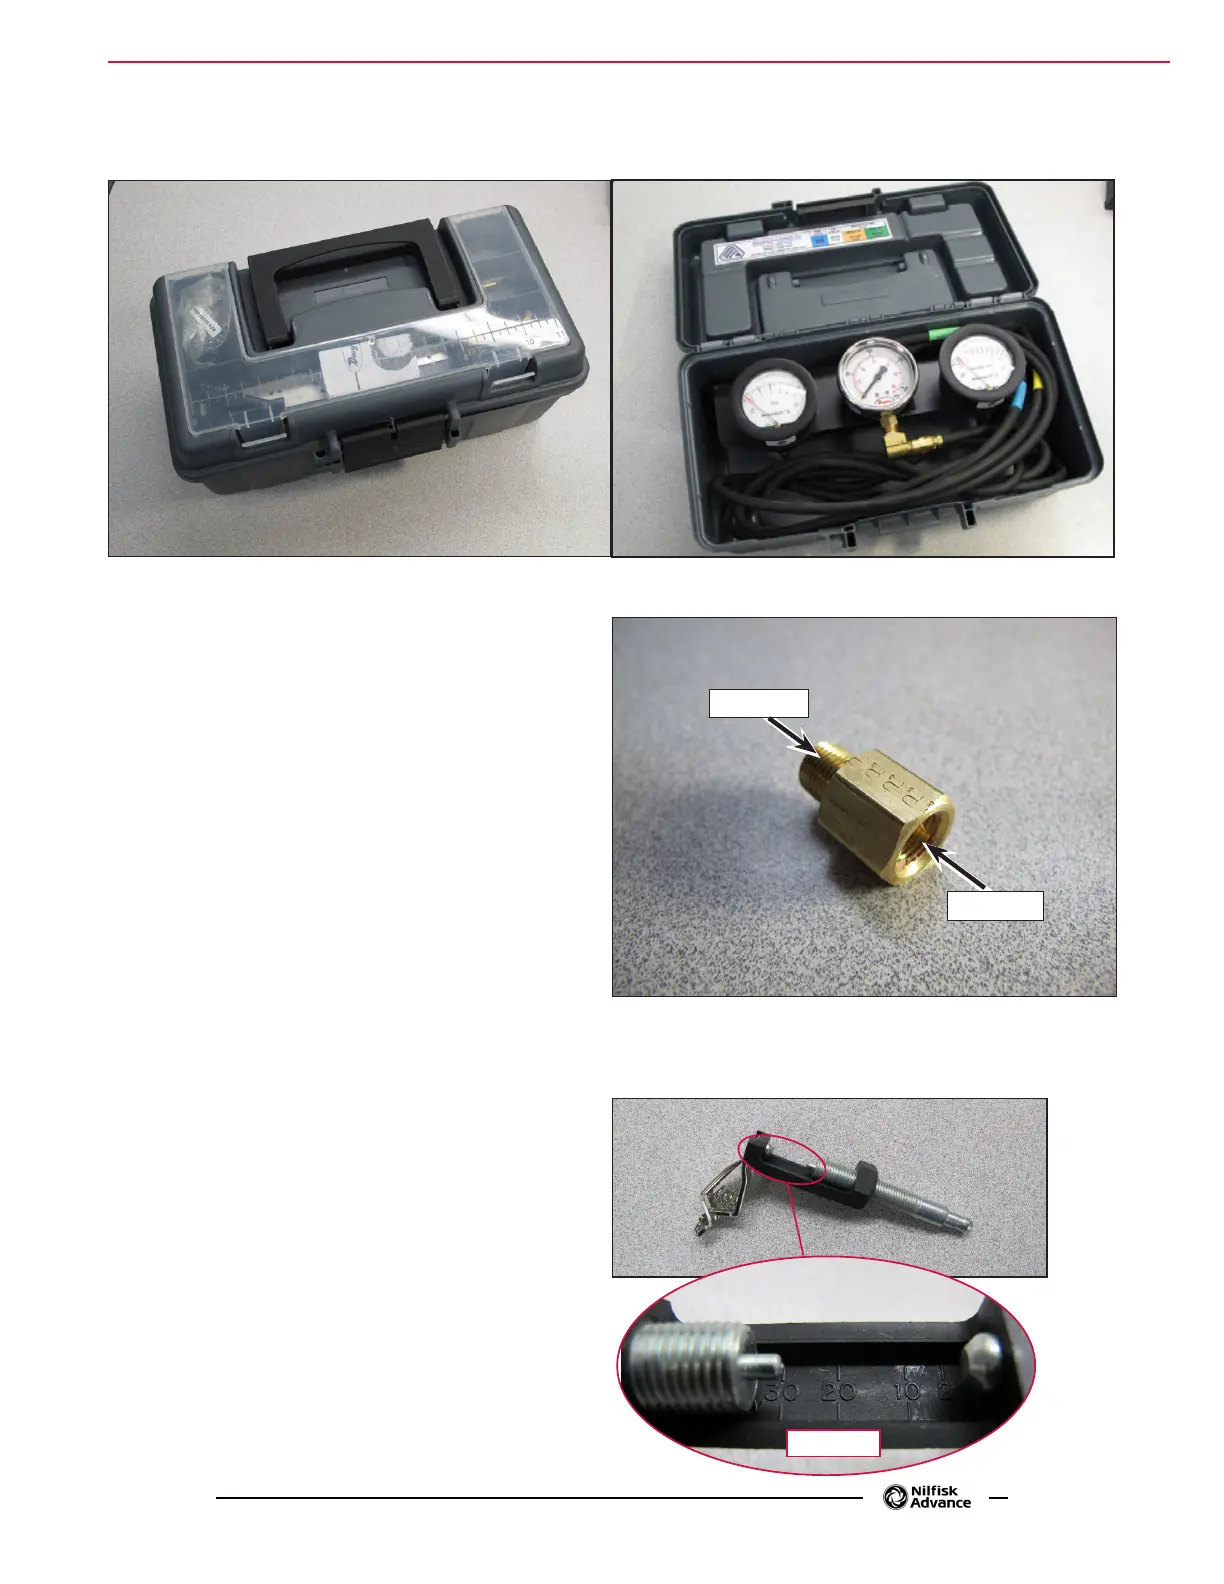
Special T
ools
LPG test gauge kit - Part # 56504450
LPG test port adapter. (Male 1/8” BSPT to Female
1/8” NPT) Part # 50360A
Adjustable KV Spark Tester.
Most automotive parts suppliers sell these tools.
Shown is 50850 from Lisle corporation. http://www.
lislecorp.com/
1/8” BPST
1/8” NPT
KV Scale
183
185
Table of Contents
Default Chapter
1
Service Manual
1
Table of Contents
2
General Information
13
General Machine Description
13
Service Manual Purpose and Application
13
Revision History
13
Other Reference Manuals and Information Sources
14
Nilfisk-Advance Publications
14
Engine Manufacturers' Technical Manuals
15
Conventions
15
Parts and Service
15
Nameplate
15
Cautions and Warning Symbols
16
General Safety Instructions
16
Hopper Prop Rod
18
To Engage the Hopper Prop Rod
18
To Disengage the Hopper Prop Rod
18
Jacking the Machine
19
Transporting the Machine
19
Towing the Machine
20
Diagnostic and Service Tools
21
Technical Specifications
22
General Specifications
22
Fastener Torque Specifications
25
Overall Dimensions
26
Maintenance
27
Maintenance Schedule
27
Recommended Service Materials
27
Daily Maintenance
27
Maintenance Every 15 to 20 Hours
28
Monthly Maintenance
28
Maintenance Every 150 Hours
28
Maintenance Every 400 Hours
28
Maintenance Every 800 to 1000 Hours
29
Maintenance Every 1500 Hours
29
Maintenance Every 1900 Hours
29
Maintenance Every 2000 Hours
29
Lubrication Points
30
Ecoflex System Maintenance
31
To Purge When Changing Detergents (the Scrub System Must be Off)
31
To Purge Weekly (the Scrub System Must be Off)
31
To Change the Detergent MIX Ratio (the Scrub System Must be On)
32
PM Checklist
33
Machine Controls
35
Control Panel - General Layout
35
Miscellaneous Controls
35
Miscellaneous Indicators
36
Scrub Controls
37
Scrub Indicators
38
Sweep Controls
38
Sweep Indicators
39
Hopper Controls
40
LCD Displays
40
General Displays
40
Battery Machine
40
LPG Machine
40
Diesel Machine
41
Broom Adjustment (Battery, LPG and Diesel)
41
Battery Charge Indicator
41
Fault, Caution and Warning Displays
42
Fault Displays
42
Caution Displays
42
Warning Displays
43
Steering Wheel
44
Foot Pedals
44
Chassis System
45
Component Locations - Battery Machine (Major Components)
45
Component Locations - LPG and Diesel Machine (Major Components)
46
Control System
47
Functional Description
47
CAN Bus Circuit
48
CAN BUS Message Routing
49
Control Panel
49
Main Machine Controller
49
Drive Controller
49
Steering Controller
50
Component Locations
51
Troubleshooting
52
Fault Codes
52
Fault Code Table (Main Machine Controller)
53
Hidden Menus
57
Configuration Display
57
Configuration Menu
59
User Options Menu
63
Service Mode
68
To Operate
71
Control Panel Leds All Stay Lit - CAN Bus Problems
75
Removal and Installation
76
Main Machine Controller
76
Control Panel
77
Specifications
78
Shop Measurements - Main Machine Controller
78
J2 Connector (White)
78
J3 Connector (Gray)
79
J7 Connector (Black)
81
Dust Control/Dustguard™ Systems
83
Functional Description
83
Overview
83
Dust Control System
83
Dustguard™ Spray System (Optional)
84
Dustguard™ System Wiring Diagram
85
Circuit Description
86
Component Locations
87
Impeller and Filter System
87
Dust Control Filter Switch
88
Dustguard™ Spray System
89
Maintenance and Adjustments
90
To Clean the Dust Control Filter
90
To Remove the Dust Control Filter
90
To Clean the Dust Control Filter
91
To Reinstall the Dust Control Filter
91
To Clean the Dustguard™ Strainer Screen
92
To Clean the Dustguard™ Spray Nozzles
93
To Adjust the Dustguard™ Spray Nozzles
93
Troubleshooting
94
Removal and Installation
96
To Remove and Reinstall the Dustguard™ Solenoid Valve Assembly
96
To Remove and Reinstall the Dustguard™ Pump
97
To Remove and Reinstall the Dust Control Filter Switch
98
To Remove and Reinstall the Impeller Assembly
98
To Disassemble and Reassemble the Impeller Assembly
99
Specifications
100
Electrical System
101
Functional Description
101
Overview
101
Wiring Harnesses
104
Circuit Protection
105
Current Sensors
105
Volt Alternator (Generator)
105
Lighting
105
Low Voltage Cutout
106
42 Volt Generator
106
Headlights
107
Incandescent Headlights
107
LED Headlights
107
Component Locations
108
Electrical Panel Contactor/Relay Location
110
Harness to Harness Connector Locations
111
Connector Pin-Outs
112
Component ID to Connector ID Look up Table
112
Wiring Connections
134
K14 Safety Relay and K15 Auxiliary Relays
134
Early Style K14 Safety Relay
134
Early Style K15 Auxiliary Relay
134
Late Style K14 Safety Relay and K15 Auxiliary Relay
135
Maintenance and Adjustments
136
Charging the Battery (Battery Model)
136
Generator Drive Belt
136
Troubleshooting
136
42 Volt Generator Is Not Charging
136
Insufficient Machine Operation Time (Battery Model)
136
Insufficient Machine Operation Time with Engine off (Hybrid Models)
136
Removal and Installation
137
42 Volt Generator Drive Belt
137
42 Volt Generator
139
Generator Drive Belt Tensioner
139
Head Light Bulb - Standard 12V Halogen
140
Specifications
141
Battery (Battery Model)
141
Low Voltage Cut out
141
Battery Run Time (Battery Powered Machine)
141
Current Sensors
142
Wiring Diagrams
146
LEV Engine Side Wiring 56511576_REV_A_LEV_ENG Sheet 1 of 1
156
Engine System - LPG
157
Functional Description
157
Circuit Descriptions
158
Ignition System
158
Engine Starter Control
160
Throttle Control Modes
161
Ignition off
161
Ignition on
162
Cranking
163
Normal Running
164
Engine RPM Control
164
Normal Engine Shut off
165
Step One
165
Step Two
166
Engine Overheat Shutdown
167
Lost Oil Pressure Shutdown
168
Component Locations
169
Maintenance and Adjustments
173
Maintenance Checklist
173
Change Engine Oil and Oil Filter
174
Change Engine Coolant
175
Inspect Air Filter
175
Replace Air Filters
175
Troubleshooting
176
Checking Spark
176
Checking LPG Primary Pressure
176
No Crank - the Starter Does Not Engage
177
Cranks but Does Not Start - no Spark
178
Cranks but Does Not Start (Has Sufficient Spark)
178
Achieves One but Not ALL RPM Modes
179
Removal and Installation
180
Engine RPM Sensor Installation
180
Engine Assembly
180
Specifications
181
Fuel System
181
Engine Oil
181
Engine Coolant
181
Shop Measurements
181
Ignition System
181
Spark Controller Measurements
182
Governor Control System
182
Woodward L Series Actuator Measurements
182
Fuel System
183
Engine
183
Special Tools
184
Engine System - LPG LEV
185
Functional Description
185
Circuit Descriptions
186
Engine Starter Control
186
Engine RPM Control
187
Normal Engine Shut off
187
Engine Protection Modes
187
Component Locations
188
Maintenance and Adjustments
190
Maintenance Checklist
190
Change Engine Oil and Oil Filter
190
Change Engine Coolant
190
Inspect Air Filter
191
Replace Air Filters
191
Troubleshooting
192
Engine Management System
192
Checking Spark
192
Checking LPG Primary Pressure
193
Removal and Installation
194
Engine Assembly
194
Specifications
195
Fuel System
195
Engine Oil
195
Engine Coolant
195
Shop Measurements
195
Ignition System
195
Fuel System
196
Engine
196
Special Tools
197
Engine System - Petrol (Gasoline)
199
Functional Description
199
Kubota WG972-GL-E3-NFK-1 Petrol (Gasoline)
199
Circuit Descriptions
200
Ignition System
200
Engine Starter and Carburetor Choke Control
202
Throttle Control Modes
203
Ignition off
203
Ignition on
204
Cranking
205
Normal Running
206
Engine RPM Control
206
Normal Engine Shut off
207
Engine Overheat Shutdown
208
Lost Oil Pressure Shutdown
209
Component Locations
210
Engine Right Side View (Toward Front of Machine)
211
Engine Back Side View (Toward Right of Machine)
212
Engine Left Side View (Toward Back of Machine)
212
Fuel Tank Area
213
Maintenance and Adjustments
214
Maintenance Checklist
214
Change Engine Oil and Oil Filter
215
Change Engine Coolant
215
Inspect Air Filter
216
Replace Air Filters
216
Troubleshooting
217
Checking Spark
217
No Crank - the Starter Does Not Engage
217
Cranks but Does Not Start - no Spark
218
Cranks but Does Not Start (Has Sufficient Spark)
218
Achieves One but Not ALL RPM Modes
219
Removal and Installation
220
Engine RPM Sensor Installation
220
Engine Assembly
220
Specifications
221
Engine Oil
221
Engine Coolant
221
Shop Measurements
221
Ignition System
221
Spark Controller Measurements
222
Governor Control System
222
Woodward L Series Actuator Measurements
222
Fuel System
223
Engine
223
Special Tools
224
Engine System, Diesel
225
Functional Description
225
Engine Starter Control
225
Fuel Pump Control
226
Engine Protection
227
Over Temperature Shutdown
228
Low Oil Pressure Shutdown
229
Engine RPM Control
230
Glow Plug Control
232
Component Locations
233
Maintenance and Adjustments
236
Diesel Engine Maintenance Schedule
236
Change Engine Oil and Oil Filter
237
Change Engine Coolant
237
Replace Fuel Filter
237
Bleed Fuel System
238
Inspect Air Filter
238
Replace Air Filters
239
Troubleshooting
240
No Crank - the Starter Does Not Engage
240
Cranks but Does Not Start
240
Cannot Achieve Either Run or Maximum Engine Speed Settings (Run 2200 RPM, Maximum Power 2400 RPM)
242
Compression Test
243
Removal and Installation
245
Engine RPM Sensor Installation
245
Engine Assembly
245
Specifications
246
Fuel Pump
246
Glow Plugs
246
Engine Compression
246
Engine Oil Capacity
246
Engine Oil Type
246
Engine Oil Viscosity
247
Cooling System
247
Engine Coolant
247
Radiator Cap
247
Shop Measurements
247
Engine RPM Sensor
247
Actuator
247
Engine Compression
248
Fuel System Return Fuel Flow
248
Starter
248
Glow Plug Relay
248
Special Tools
249
Hopper System
250
Functional Description
250
Overview
250
Hopper System Wiring Diagram
251
Hopper Hydraulic System Circuit Details
252
Hopper at Rest
252
Hopper Being Raised
252
Hopper Being Lowered
253
Circuit Description
253
Component Locations
254
Upper and Lower Hopper
254
Hydraulic Power Pack Assembly
255
Hopper Dump Door
256
Hopper Dump Door Actuator
256
Dump Door Extend and Retract Limit Switches
256
Hopper Interlock Switch
257
Hopper Prop Rod and Pull Rod
257
Troubleshooting
258
Removal and Installation
260
To Remove and Reinstall the Hydraulic Power Pack Assembly
260
LPG and Diesel Models
260
Battery Models
262
To Remove and Reinstall the Hopper Lift Cylinder
264
To Replace the Oil in the Hydraulic System
267
To Remove and Reinstall the Hopper Dump Door Actuator Assembly
276
Hopper Interlock Switch Replacement
276
Specifications
277
Options and Accessories
278
Recovery System
288
Functional Description
288
Overview
288
Recovery System Wiring Diagram
289
Circuit Description
290
Component Locations
291
Recovery Tank
291
Recovery Tank Cover and Debris Basket
291
Vacuum Fan Cover Assembly
292
Vacuum Motors
292
Float Cage and Ball Assemblies
292
Maintenance and Adjustments
293
To Clean the Vacuum Filter and Filter Screen
293
To Clean the Debris Basket
294
Troubleshooting
295
Removal and Installation
296
To Remove the Recovery Tank
296
To Reinstall the Recovery Tank
298
To Remove and Reinstall a Vacuum Motor
299
Specifications
300
Special Tools
300
Scrub System
301
Functional Description
301
Overview
301
Scrub Pressure Control
301
Scrub System Wiring Diagram
302
Circuit Description
303
The Following Conditions Must be Met for the Scrub System to Operate
303
Scrub Deck Actuator Motor
303
Brush Current Sensor
304
Component Locations
304
Scrub Motor Assemblies
304
Right Scrub Arm Gas Spring and Lever Arm Bracket
304
Side Squeegee Assemblies
305
Scrub Deck Actuator
305
Maintenance and Adjustments
306
To Replace a Leading Deck Blade
306
To Replace a Trailing Deck Blade
306
Troubleshooting
307
Removal and Installation
308
To Remove and Reinstall a Side Squeegee Assembly
308
To Remove and Reinstall the Scrub Deck Actuator
309
To Remove and Reinstall the Scrub Deck
309
To Remove and Reinstall a Scrub Motor Assembly
312
To Replace the Scrub Motor Carbon Brushes
313
Specifications
316
Special Tools
317
Solution System
318
Functional Description
318
Overview
318
Solution Flow Control - Non-Ecoflex™ Machines
318
Solution Flow Control - Ecoflex™ Machines
318
Ecoflex™ Detergent System
319
Extended Scrub System
319
Optional Hot Water System (LP and Diesel Ecoflex™ Machines Only)
319
Optional Wash Hose Kit
319
Optional High-Pressure Spray System (LP and Diesel Only)
320
Solution Level Sensor
320
Solution System Wiring Diagram
321
Circuit Description
322
The Following Conditions Must be Met for the Solution System to Operate
322
The Following Conditions Must be Met for the Extended Scrub System to Operate
322
The Following Conditions Must be Met for the Ecoflex™ System to Operate
323
The Following Conditions Must be Met for the High-Pressure Spray System to Operate
323
Component Locations
324
Solution Tank
324
Drain Hose
324
Solution Filter and Solution Shutoff Valve
324
Solution Pressure Sensor
325
Solution Pump (Ecoflex™ Models Only)
325
Low Pressure (Wash Hose) Pump
325
Solution Solenoid Valve
326
Solution Nozzles
326
Ecoflex™ Detergent Bottles and Pumps
327
High-Pressure Spray System Pump
327
Extended Scrub System
328
Maintenance and Adjustments
329
To Clean the Solution Filter Screen
329
To Clean the Extended Scrub System Strainer
330
To Clean the High Pressure Solution Filter
330
To Adjust the Belt Tension on the High Pressure Pump
331
Troubleshooting
332
Removal and Installation
335
To Remove and Reinstall the Solution Tank
335
To Remove and Reinstall the Solution Shutoff Valve
339
To Remove and Reinstall the Solution Filter Assembly
339
To Remove and Reinstall the Solution Solenoid Valve
340
To Remove and Reinstall a Detergent Pump (Ecoflex™ Models Only)
340
Specifications
341
Special Tools
343
Squeegee System
344
Functional Description
344
Overview
344
Squeegee System Wiring Diagram
344
Circuit Description
345
Component Locations
345
Maintenance and Adjustments
346
To Remove and Reinstall the Squeegee Blades
346
To Remove and Reinstall the Front Squeegee Blade
346
To Remove and Reinstall the Rear Squeegee Blade
347
Squeegee End Wheels
347
Squeegee Caster Wheel Bearings
347
To Adjust the Squeegee Tilt
348
To Adjust the Squeegee Casters
349
Troubleshooting
350
Removal and Installation
351
To Remove and Reinstall the Squeegee Support Assembly
351
To Remove and Reinstall the Squeegee Lift Arm
351
To Remove and Reinstall the Squeegee Lift Actuator
352
Specifications
353
Special Tools
353
Steering System
354
Functional Description
354
Summary
354
Steering Wheel Rotation Sensor
354
Steering Actuator
355
Steering Travel Limit Switches
356
Steering Controller
356
Steering System Wiring Diagram
357
Circuit Description
358
Component Locations
362
Maintenance and Adjustments
363
Troubleshooting
363
Diagnostic Trouble Codes (Dtcs)
363
To Retrieve Steering System Codes from the "Hidden Menu
363
Diagnostic Trouble Code Table
364
Symptom Troubleshooting (no DTC Stored)
368
Steering Inoperative - Steering Controller Status LED Is Blinking Rapidly
368
Steering Inoperative - Steering Controller Status LED Is off
368
Steering Inoperative - Steering Controller Status LED Is on Steady
368
No "Steering Feel
368
Steering Wheel Is Difficult to Turn
368
Removal and Installation
369
Steering Wheel Assembly
369
Steering Wheel Rotation Sensor
370
Steering Controller
373
Steering Actuator
373
Specifications
375
Shop Measurements
375
Steering Wheel Rotation Sensor Voltage Measurements
375
Steering Controller Voltage Measurements
376
J5 Connector
376
Motor U, V and W Terminal Pair Voltages
377
Motor U, V and W Terminal Pair Frequency
377
System Current Draw
377
Steering Contactor
377
Safety Relay
377
Special Tools
377
Sweep System, Main
378
Functional Description
378
Overview
378
Main Sweep System Wiring Diagram
379
Circuit Description
380
The Following Conditions Must be Met for the Main Sweep System to Operate
380
Main Broom Actuator Motor
380
Broom Current Sensor
381
Component Locations
381
Main Broom and Drive Components
381
Maintenance and Adjustments
382
To Adjust the Main Broom Height
382
To Adjust the Main Broom Tilt
383
Inspecting/Replacing Main Broom Motor Carbon Brushes
384
Troubleshooting
387
Removal and Installation
388
To Remove the Main Broom
388
To Install the Main Broom
389
To Remove and Reinstall the Broom Motor Assembly
390
To Remove and Reinstall the Broom Lift Actuator
391
Specifications
393
Sweep System, Side Broom
394
Functional Description
394
Overview
394
Side Broom System Wiring Diagram
395
Side Broom Actuator Motor
395
Circuit Description
396
Component Locations
397
Side Brooms
397
Side Broom Motor Assemblies
397
Side Broom Actuator
397
Maintenance and Adjustments
398
To Remove and Reinstall a Side Broom
398
Inspecting/Replacing Side Broom Motor Carbon Brushes
399
Troubleshooting
401
Removal and Installation
402
To Remove and Reinstall a Side Broom Motor Assembly
402
To Remove and Reinstall a Side Broom Hub Assembly
404
To Remove and Reinstall the Side Broom Actuator
404
Specifications
407
Special Tools
407
Wheel System, Traction
408
Functional Description
408
Drive Pedal
408
Drive Controller
408
Drive Wheel Motor
409
Gear Box
409
Circuit Description
409
Powering up the Drive Controller
410
Drive Pedal Sensor
410
CAN Bus
413
Component Locations
414
Maintenance and Adjustments
415
Drive Controller
415
Drive Pedal Position Sensor
415
Gear Box
415
Troubleshooting
416
Fault Codes
416
Summary of LED Display Formats
417
Troubleshooting Chart
418
Fault History
428
Removal and Installation
429
Drive Pedal Assembly
429
Drive Motor and Gearbox Assembly
429
Drive Wheel
433
Drive Controller
433
Specifications
434
Shop Measurements
434
Drive Controller Voltage Measurements
434
Low Current 35 Pin Connector (J4)
434
Motor U, V and W Terminal Pair Voltages
435
Motor U, V and W Terminal Pair Frequency
435
System Current Draw - Driving Only with no Cleaning Functions
436
Wheel Drive Contactor
436
Special Tools
436
Wheel System, Non-Traction
437
Functional Description
437
Maintenance and Adjustments
438
To Adjust the Brakes
438
Troubleshooting
439
Removal and Installation
439
To Remove and Reinstall a Wheel
439
To Remove and Reinstall a Brake and Spindle Assembly
440
Other manuals for Nilfisk-Advance CS7000
How-To Guide
3 pages
5
Based on 1 rating
Ask a question
Give review
Questions and Answers:
Need help?
Do you have a question about the Nilfisk-Advance CS7000 and is the answer not in the manual?
Ask a question
Nilfisk-Advance CS7000 Specifications
General
Brand
Nilfisk-Advance
Model
CS7000
Category
Floor Machine
Language
English
Related product manuals
Nilfisk-Advance Condor XL
102 pages
Nilfisk-Advance CMAX 28/34ST
69 pages
Nilfisk-Advance ConvertaMAX 28
67 pages
Nilfisk-Advance ecoflex CA 531
120 pages
Nilfisk-Advance Carpetriever 28
84 pages
Nilfisk-Advance Clarke EX40 18LX
56 pages
Nilfisk-Advance SC500
29 pages
Nilfisk-Advance SC8000
116 pages
Nilfisk-Advance SW4000
33 pages
Nilfisk-Advance BR 850S
82 pages
Nilfisk-Advance SR 1601 D3
140 pages
Hydro-Retriever 2800 BR700
66 pages
 Loading...