1-17
70
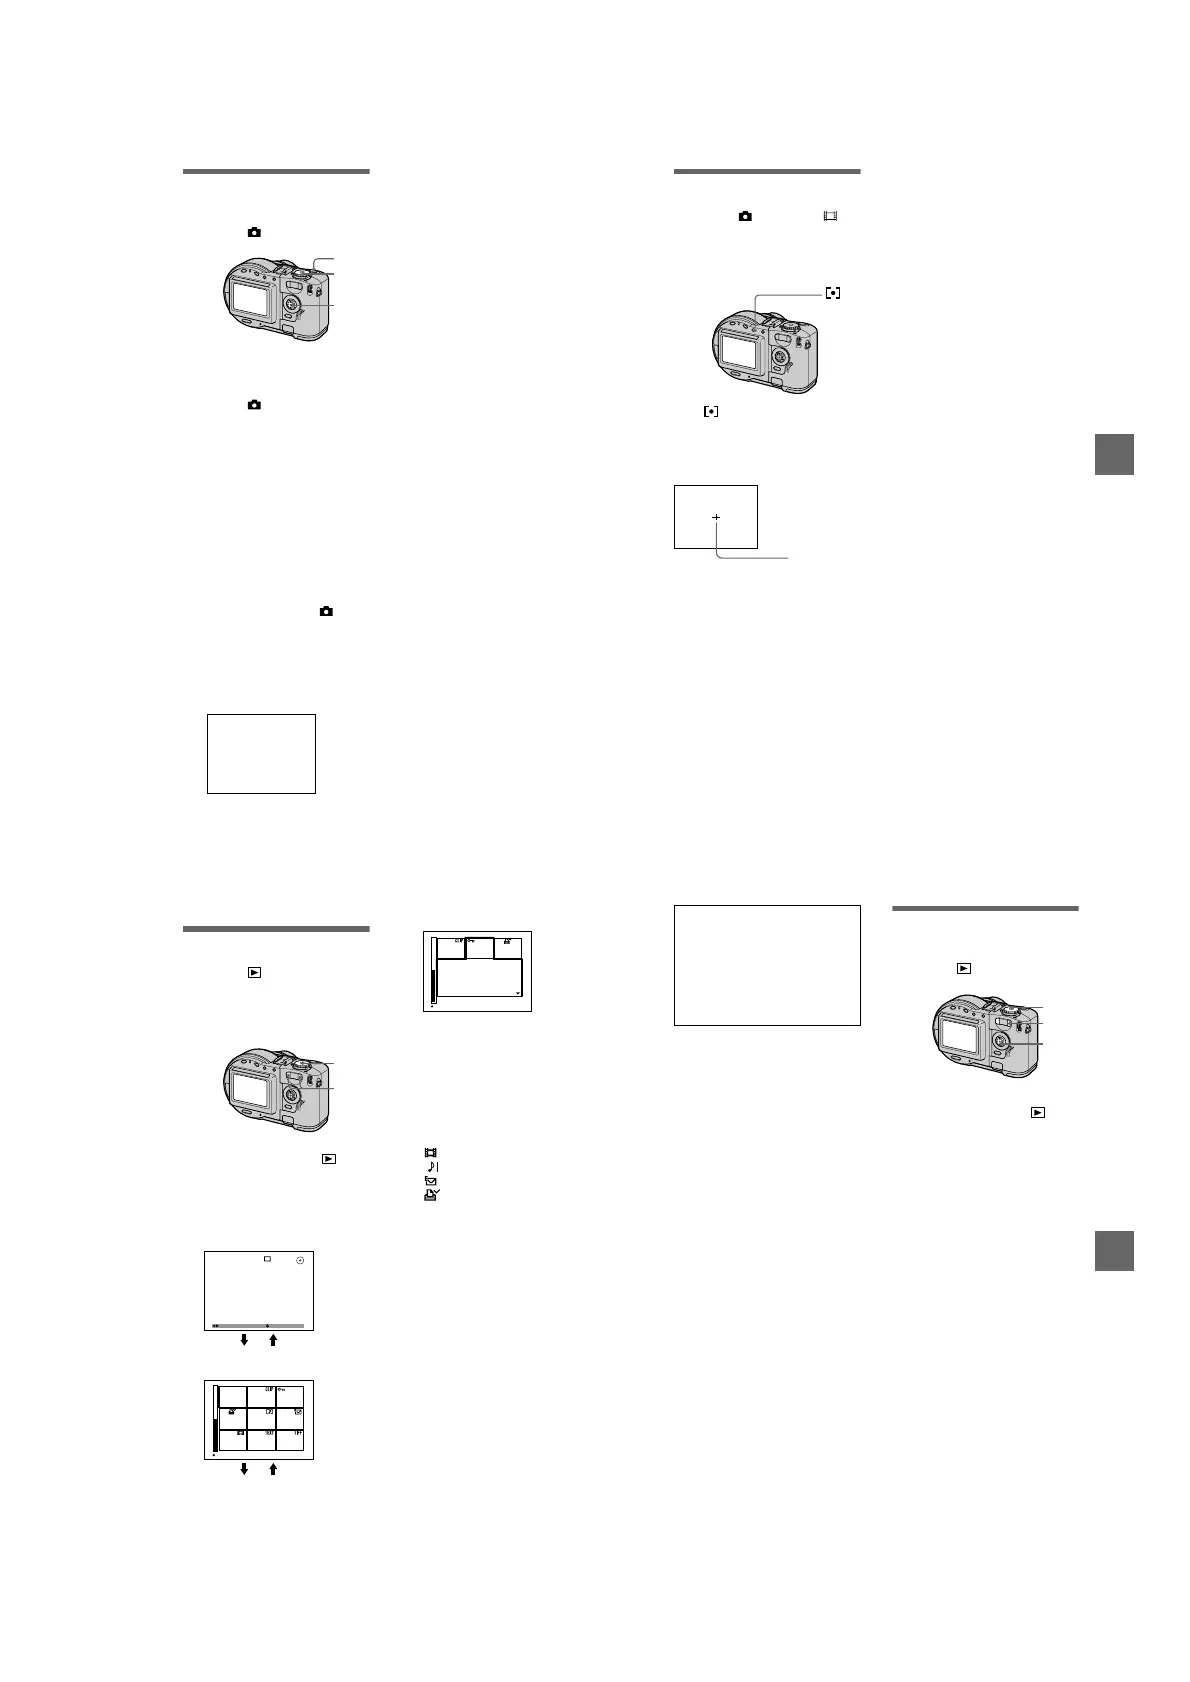
Recording the date
and time on the still
image (DATE/TIME)
Mode dial: /S/A/M/SCN
Notes
• If you select [DATE] in step 3,thedateis
imposed onto the image in the order
selected with “Setting the date and time”
(page 14).
• The date and time are not superimposed
onto Clip Motion images.
1
Set the mode dial to SET UP.
The setup screen appears.
2
Select [ ] (CAMERA) with
v
/
V
, [DATE/TIME] with
B
/
v
/
V
,
then press
B
.
3
Select the date and time
setting with
v
/
V
,thenpress
z
.
DAY & TIME
Imposes the date, hour, and
minute.
DATE
Imposes the year, month, and day.
OFF
Does not impose the date and time.
4
Set the mode dial to , S, A,
M, or SCN.
5
Record the image.
The date and time do not appear on
the LCD screen during shooting.
These appear during playback
only.
1, 4
2, 3
5
2001 7 4
B
BB
B Various recording
71
Using the Spot light-
metering function
Mode dial: /S/A/M/SCN/
Use this function when there is
backlight or when there is strong
contrast between the subject and the
background, etc.
Press to activate the spot light-
metering function. Position the point
youwanttorecordatthespotlight-
metering cross hair.
LCD screen
Spot light-
metering
cross hair
72
B
Various playback
Playing back three or
nine images at once
Mode dial:
You can display multiple images on the
LCD screen at one time using the
zoom buttons.
To display the next
(previous) index screen
Press
v
/
V
/
b
/
B
.
To return to normal playback
(single-image)
• Press the zoom T button repeatedly.
• Press
z
.
Note
When viewing an image recorded in Clip
Motion or TEXT mode on the index screen,
the image may appear different from the
actual image.
1
Set the mode dial to .
2
Press the zoom W/T buttons
repeatedly.
The LCD screen display changes
as follows:
• Single (single-image) screen
• Index (nine-image) screen
2
1
FILE BACK/NEXT VOLUME
10:30
PM
2001 7 4100-0001
1/10
1600
1600
W T
SINGLE DISPLAY
W T
• Triple-image screen
The image indicated by the yellow
frame in the index screen is
displayed in the middle of the
triple-image screen with the
recording information. To display
the other information, press
v
/
V
.
The following marks are displayed
on each image according to the
image type and settings.
: Moving image file
: VOICE mode file
: E-mail file
:Printmark
-
:Protectmark
TEXT: TEXT file
TIFF: TIFF file
CLIP:ClipMotionfile
(No mark): Normal recording (no
settings)
SINGLE DISPLAY
10:30
PM
2001 7 4100-0005
APERTURE VALUE
:
SHUTTER SPEED
:
EXPOSURE VALUE
:
F2.5
1/125
0.0
B
BB
B Various playback
73
Enlarging a part of the
still image (Zoom and
trimming)
Mode dial:
To return to the normal size
Press
z
.
To record an enlarged image
(trimming)
1
Press MENU after zooming.
2
Select [TRIMMING] with
B
,then
press
z
.
3
Select the image size with
v
/
V
,
then press
z
.
The image is recorded and the
image on the LCD screen returns
to the normal size after recording.
Tip
When the triple-image screen is
displayed, pressing MENU opens the
menu including [PRINT], [PROTECT],
and [DELETE]. For details on items, see
pages 77, 78, and 81. To close the menu,
press MENU again. The menu disappears
and the recording information is
indicated.
1
Setthemodedialto .
2
Displaytheimagetobe
enlarged.
3
Zoom in the image with the
zoom T button.
4
Press
v
/
V
/
b
/
B
repeatedly to
select the desired portion of
the image.
v
: The image moves downward
V
: The image moves upward
b
: The image moves rightward
B
: The image moves leftward
1
3
4

 Loading...