EasyManua.ls Logo

Sony RM-IP500 User Manual

Sony RM-IP500
86 pages
To Next Page IconTo Next Page
To Previous Page IconTo Previous Page
Page #43 background imageLoading...
Page #43 background image
43
This setting sets the item to which the auto
exposure command is sent when the AE button
light is switched on. Some items may not switch
to automatic adjustment depending on the
status of the camera.
Example:
When a lens that does not support auto iris
ad
justment is attached
When the ND filter is set to preset mode or
CLEA
R
Prepare the camera beforehand. For details, refer
to
the Help Guide of the camera.
You can also switch between automatic and
ma
nual operation for each item regardless of this
setting. For details, see “Setting Specific
Functions using Shortcuts (ILME-FR7)” (page 60).
Adjusting the white balance
1
Select the target camera to control.
For details about selection, see “Selecting a
Camera” (page 34).
2
Press the ACTIVE button, turning it on
(button is lit), on the color adjustment
block.
To adjust the white balance
automatically (ATW (auto tracking white
balance))
You can set OPERATION >WHITE >WB MODE to
ATW in the RM menu to smoothly adjust the
white balance automatically in response to
changes in the image. Or press the WB SET
button to adjust the white balance immediately.
During ATW, you can use the C.TEMP knob and
T
INT knob to operate Offset White to shift the
hue.
For details about ATW operation and Offset
Wh
ite, refer to the Help Guide of the camera.
Note
Before using ATW, check the setting for Offset
White<ATW> in the camera menu. It is
recommended that all settings be set back to ±0
after use.
To adjust the white balance
automatically (auto white balance)
Position a white object under the same lighting
conditions as the subject you want to shoot, and
zoom in on it on the screen. (You can use a white
wall or other object.)
The white balance is adjusted against the white
obj
ect.
1
Set OPERATION >WHITE >WB MODE to
MEM.A T/T or MEM.A R/B in the RM menu.
2
Press the WB SET button to run white
balance.
The button blinks red for a few seconds, then
the
result of automatic adjustment is saved
the mode returns to manual adjustment
state.
To adjust the white balance manually
1
Set OPERATION >WHITE >WB MODE to
MEM.A T/T, MEM.A R/B, or PRESET in the
RM menu.
2
Adjust the white balance using the
C.TEMP/R-WHITE knob and TINT/B-WHITE
knob.
When WB MODE is set to PRESET, you can
ad
just the color temperature only.
When WB MODE is set to MEM.A T/T, you can
ad
just the color temperature and the tint.
When WB MODE is set to MEM.A R/B, you
c
an adjust the red and blue gain.
Adjusting the black balance
Adjust the black balance when you use a camera
for the first time or after a long time of non-use,
or if the ambient temperature of the camera has
changed significantly.
2
Manual adjust
Auto adjust

Table of Contents

Question and Answer IconNeed help?

Do you have a question about the Sony RM-IP500 and is the answer not in the manual?

Sony RM-IP500 Specifications

General IconGeneral
InterfaceWired
Product colorBlack
Brand compatibilitySony
Remote control proper use-
Quantity per pack1 pc(s)
Storage temperature (T-T)-20 - 60 °C
Operating temperature (T-T)0 - 40 °C
Built-in displayYes
Maximum range- m
I/O portsRJ-45, D-Sub 15-pin, DC
RechargeableNo
Harmonized System (HS) code85299097
Weight and Dimensions IconWeight and Dimensions
Depth224.1 mm
Width306 mm
Height159.3 mm
Weight2400 g

Summary

Introduction and Features

Safety Regulations

Important points for safe unit operation.

Operating Instructions

Describes unit parts, installation, connection, and operation.

Panel Sheet for ILME-FR7

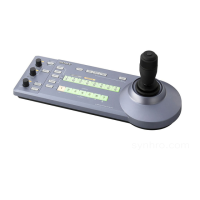
Panel sheet with function names for ILME-FR7 camera.

Product Features Overview

Highlights system construction, design, and operation capabilities.

Location and Function of Parts

Top Panel Controls

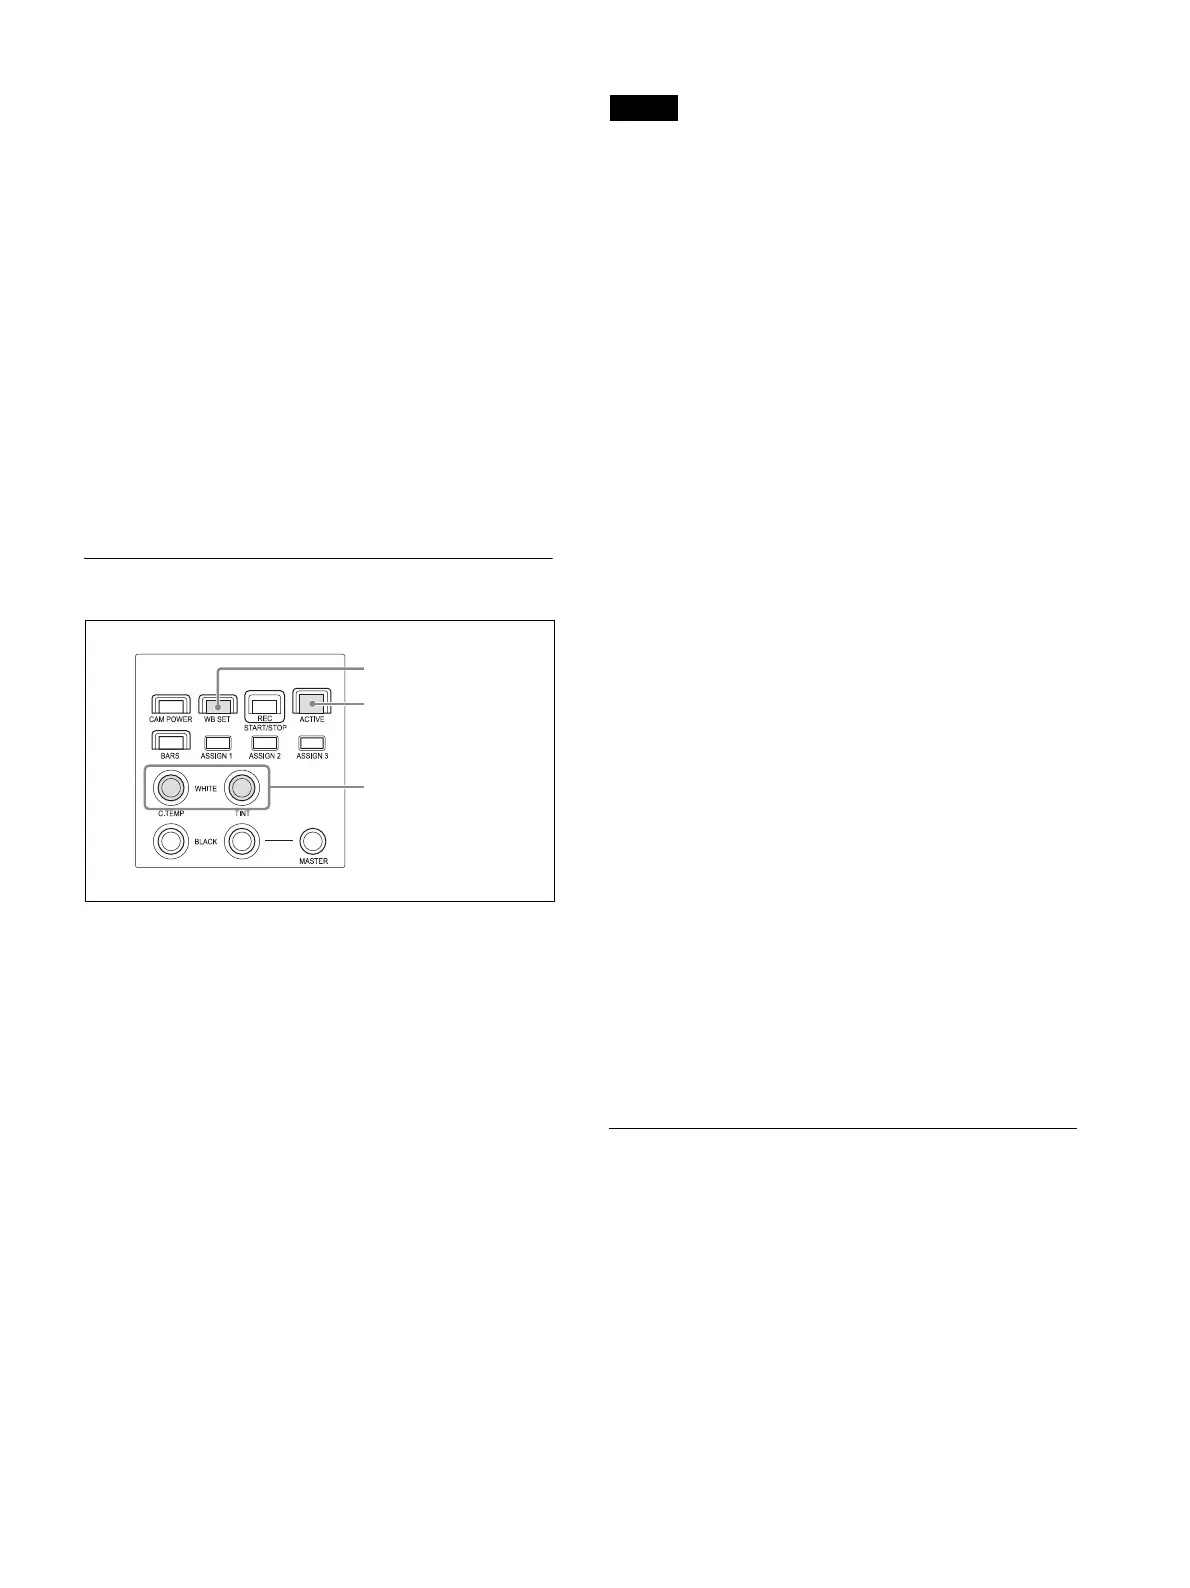
Layout and function of controls on the top panel.

Color Adjustment Block

Controls for adjusting camera color parameters.

Menu Control Block

Buttons for navigating and operating menus.

Camera Selection Block

Controls for selecting the target camera.

Lens Control Block

Controls for lens adjustments like iris, focus, and zoom.

Preset Memory Control Block

Controls for storing and recalling camera status.

Joystick Control Block

Joystick for pan, tilt, and zoom camera movements.

Rear Panel Connectors

Description of rear panel ports like LAN and power input.

Side/Front Panel Details

Information on screw holes and protective covers.

Menu Operations and Basic Navigation

RM Menu Operations

How to use the RM menu for configuration.

Camera Menu Operations

Accessing camera setup menus via the unit.

FUNCTION Menu Operations

Using shortcuts for specific function settings.

Basic RM Menu Navigation Steps

Step-by-step guide for RM menu operations.

Connection and Setup Procedures

VISCA Over IP (LAN) Connection

Setup for connecting via LAN network.

Setting the Unit's IP Address

Procedure to configure the unit's network IP address.

VISCA RS-422 Serial Connection

Setup for connecting via serial communication.

Configuring Serial Connection

Steps to set up serial communication and baud rate.

Network Configuration and Camera Management

LAN Connection Setup Example

Illustrates a typical network setup with cameras and PCs.

Assigning Cameras via AUTO IP SETUP

Automatic assignment of IP addresses and camera numbers.

Managing Camera Assignments

Adding, clearing, and swapping camera information.

PC Interaction and Firmware Updates

Using a Setup PC

Saving, restoring settings, and updating firmware via PC.

Accessing the Remote Controller

Procedures for backing up, restoring, and updating.

Updating the Firmware

Step-by-step process for firmware updates.

RM-IP Setup Tool Utility

Software tool for controller configuration.

General Operations and Camera Control

Powering Unit and Cameras On/Off

Procedures for turning the unit and cameras on and off.

Selecting and Controlling Cameras

Methods for selecting cameras via LAN and serial connections.

Pan, Tilt, and Zoom Camera Control

Operating camera pan, tilt, and zoom movements.

Camera Adjustments and Settings

Focus and Brightness Adjustment

Procedures for adjusting focus and brightness.

Exposure, White, and Black Balance

Adjusting exposure, white balance, and black balance.

Picture Quality Adjustments

Controls for backlight, flicker, detail, and other picture settings.

ILME-FR7 Specific Adjustments

Iris, ISO/gain, shutter, ND filter, and exposure adjustments for ILME-FR7.

Advanced Functions and Customization

Video Recording to Memory Card

Recording video clips to the camera's memory card.

Storing Camera Status (Preset Function)

Saving and recalling camera settings like position and zoom.

Trace Function: Recording Movements

Recording and playing back camera pan/tilt/zoom movements.

Assigning Functions to Buttons

Customizing buttons for specific camera functions.

Recommended ILME-FR7 Settings

Pre-configured settings for efficient operation.

Menu System and Shortcuts

Setting Specific Functions via Shortcuts (Excluding ILME-FR7)

Quick access to functions using IRIS, GAIN, SHUTTER, ASSIGN buttons.

Adjusting Detail, Knee, and Audio Level

Using ASSIGN buttons for specific parameter adjustments.

Status Checks, Maintenance, and Troubleshooting

Checking Camera Settings Status

Displaying current camera iris, gain, shutter, and zoom status.

Restoring Factory Default Settings

Resetting all unit settings to their original defaults.

Troubleshooting Common Issues

Solutions for common operational problems and symptoms.

LCD Panel Messages Guide

Explanations and remedies for warning and error messages.

Specifications and Licensing

Technical Specifications

Details on connectors, power, dimensions, and mass.

Pin Assignments Information

Pinout diagrams for RS-422 and GPI I/O connectors.

Software Licenses

Licensing terms for included software components.

Related product manuals