46
Each time you press an assign button, the
preset mode switches between MODE1/
MODE2 and TRACE. MODE1 is selected when
“PRST:MODE1” is displayed on the LCD panel.
MODE2 is selected when “PRST:MODE2” is
displayed.
Not displayed on cameras that do not
sup
port switching the preset mode.
For details about function assignments to
assig
n buttons, see “Assigning Functions to
Assign Buttons” (page 51).
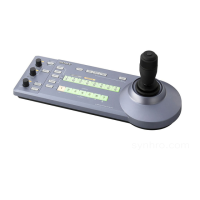
3
Operate the joystick to pan/tilt the
orientation of the camera.
4
Perform zoom, focus, backlight
compensation, flicker compensation, and
white/black balance adjustments, as
required.
5
Check that the DIRECT RECALL button is
off.
If the button is on (button lit yellow), turn it
o
ff (button not lit).
6
Enter the preset number you want to store.
Use the PRESET 10/0 button to enter a “0”
di
git.
The maximum number that can be saved
v
aries depending on the camera.
The preset number is displayed at the
b
ottom right on the LCD panel of the menu
control block.
7
Press and hold the STORE button.
The camera status is stored in the memory of
the
camera.
The preset number at the bottom right of the
L
CD panel is displayed highlighted, and
storing is completed when the display
disappears.
After registering a preset, we recommend
that you c
heck that the camera status is
stored correctly by recalling the preset.
Recalling stored status
There are two methods for recalling stored
status: direct recall and number recall.
Pressing and holding the CLEAR button cancels
the
recall operation and stops the camera at its
current position.
Direct recall
With the DIRECT RECALL button on (button is lit
yellow), press the PRESET 1 to PRESET 10/0
buttons to recall preset numbers 1 to 10.
Only preset numbers 1 to 10 can
be recalled using
direct recall.
Number recall
With the DIRECT RECALL button off (button is not
lit), enter the preset number using the PRESET 1
to PRESET 10/0 buttons, in the same way as
when storing a preset, and then press the
RECALL button.
In this method, the entered preset number is
d
isplayed at the bottom right on the LCD panel of
the menu control block.
Preset numbers 1 to 100 can be recalled using
n
umber recall.
Changing the speed of movement
between positions
1
Check that the DIRECT RECALL button is
off.
If the button is on (button lit yellow), turn it
o
ff (button not lit).
2
Select a camera, and recall the position
you want to change.
3
Set the speed using OPERATION >OTHER
>PRST SPEED in the RM menu.
4
Press and hold the STORE button.
Note
Subsequently when a preset is stored, the speed
of movement between positions changes to the
value set in step 3.

 Loading...