Home
KTM
Motorcycle
690 Enduro EU 2010
KTM 690 Enduro EU 2010 User Manual
4
of 1
of 1 rating
265 pages
Give review
Manual
Specs
To Next Page
To Next Page
To Previous Page
To Previous Page
Loading...
07/FUEL
TAN
K,
SEAT,
TRIM
71
300563-10
–
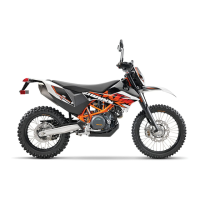
Lift
the
rear
fairing.
–
Mount
and
tighten
screws
.
Guideline
Screw,
main
silencer
holder
on
fuel
tank
M8
25
Nm
(18.4
lbf
ft)
Loctite
®
243™
300562-10
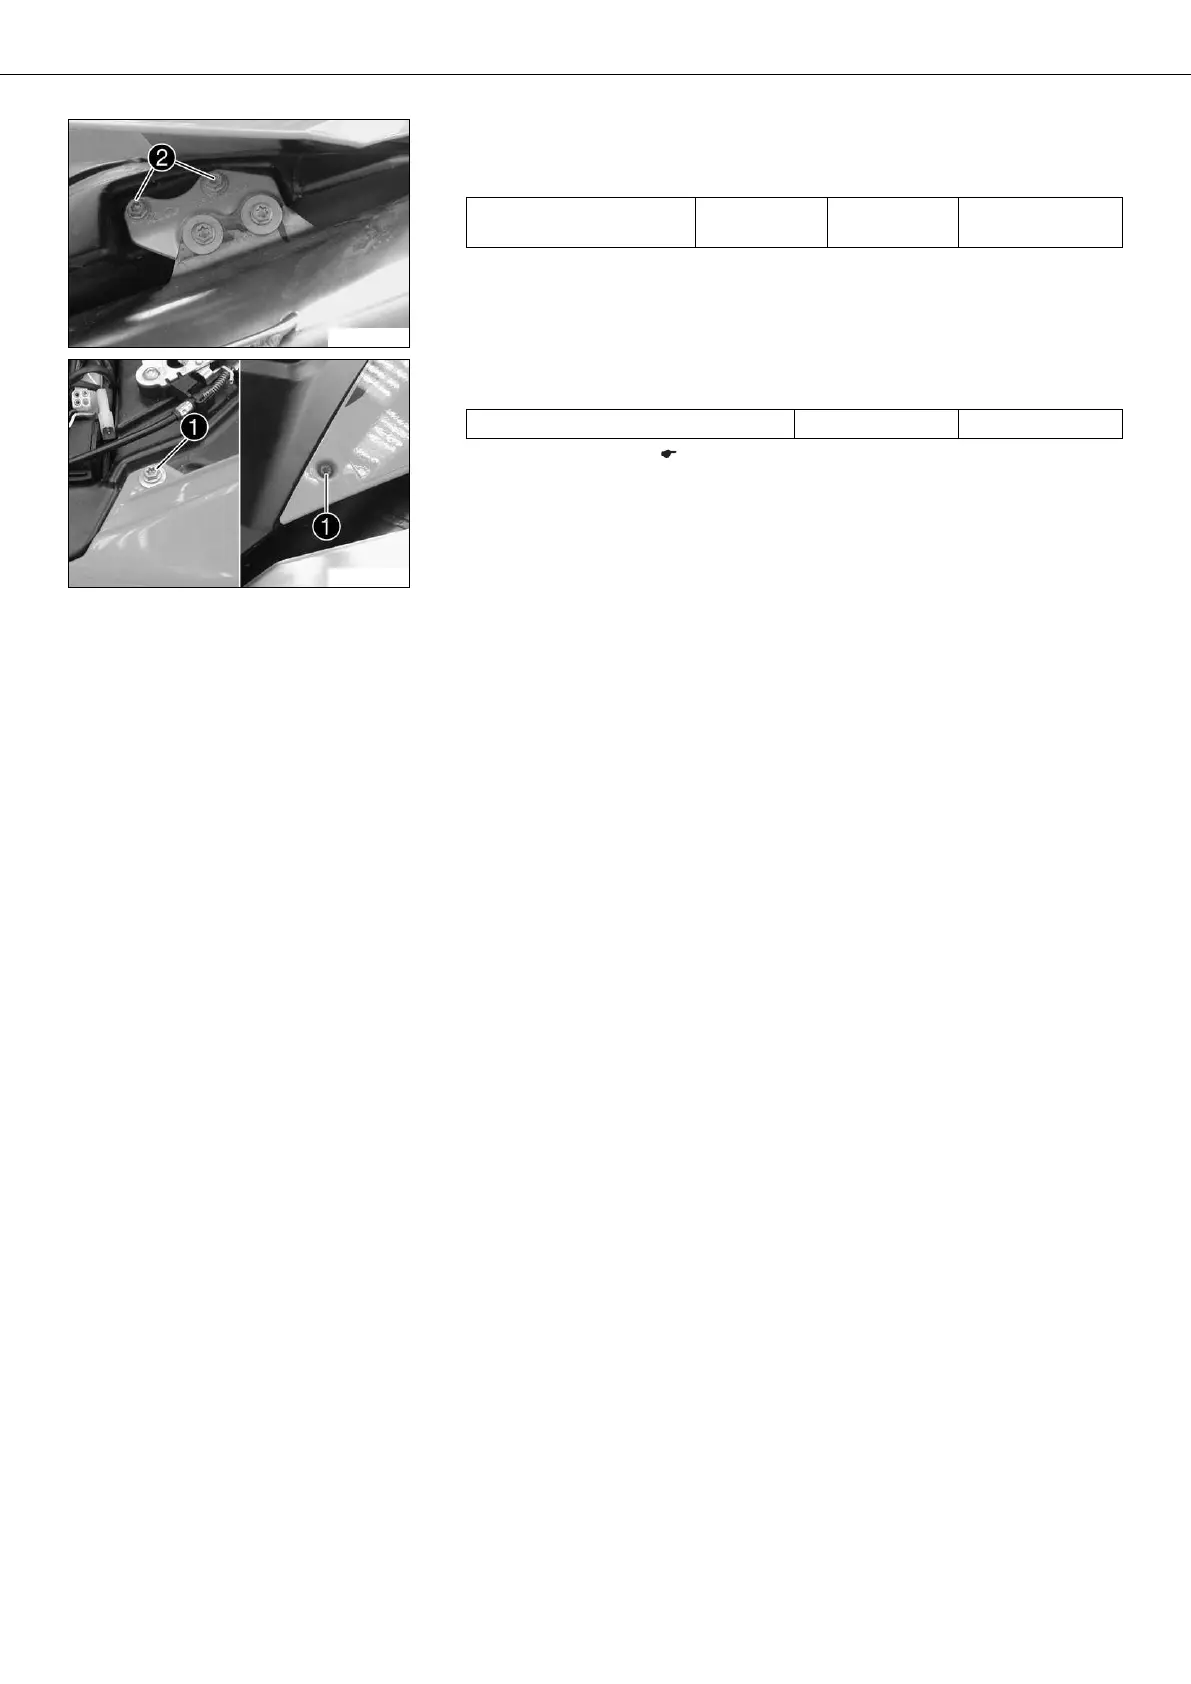
–
Mount
and
tighten
screws
.
Guideline
Screw,
side
cover
M5
2
N
m
(1.
5
lbf
ft)
–
Disconnect
the
battery.
(
p.
82)
72
74
Table of Contents
Table of Contents
4
Means of Representation
7
Important Notes
8
Location of Serial Numbers
9
Chassis Number/Type Label (690 Enduro, 690 Enduro R EU, 690 Enduro R AUS/UK)
9
Chassis Number/Type Label (690 Enduro R USA)
9
Key Number
9
Engine Number
9
Fork Part Number
10
Shock Absorber Part Number
10
Motorcycle
11
Raising the Motorcycle with the Lift Stand
11
Removing the Motorcycle from the Lift Stand
11
Raising the Motorcycle with the Work Stand
11
Removing the Motorcycle from the Work Stand
12
Starting
12
Starting the Motorcycle to Make Checks
13
01/Fork, Triple Clamp
14
Adjusting the Compression Damping of the Fork
14
Adjusting the Rebound Damping of the Fork
14
Bleeding the Fork Legs
15
Cleaning the Dust Boots of the Fork Legs
15
Loosening the Fork Protection
16
Positioning the Fork Protection
16
Removing Fork Legs
17
Installing the Fork Legs
18
Servicing the Fork
19
Disassembling the Fork Legs
20
Disassembling the Cartridge
22
Disassembling the Tap Compression
24
Checking the Fork Legs (690 Enduro)
25
Checking the Fork Legs (690 Enduro R)
26
Assembling the Tap Compression
27
Assembling the Cartridge
28
Assembling the Fork Legs (690 Enduro)
29
Assembling the Fork Legs (690 Enduro R)
33
Checking the Steering Head Bearing Play
37
Adjusting the Play of the Steering Head Bearing
37
02/Handlebar, Instruments
39
Handlebar Position
39
Adjusting Handlebar Position
39
Checking the Play in the Throttle Cable
39
Adjusting the Play in the Throttle Cable
40
03/Frame
41
Removing the Engine Guard
41
Installing the Engine Guard
41
04/Shock Absorber, Swingarm
42
Adjusting the High-Speed Compression Damping of the Shock Absorber
42
Adjusting the Low-Speed Compression Damping of the Shock Absorber
42
Adjusting the Rebound Damping of the Shock Absorber
43
Measuring the Unloaded Rear Wheel Sag
44
Checking the Static Sag of the Shock Absorber
44
Checking the Riding Sag of the Shock Absorber
44
Adjusting the Spring Preload of the Shock Absorber
45
Adjusting the Riding Sag
45
Removing the Shock Absorber
46
04/Shock Absorber, Swingarm
47
Installing the Shock Absorber
47
Removing the Spring
48
Servicing the Shock Absorber
48
Dismantling the Damper
49
Disassembling the Piston Rod
50
Checking the Damper
51
Removing the Heim Joint
52
Installing the Heim Joint
53
Assembling the Piston Rod
54
Assembling the Damper
55
Guideline
55
Mount and Tighten Screw
55
Bleeding and Filling the Damper
57
Filling the Damper with Nitrogen
59
Installing the Spring
60
05/Exhaust
61
Removing the Exhaust Manifold
61
Installing Exhaust Manifold
61
Removing the Main Silencer
62
Tighten Screw
62
Guideline
62
Installing the Main Silencer
63
06/Air Filter
65
Removing the Air Filter
65
Installing the Air Filter
65
Removing the Air Filter Box
65
Installing the Air Filter Box
66
07/Fuel Tank, Seat, Trim
68
Opening Filler Cap
68
Closing Filler Cap
68
Removing the Seat
68
Mounting the Seat
68
Taking off the Side Cover
69
Mounting the Side Cover
69
Checking the Fuel Pressure
69
Changing the Fuel Filter
70
Mount and Tighten Screw Guideline Screw, Fuel Tank, Bottom
72
Screw, Fuel Tank, Bottom M8
72
Repeat the Operation on the Opposite Side
72
Lift the Rear Fairing
73
Mount and Tighten Screws . Guideline Screw, Main Silencer M8
73
Holder on Fuel Tank
73
Loctite
73
09/Front Wheel
74
Removing the Front Wheel
74
Installing the Front Wheel
74
Checking the Tire Air Pressure
75
Checking the Tire Condition
75
Checking the Brake Discs
76
10/Rear Wheel
77
Removing Rear Wheel
77
Installing the Rear Wheel
77
Checking the Chain Tension
78
Adjusting the Chain Tension
78
Adjusting Chain Guide
79
Checking the Chain, Rear Sprocket and Engine Sprocket
79
Cleaning the Chain
80
Checking the Rear Hub Rubber Dampers
81
Checking the Spoke Tension
81
Checking the Rim Run-Out
82
11/Wiring Harness, Battery
83
Removing the Battery
83
Installing the Battery
83
Disconnecting the Battery
83
Connecting the Battery
84
Recharging the Battery
84
Checking the Charging Voltage
85
Changing the Main Fuse
85
Changing Fuses of Individual Power Consumers
86
Adjusting the Engine Characteristic
87
13/Brake System
88
Checking the Front Brake Linings
88
Changing the Front Brake Linings
88
Checking the Free Travel of the Hand Brake Lever
90
Adjusting the Free Travel of the Hand Brake Lever
90
Checking the Front Brake Fluid Level
90
Adding Front Brake Fluid
91
Changing the Front Brake Fluid
91
Checking the Rear Brake Linings
92
Changing Rear Brake Linings
93
Checking the Free Travel of Foot Brake Lever
94
Adjusting the Basic Position of the Foot Brake Lever
94
Checking Rear Brake Fluid Level
95
Adding Rear Brake Fluid
95
Changing the Rear Brake Fluid
96
14/Light System, Instruments
98
Setting Kilometers or Miles
98
Setting the Clock
98
Combination Instrument - Setting/Resetting TRIP 1
99
Combination Instrument - Setting/Resetting TRIP 2
99
Combination Instrument - Setting the Wheel Circumference (690 Enduro)
100
Checking the Headlight Setting
100
Adjusting the Headlight Range
101
Removing the Headlight Mask with the Headlight
101
Installing the Headlight Mask with the Headlight
102
Changing the Parking Light Bulb
103
Changing the Headlight Bulb
104
Changing the Turn Signal Bulb
105
30/Engine
106
Removing the Engine
106
Installing the Engine
108
30/Disassembling the Engine
112
Clamping Engine into Engine Work Stand
112
Draining the Engine Oil
112
Removing Starter Motor
112
Removing Valve Cover
112
Removing the Alternator Cover
113
Removing Spacer
113
Removing Gear Position Sensor
113
Removing Oil Filter
113
Removing Thermostat
114
Setting Engine to Ignition Top Dead Center
114
Removing Water Pump Wheel
114
Removing Clutch Cover
115
Removing Spacer and Spring
115
Removing Spark Plug
115
Removing Timing Chain Tensioner
116
Removing Camshafts
116
Removing Cylinder Head
116
Removing Piston
116
Removing Rotor
117
Removing Timing Chain Rails
117
Removing Timing Chain and Timing Chain Sprocket
118
Removing Crankshaft Position Sensor
118
Removing Clutch Cage
118
Removing Primary Gear
120
Removing Starter Drive
120
Removing Shift Shaft
120
Removing Shift Drum Locating
120
Removing Locking Lever
121
Removing Oil Pumps
121
Removing Left Engine Case
121
Removing Crankshaft and Balancer Shaft
122
Removing Transmission Shafts
122
30/Engine - Work on Individual Parts
124
Work on the Right Section of the Engine Case
124
Work on the Left Section of the Engine Case
125
Work on the Clutch Cover
126
Removing Crankshaft Bearing Inner Ring
127
Removing Balancer Shaft Drive Wheel
127
Changing the Conrod Bearing
127
Checking Crankshaft Run-Out at Bearing Pin
129
Installing Balancer Shaft Drive Wheel
129
Installing Crankshaft Bearing Inner Ring
129
Measuring Axial Clearance of Crankshaft and Balancer Shaft
130
Cylinder - Nikasil Coating
130
Checking/Measuring the Cylinder
131
Checking/Measuring the Piston
131
Checking Piston Ring End Gap
132
Checking Piston/Cylinder Mounting Clearance
133
Checking Oil Pumps for Wear
133
Replacing Autodecompressor
133
Preparing Timing Chain Tensioner for Installation
134
Checking Timing Assembly
135
Removing Rocker Arm
135
Changing Camshaft Bearing
135
Removing Valves
136
Checking Valves
137
Checking Valve Springs
137
Checking Valve Spring Retainer
137
Checking Cylinder Head
137
Installing Valves
138
Installing Rocker Arm
139
Dismantling Antihopping Clutch
139
Checking the Clutch
140
Preassembling Antihopping Clutch
141
Checking Shift Mechanism
142
Preassembling Shift Shaft
142
Disassembling the Main Shaft
143
Dismantling Countershaft
144
Checking the Transmission
145
Assembling the Main Shaft
147
Assembling Countershaft
148
Checking Electric Starter Drive
149
Removing Freewheel
150
Checking Freewheel
150
Installing Freewheel
151
30/Assembling the Engine
152
Installing Transmission Shafts
152
Installing Crankshaft and Balancer Shaft
153
Installing Left Engine Case
153
Installing Oil Pumps
154
Installing Locking Lever
154
Installing Shift Drum Locating
154
Installing Shift Shaft
155
Installing Starter Drive
155
Installing Primary Gear
155
Installing Clutch Cage
156
Installing Crankshaft Position Sensor
157
Installing Timing Chain and Timing Chain Sprocket
157
Installing Timing Chain Rails
158
Installing Rotor
158
Adjusting Crankshaft Position Sensor Distance
158
Setting Engine to Top Dead Center
159
Installing Piston
159
Installing Cylinder Head
160
Installing Camshafts
161
Installing Timing Chain Tensioner
161
Checking Valve Clearance
162
Adjusting Valve Clearance
162
Installing Spark Plug
163
Installing Spacer and Spring
163
Installing Clutch Cover
163
Mounting Water Pump Cover
164
Installing Thermostat
164
Installing the Oil Filter
164
Installing Gear Position Sensor
165
Installing the Spacer
165
Installing Oil Screens
166
Installing Alternator Cover
166
Installing Starter Motor
167
Installing Valve Cover
167
Taking Engine off Universal Mounting Rack
167
32/Clutch
168
Checking/Rectifying the Fluid Level of the Hydraulic Clutch
168
35/Water Pump, Cooling System
169
Draining the Coolant
169
Filling the Cooling System
169
Checking the Antifreeze and Coolant Level
170
Checking the Coolant Level
171
38/Lubrication System
172
Oil Circuit
172
Checking the Engine Oil Level
172
Checking the Engine Oil Pressure
173
Changing the Engine Oil and Filter, Cleaning the Oil Screens
174
Draining the Engine Oil
174
Removing the Oil Filter
175
Installing the Oil Filter
175
Cleaning the Oil Screens
176
Filling up with Engine Oil
177
Adding Engine Oil
177
39/Ignition System
178
Alternator - Checking the Stator Winding
178
Checking the Spark Plug Connector
178
Ignition Coil - Checking the Secondary Winding
179
41/Throttle Valve Body
180
Checking the Basic Setting of the Motor Drive
180
Adjusting the Basic Setting of the Motor Drive
181
Flashing the EFI Control Unit And/Or the EPT Control Unit
184
Requesting the Enabling Code
185
Coding the EFI Control Unit And/Or EPT Control Unit
186
Technical Data - Engine
188
Capacity - Engine Oil
188
Capacity - Coolant
188
Technical Data - Tolerance, Wear Limits of Engine
189
Technical Data - Engine Tightening Torques
191
Technical Data - Chassis
193
Lighting Equipment
194
Capacity - Fuel
194
Technical Data - Fork
195
690 Enduro
195
690 Enduro R
195
Technical Data - Shock Absorber
196
690 Enduro
196
690 Enduro R
196
Technical Data - Chassis Tightening Torques
198
Cleaning/Protective Treatment
200
Cleaning the Motorcycle
200
Protective Treatment for Winter Operation
201
Storage
202
Putting into Operation after Storage
202
Service Schedule
203
Wiring Diagram
204
690 Enduro)
204
690 Enduro)
206
690 Enduro)
208
690 Enduro)
210
690 Enduro)
212
690 Enduro)
214
690 Enduro)
216
690 Enduro)
218
690 Enduro)
220
690 Enduro)
222
690 Enduro R)
224
690 Enduro R)
226
690 Enduro R)
228
690 Enduro R)
230
690 Enduro R)
232
690 Enduro R)
234
690 Enduro R)
236
690 Enduro R)
238
690 Enduro R)
240
690 Enduro R)
242
Substances
244
Auxiliary Substances
246
Special Tools
248
Standards
260
Index
261
Other manuals for KTM 690 Enduro EU 2010
Setup Instructions
18 pages
4
Based on 1 rating
Ask a question
Give review
Questions and Answers:
Need help?
Do you have a question about the KTM 690 Enduro EU 2010 and is the answer not in the manual?
Ask a question
KTM 690 Enduro EU 2010 Specifications
General
Brand
KTM
Model
690 Enduro EU 2010
Category
Motorcycle
Language
English
Related product manuals
KTM 690 Enduro R EU 2013
234 pages
KTM 2014 690 Enduro R EU
207 pages
KTM 690 Enduro R EU 2012
234 pages
KTM 690 ENDURO EU 2009
181 pages
KTM 690 ENDURO EU 2008
231 pages
KTM 690 ENDURO EU
179 pages
KTM 690 Enduro R EU
190 pages
KTM 690 Enduro R USA 2010
265 pages
KTM 690 Enduro R
212 pages
KTM 690 Enduro R 2019
274 pages
KTM 690 Enduro R 2021
135 pages
KTM 690 Enduro R 2018
276 pages