■ When “PLC = COMM. ERR” is displayed on the NPST-GR screen
• NPST-GR baud rate setting
In this window, you can find the baud rate as shown below:
TRNS RATE (bps) [19200 / 9600 / 4800 / 2400 / 1200 / 600 / 300 ]
Select a baud rate (19200 or 9600), press the key and select “SAVE DISK ? YES”
to register this change onto the disk.
Note:
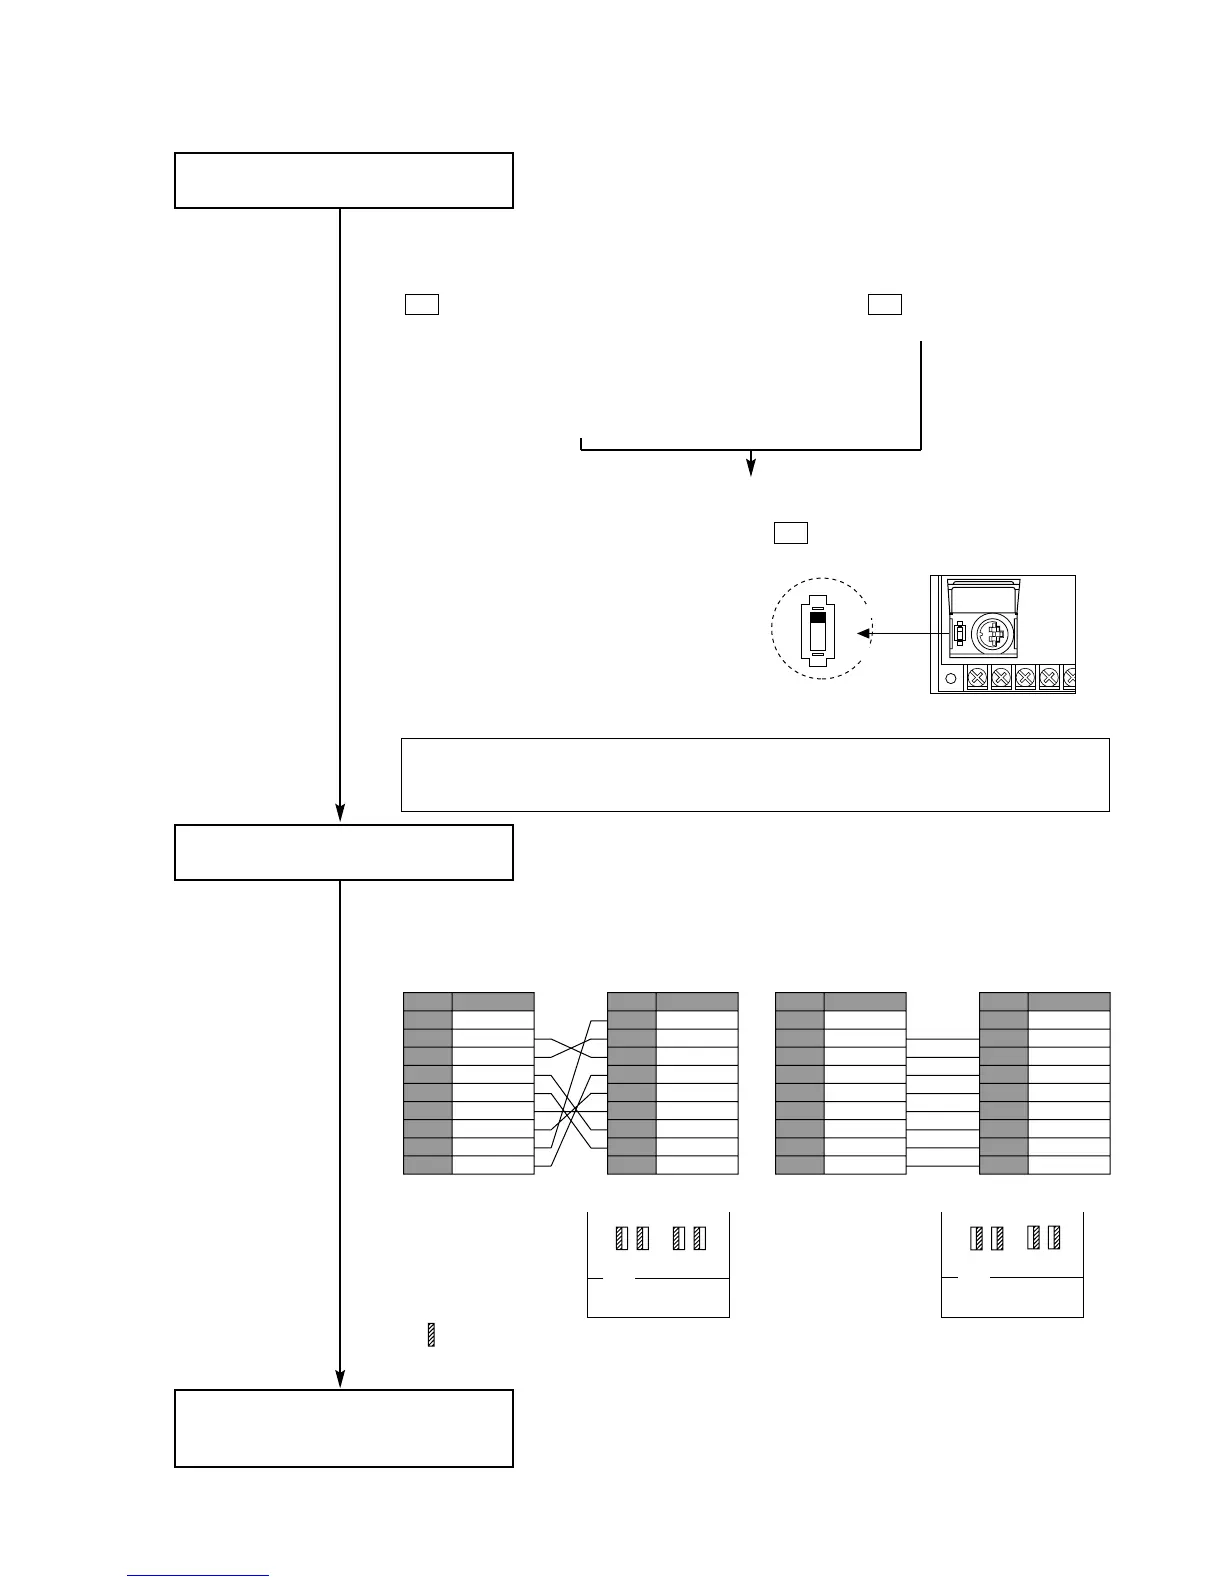
• Confirm the cable specifications, referring to the following examples:
• Confirm the RS422/232C adapter pin setting, referring to the following:
When shipped from the factory, the pins are set as shown in 1.
Confirm the setting of the personal
computer referring to the manual for
your computer.
CN1
RS232C Connector
AB
CS
RS
AB
RD AB
SDAB
: Denotes the pin position.
1 When the cables
described above
are used
CN1
RS232C Connector
AB
CS
RS
AB
RD AB
SDAB
2 When a cable with
reverse wiring
specifications is used
Pin No.
1
2
3
4
5
6
7
8
20
Abbreviation
FG
SD (TXD)
RD (RXD)
RS (RTS)
CS (CTS)
DR (DSR)
SG
CD (DCD)
ER (DTR)
Connected to
RS422/232C Adapter
(25 pins male)
Pin No.
1
2
3
4
5
6
7
8
9
Abbreviation
CD (DCD)
RD (RXD)
SD (TXD)
ER (DTR)
SG
DR (DSR)
RS (RTS)
CS (CTS)
RI (CI)
Connected to
IBM PC-AT
(9 pins female)
RS422/232C Adapter & IBM PC-AT (9 pins)
Pin No.
1
2
3
4
5
6
7
8
20
Abbreviation
FG
SD (TXD)
RD (RXD)
RS (RTS)
CS (CTS)
DR (DSR)
SG
CD (DCD)
ER (DTR)
Connected to
RS422/232C Adapter
(25 pins male)
Pin No.
1
2
3
4
5
6
7
8
20
Abbreviation
FG
SD (TXD)
RD (RXD)
RS (RTS)
CS (CTS)
DR (DSR)
SG
CD (DCD)
ER (DTR)
Connected to
Personal Computer
(25 pins male)
RS422/232C Adapter & Personal Computer (25 pins)
Check the cable and the RS422/232C
adapter.
• Even when both the NPST-GR and FP1 are set to 19200 bps, sometimes a computer
cannot communicate with the FP1 properly at 19200 bps. If this happens, change
both of their settings to 9,600 bps and try again.
19200
9600
19200bps
Baud rate selector
9600bps
• FP1 baud rate setting
Set the baud rate using the baud rate
selector inside the FP1 Control Unit.
F1
<If you are using MENU 1 screen type>
Open [NPST MENU] by pressing the
key, then select “NPST
CONFIGURATION” to skip to the
[NPST CONFIGURATION]
subwindow. In the [NPST
CONFIGURATION] subwindow, select
“1. NPST CONFIGURATION”.
<If you are using MENU 2 screen type>
Open [NPST FUNCTION MENU] by
pressing the key, then select “Z.
NPST CONFIGURATION”.
EscEsc
Check if the baud rate settings of the
FP1 and NPST-GR are the same.
214
7-2. Troubleshooting
 Loading...