Home
QuickLabel Systems
Label Maker
QL-300
QuickLabel Systems QL-300 User Manual
5
of 1
of 1 rating
485 pages
Give review
Manual
Specs
To Next Page
To Next Page
To Previous Page
To Previous Page
Loading...
Installation
QL-300 User Gu
ide
25
10
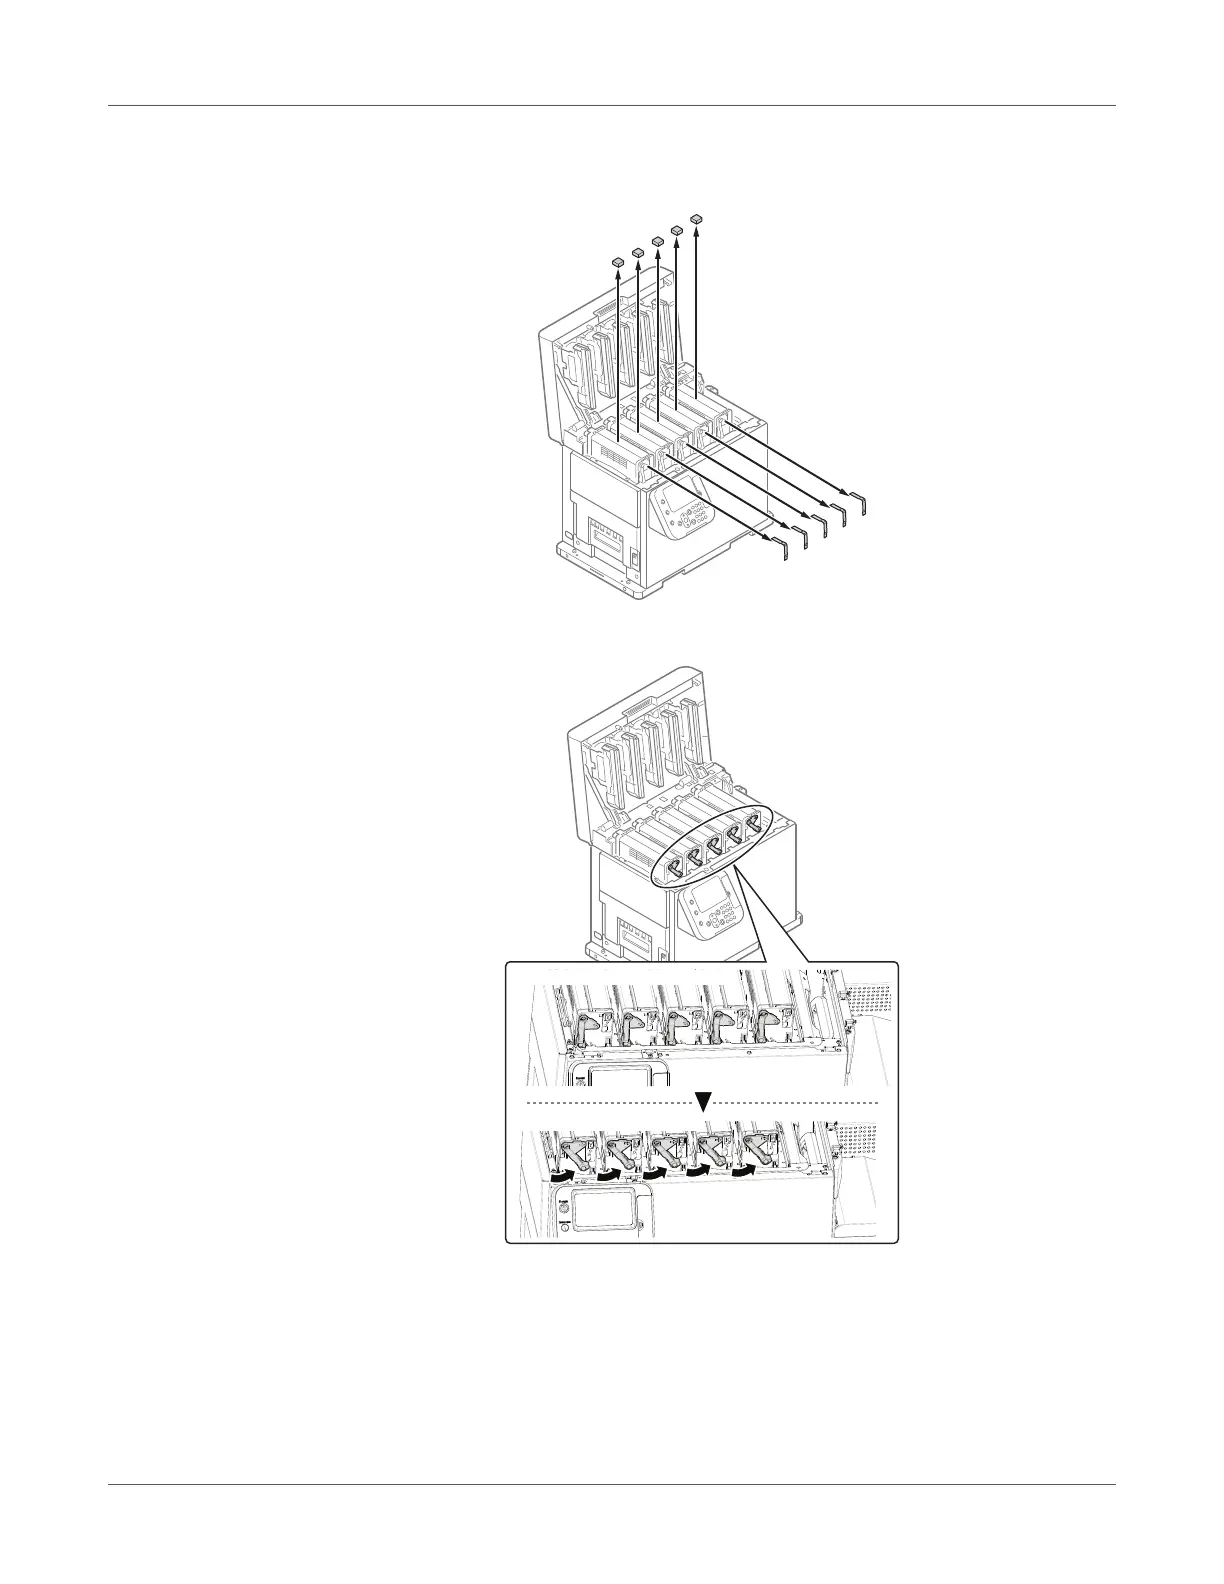
Remove the Pad-TC from the top
of the print cart
ridge, and th
en remove
the tape tha
t is
securing the lift up lever.
11
The print cartridges lift up, so turn the lift up
lever to lower the print cartridges.
Print cartridge when lifted up
Print cartridge when down
24
26
Table of Contents
Default Chapter
8
Table of Contents
8
Chapter 1: Installation
14
Checking the Product
14
Printer
14
Installation
14
Choosing an Installation Location
15
Precautions Related to Installation
15
Installation Environment
17
Installation Space
17
Unwinder
15
Unpacking
18
Unpacking Precautions
18
Unpacking the Printer
19
Unpacking the Unwinder
27
Installation
31
Installing Cable Clamps
31
Installing the Unwinder on the Printer
32
Power
35
Precautions about the Electric Power
35
Connecting a Power Cord
37
Turning on the Power
37
Turning off the Power
38
Test Printing
38
Adjusting Density and Test Printing
38
Adjusting the Position of the Sensor
40
Chapter 2: PC Connection
42
Driver Installation Process Overview
42
Connecting to a PC with a Network Connection
42
Connecting to a PC with a USB Connection
42
Operating Environment
42
PC Connection
42
Connecting Cables
43
Connecting a LAN Cable
43
Connecting a USB Cable
45
Network Connection
46
Network Setup Flow
46
Setting the Printer's IP Address on the Control Panel
47
Configuring the IP Address and Other Settings on the Computer
51
Installing the Printer Driver (Network)
54
USB Connection
57
USB Setup Flow
57
Installing the Printer Driver (USB)
58
Dealing with Setup Problems
61
Chapter 3 Part Names and Functions
62
Printer Front/Left Side
62
Printer Exit
63
Printer Interior 1
64
Printer Interior 2
65
Interface Connectors
66
Unwinder
67
Unwinder Interior
68
Chapter 4: Control Panel
69
Control Panel
69
Control Panel Overview
69
Using the Control Panel
71
Standby Screen
71
Error Screen
73
Help Screen
74
Using the Numeric Keypad
74
Function Number Input Screen
75
Function Number List
76
Chapter 5: Paper Settings
78
Paper Types, Size, and Thickness
79
Paper Settings
78
Usable Media Types
78
Storing Media
81
Registering a Desired Paper Size with the Printer Driver
82
Using the Printer Driver to Fine-Tune the Print Position
84
Using the Printer Driver to Fine-Tune the Cut Position
86
Chapter 6: Printing
89
Preparing Paper
89
Printing
89
Loading Media
91
Calibrating the Sensor
103
Confirming the Unwinder Sensor Position
104
Confirming the Printer Sensor Position
108
Sensor Calibration
118
If You Cannot Set the Sensors from the Printer Driver
121
Calibrating the Black Mark Sensor
122
Calibrating the Gap Sensor
126
Detecting the Interval between Pages
131
Detecting the Interval between Pages with the Printer Driver
131
Detecting the Interval between Pages with the Control Panel
133
Printing
133
Printing from the Windows PCL Printer Driver
133
Canceling a Print Job
134
Chapter 7 Print Function Settings
135
Printer Driver Functions Table
135
Explanation of Functions
135
Control Panel Menu Functions Table
140
Device Setup Screen
140
Configuration
140
Print Information
143
Menus
145
Admin Setup
162
Print Statistics
176
Calibration
177
Boot Menu
184
Saving Toner When Printing
186
Saving Toner When Printing (Toner Save Mode)
186
Printing Using the Specified Print Cartridge Only (Lift Up)
187
Fine Quality Printing
189
Changing Print Quality (Resolution)
189
Making Photograph Printing more VIVID (Photo Enhance)
190
Adjusting Fine Lines
191
Using Printer Fonts
192
Using Computer Fonts
193
Adjusting the Print Position on the Paper
194
Using the Roll Paper
195
Adjusting the Print Start Position
196
Other Print Functions
199
Specifying the Page Order
199
Overlaying Stamps for Printing (Watermarks)
200
Collating Printed Output (Sorted Printing)
202
Printing a Mirror Image
203
Printing Registered Forms (Print Overlay)
205
Outputting to a File Without Printing
205
Changing the Check Unnecessary Print Cartridge Setting
206
Saving Printer Driver Setups
208
Importing/Exporting a Printer Driver Print Setup
210
Changing Default Printer Driver Settings
211
Deleting or Updating a Printer Driver
212
Chapter 8 Adjusting the Color
214
Adjusting Color with a Printer Driver
227
About Color Matching
227
Color Matching (Automatic)
227
Simple Color Matching (Simple Adjustment)
228
Color Matching (Graphic Pro)
229
Color Matching (no Color Matching)
230
Changing the Black Finish
231
Monochrome (Black and White) Printing
232
Suppressing White Lines between Text and the Background (Black Overprint)
233
Correcting for Print Misalignment (Trapping)
234
Simulating Print Results
235
Adjusting Color with the Control Panel
214
Correcting Color Drift Manually
214
Configuring Settings for Auto Adjustment of Density and Gradation
215
Adjusting Density Manually
216
Fine Tuning Density Adjustments
217
Adjusting Color Balance (Density)
219
Fine-Tuning Color Balance
223
Chapter 9: Network Settings
236
Initializing Network Settings
236
Network Settings
236
Using DHCP
237
Ipv6
239
Checking the Ipv6 Address
240
Using BOOTP
239
Chapter 10: Viewing Machine Information
241
Printing Printer Setup Lists
242
Printing Printer Information Lists
243
Printing Print Lists
246
Printing Configuration Information
241
Printable Report List
241
Viewing Machine Information
241
Changing the Administrator Password
248
Checking the Print Count
250
Chapter 11: Troubleshooting
252
Checking Messages (if a Paper Jam Occurs)
253
Operating the Help Screen
255
Removing Jammed Paper
257
Frequent Paper Jams
283
Paper Jams
252
Troubleshooting
252
Troubleshooting Solutions Procedure
252
Troubleshooting When an Error Message Is Displayed
252
Troubleshooting When an Error Message Is Not Displayed
252
Messages about Paper
283
Messages about Replacing Wear Items
284
Messages about Other Issues
286
Printing Problems
294
Unable to Print
294
Printer Driver Malfunctions
299
Print Quality Is Poor
302
Paper Feed Is Poor
315
Chapter 12: Replacing Wear Items
319
Checking Service Life and Remaining Amounts of Wear Items
319
Replacing Wear Items
319
Replacing Wear Items
320
About the Service Life of Wear Items
320
When the Replacement Period Is Approaching
321
Replacing Print Cartridges
322
Replacing the Belt Unit and 2Nd Transfer Roller
326
Replacing Waste Toner Boxes
337
Replacing the Fuser and Exit Unit
348
Chapter 13: Cleaning
355
Cleaning
355
Required Materials for Cleaning
355
Cleaning Schedule
356
Cleaning the Unwinder
357
Cleaning the Surfaces of the Unwinder
357
Cleaning the Inside of the Unwinder
358
Cleaning the Printer
367
Cleaning the Surfaces of the Printer
367
Cleaning the Inside of the Printer
368
Cleaning LED Heads
387
Cleaning the Fuser Unit
390
Cleaning the Cutter Unit
392
Cleaning the Cutter Blades
392
Chapter 14: Web Utility
405
Logging in as an Administrator
405
Operating Environment
405
Starting up
405
Web Utility
405
Item List
407
View Information
407
Print Information
408
Printer Menu
408
Admin Setup
409
Calibration
410
Links
410
Changing an Administrator Password
411
Checking Printer Settings from a Computer
413
To Check Using the "Status Screen
413
To Check Using the "Status Window
414
Changing Printer Settings from a Computer
415
Encrypting Communication (SSL/TLS)
415
Configuring Settings
415
Usage Method
418
Printing with IPP
418
To Enable IPP Printing
418
To Set up the Printer as an IPP Printer (Windows)
418
Encrypting Communication (Ipsec)
420
Setup Flow
420
To Configure the Printer Setup
420
To Configure Computer Settings
424
Controlling Access by IP Address (IP Filter)
433
Controlling Access by MAC Address
436
Sending Error Notifications by Mail
439
Sending Error Notifications by Periodic Mail
442
To Send Periodic Notifications about Problems
443
To Send Alerts When Problems Occur
446
Using Snmpv3
448
Using IEEE802.1X
450
IEEE802.1X Setup Flow
450
To Configure IEEE802.1 Settings
451
To Use PEAP
452
To Use EAP-TLS
453
To Connect the Printer to an Authentication Switch
454
Appendix A: Safety
455
Cautions Related to Safety
455
Residual Risk Map
455
List of Risks
457
General Warnings and Cautions
464
Emergency First Aid
466
Appendix B: Specifications
467
Major Specifications
467
Roll Paper Specifications
470
Continuous Paper (Normal Printing)
470
Continuous Paper (Printing on Large Size Paper)
472
Continuous Paper (with Black Marks)
474
Die-Cut Label Paper
476
Die-Cut Label Paper (with Black Marks)
478
Full Sheet Labels (Normal Printing)
480
Full-Sheet Labels (Printing on Large Size Paper)
482
Full-Sheet Label Paper (with Black Marks)
484
5
Based on 1 rating
Ask a question
Give review
Questions and Answers:
Need help?
Do you have a question about the QuickLabel Systems QL-300 and is the answer not in the manual?
Ask a question
QuickLabel Systems QL-300 Specifications
General
Brand
QuickLabel Systems
Model
QL-300
Category
Label Maker
Language
English
Related product manuals
QuickLabel Systems QLS-4100
215 pages
QuickLabel Systems pronto! 486
256 pages
QuickLabel Systems pronto! 482
256 pages
 Loading...