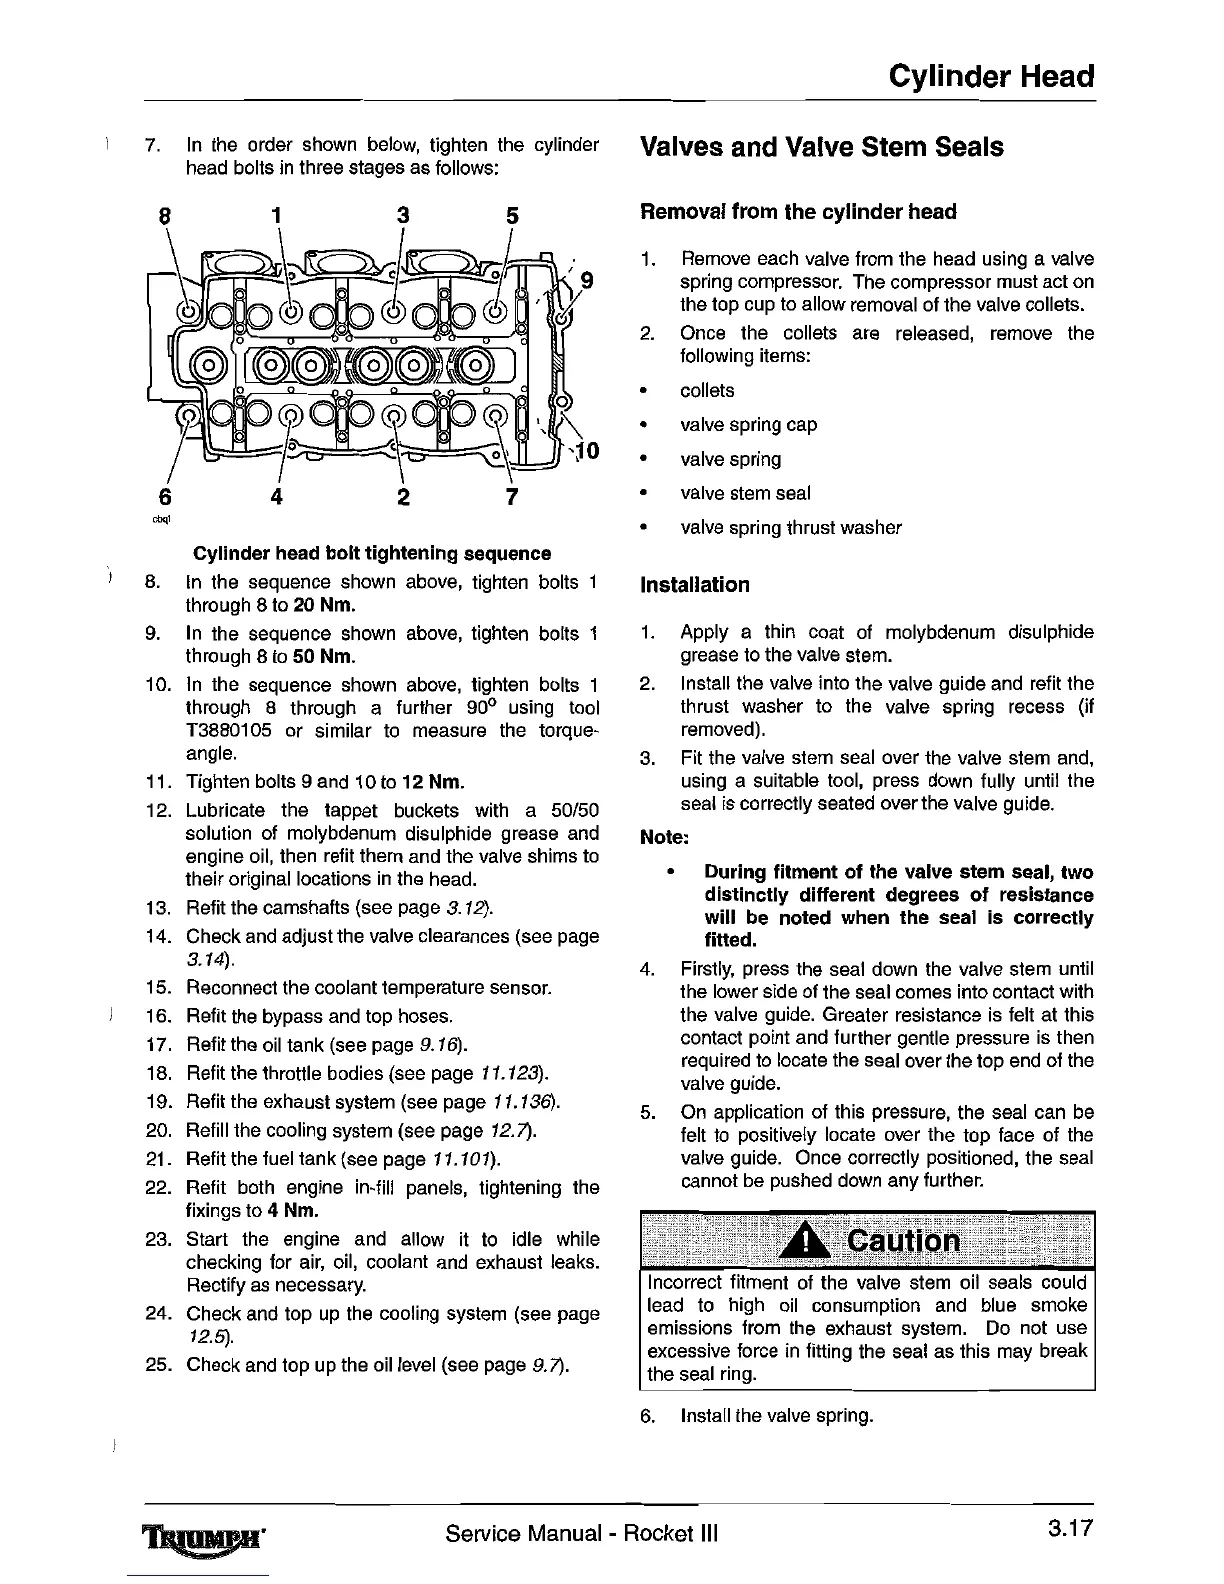
7.
In
the order
shown
below,
tighten the cylinder
head bolts
in
three stages
as
follows:
"""
Cylinder head
bolt
tightening sequence
8.
In
the sequence shown above, tighten bolts
through 8 to 20 Nm.
9.
In
the sequence
shown
above,
tighten bolts 1
through 8
to
50 Nm.
10.
In
the sequence shown
above,
tighten bolts 1
through 8 through a further 90° using tool
T3880105 or similar
to
measure
the
torque-
angle.
11. Tighten bolts 9
and
10
to 12 Nm.
12. Lubricate the tappet buckets with a
50/50
solution
of
molybdenum disulphide grease
and
engine oil, then refit them
and
the valve shims
to
their original locations
in
the
head.
13.
Refit the camshafts (see
page
3.12).
14. Check
and
adjust the valve clearances (see
page
3.14).
15. Reconnect the coolant temperature sensor.
16. Refit
the
bypass
and
top hoses.
17.
Refit the
oil
tank (see page 9.16).
18.
Refit the throttle bodies (see page
11.123).
19. Refit the exhaust system (see page 11.136).
20. Refill the cooling system (see page
12.7).
21. Refit
the
fuel tank (see page 11.101).
22.
Refit
both
engine in-fill panels, tightening the
fixings to 4 Nm.
23.
Start the engine
and
allow
it
to
idle while
checking for
air,
oil,
coolant and exhaust leaks.
Rectify
as
necessary.
24. Check
and
top
up
the
cooling system
(see
page
12.5).
25. Check
and
top
up
the oil
level
(see page
9.7).
Cylinder Head
Valves and Valve Stem Seals
Removal
from
the
cylinder
head
1.
Remove
each valve from the head using a valve
spring compressor. The compressor must act
on
the top
cup
to
allow removal
of
the valve collets.
2.
Once the collets
are
released,
remove
the
following items:
• collets
• valve spring
cap
• valve spring
• valve stem seal
• valve spring thrust washer
Installation
1.
Apply a thin coat
of
molybdenum disulphide
grease
to
the valve stem.
2.
Install the valve into the valve guide
and
refit the
thrust washer to the valve spring recess (if
removed).
3.
Fit
the
valve stem seal over the valve stem
and,
using a suitable tool, press down fully until
the
seal
is
correctly seated over the valve guide.
Note:
• During fitment
of
the valve stem seal,
two
distinctly different degrees
of
resistance
will
be noted when the seal is correctly
fitted.
4.
Firstly,
press the seal down
the
valve stem until
the lower side
of
the seal comes into contact with
the valve guide. Greater resistance
is
felt at this
contact point and further gentle pressure
is
then
required
to
locate
the
seal over the top
end
of
the
valve guide.
5.
On
application
of
this pressure, the seal
can
be
felt
to
positively locate over the top face
of
the
valve guide. Once correctly positioned, the seal
cannot
be
pushed
down
any further.
Incorrect fitment
of
the valve stem oil seals could
lead
to
high
oil
consumption
and
blue smoke
emissions from
the
exhaust system.
Do
not use
excessive
force
in
fitting the seal
as
this
may
break
the
seal
ring.
6.
Install the valve spring.
~.
Service Manual - Rocket
III
3.17
 Loading...