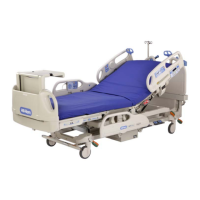
4.20 Bed Exit Switch
Chapter 4: Removal, Replacement, and Adjustment Procedures
Page 4 - 58 CareAssist® and CareAssist® ES Bed Service Manual (MAN330 REV 4)
4.20 Bed Exit Switch
Tools required: Soft faced hammer
3/32" punch
T25 Torx®
1
screwdriver
13 mm wrench
Removal
The tape switch assembly consists of two tape switches connected to a single
cable, if one tape switch is inoperable, both tape switches must be replaced.
1. Set the brakes.
2. Raise the sleep surface to a comfortable working level.
3. Raise the head section to the highest position.
Unplug the bed from its power source. Failure to do so could cause
personal injury or equipment damage.
4. Unplug the bed from its power source. Let the bed sit for 60 seconds for the
battery to time out.
5. Lower the right side siderails.
6. Using the punch, punch out the center of the four rivets (A) securing the
switch (B) to the seat section (C) (see figure 4-26 on page 4-59).
7. Remove the switch (B).
8. Using the punch, punch out the center of the four rivets (A) securing the
switch (B) to the thigh section (D).
9. Remove the switch (B).
10. Remove the seat section (C) and knee section (D).
11. Remove the two cable covers (E) from the central rail.
1. Torx® is a registered trademark of Acument Intellectual Properties, LLC.
 Loading...