109
1001108-01-F
MIDI
The MIDI (Musical Instrument Digital Interface) Setup
provides the means to use a “class compliant” USB MIDI
foot switch to control many functions of the TouchMix
mixer. This screen is not available on remote devices.
QSC has verified proper operation with these USB MIDI
foot-switches: iCON G-BOARD and Logidy UMI3
NOTE: Only On/Off commands are
supported. The mixer does not respond to
continuous controller data.
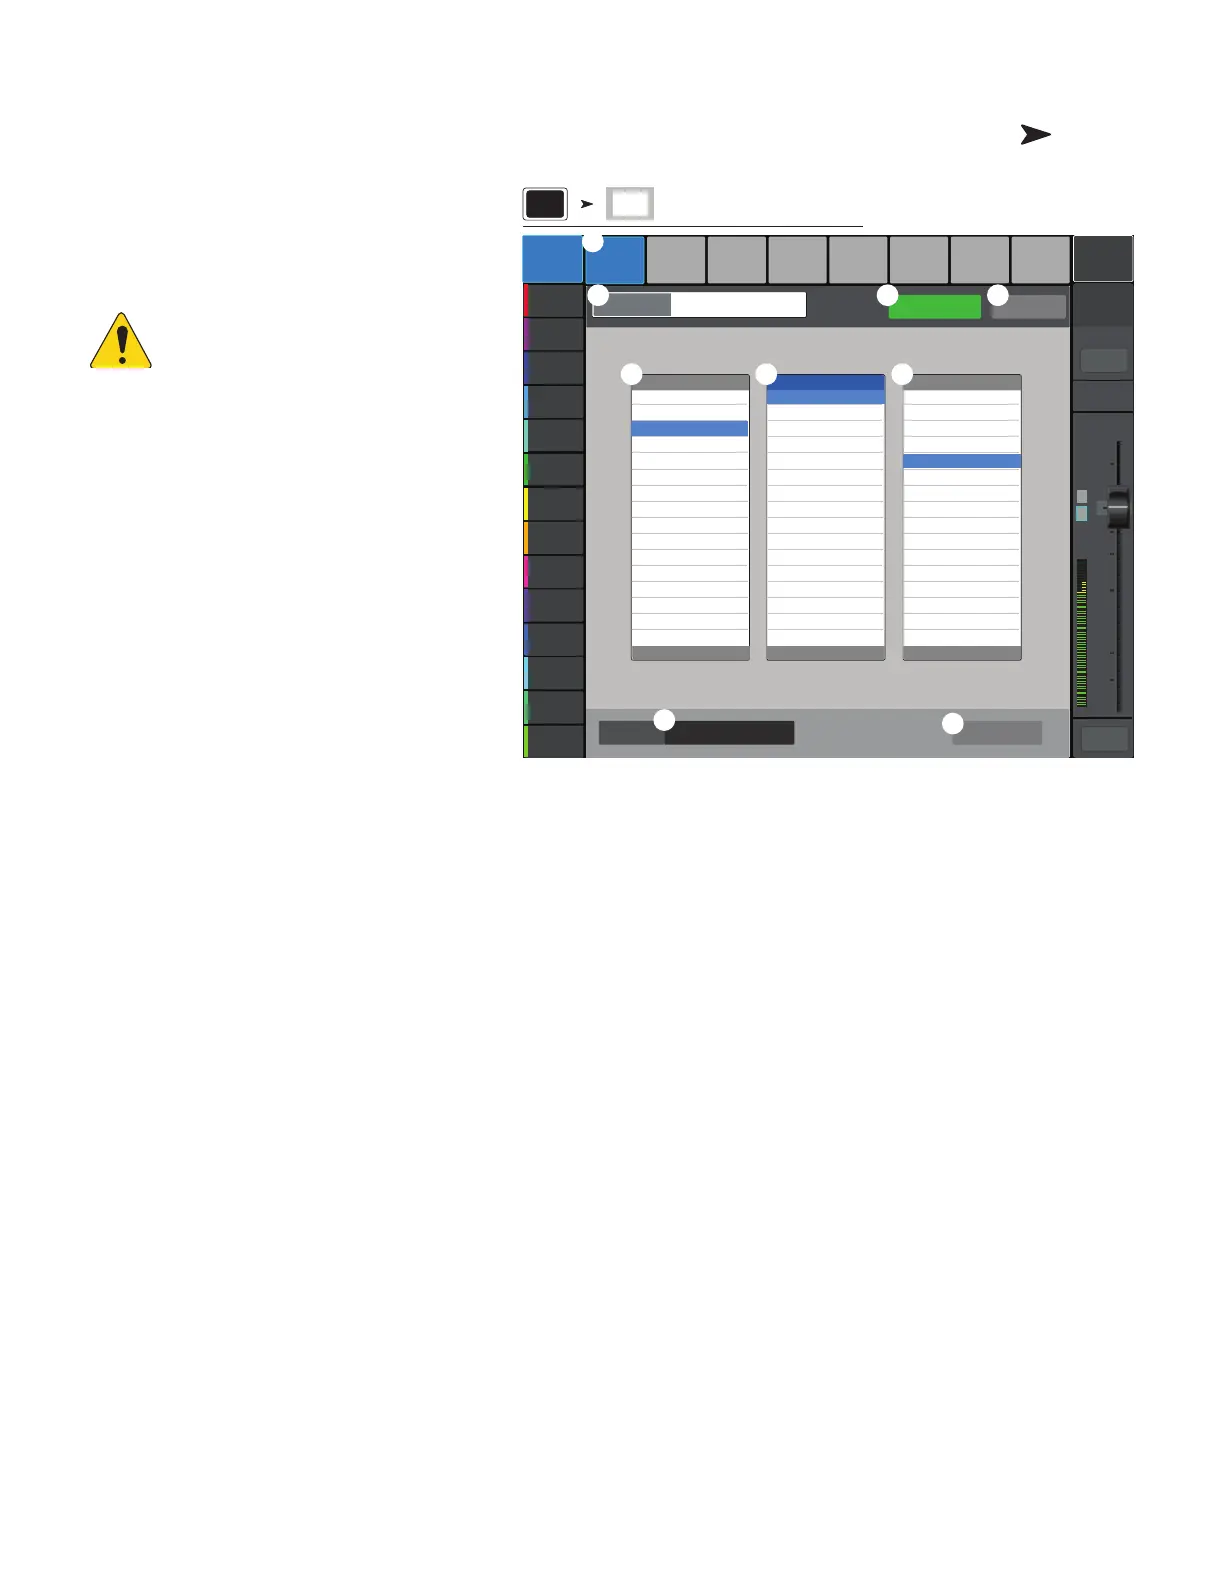
1.
MIDI Functions –
The current MIDI
assignments are displayed on MIDI buttons 1–8.
Blue indicates the MIDI function is selected and
can be assigned/unassigned or renamed.
2.
Name –
Displays the name of the currently
assigned MIDI function. A name is automatically
assigned when a function is selected in the
Action, Selection, Detail fields.
3.
Assign button –
After making your
selection, touch this button to assign your
selection to the selected MIDI.
4.
Unassign
– Touch this button to remove the
assignment to the selected MIDI button.
5.
Action –
This list is a general list of types of
things the MIDI controller can affect. For example “Recall Scene”.
6.
Selection –
When an Action is chosen, a list of ways the action can be applied are displayed. For example “Factory”.
7.
Detail –
Displays a list of specific targets for the selection. For example “Drum Sub Mix”.
8.
MIDI Assignment –
The name of the assignment made internally to the USB MIDI device button.
9.
Learn MIDI –
a. Touch this button to teach the TouchMix what MIDI command should trigger the selected action.
b. A message displays saying, “Waiting for incoming MIDI message...”
c. Press a button on the USB MIDI device.
d. When the USB MIDI device button is pressed, the TouchMix responds by executing the assigned function.
Press Menu
Touch MIDI
Setup
Joe’s Monitor
Aux 1
Aux 2
Aux 2
Aux 3
Aux 3
Aux 4
Aux 4
Aux 5
Aux 5
Aux 6
Aux 6
Aux 7
Aux 7
Aux 8
Aux 8
Aux 9
Aux 9
Aux 10
Aux 10
Aux 11
Aux 11
Aux 12
Aux 12
Aux 13
Aux 13
Aux 14
Aux 14
Default
Scene:
Main Mix
L/R
L
F
∞
10
5
u
5
10
20
0
40
10
Main
Cue
Main
L/R
Mute
MIDI 1
Drums
MIDI 2
Not in use
MIDI 3
Not in use
MIDI 4
Not in use
MIDI 5
Not in use
MIDI 6
Not in use
MIDI 7
Not in use
MIDI 8
Not in use
Recall Input Preset
Recall Output Preset
Recall Scene
Factory
User
Relative
Mute
Go to Screen
Recording
Select
Utility
Horn Band
Rock Band
Country
Drum Sub Mix
Jazz Quintet
Rock Band 1
Rock Band 2
Songwriter
Default
D
rums
Action Selection Detail
No MIDI AssignmentMIDI Assignment Learn MIDI
UnassignAssign
Drums
Name
Menu
2
4
5
1
8
76
3
9
MIDI

 Loading...