SECTION 11—BATTERIES
Part No. 1125038 103 Pronto
®
M91™and M94™
Installing/Removing the Batteries
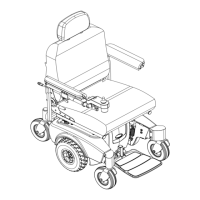
NOTE:Forthisprocedure,refertoFIGURE 11.1onpage104andFIGURE 11.2onpage105.
NOTE:Havethefollowingtoolsavailable:
NOTE:WheelchairswithMKIVElectronics:Wiringharnessusedwiththefrontbatteryhastwo
connectors,onetotherearbatterywiringharnessandonetotheControllercable.
NOTE:WheelchairswithMKIVElectronics:Wiringharnessusedwiththerearbatteryhasone
connectortothefrontbatterywiringharness.
NOTE:WheelchairswithMK
5
™Electronics:Thefrontbatteryhasthreeconnectors‐twotothe
rearbatterywiringharness(REDandBLACK)andonetothecontrollercable(RED),andtherear
batteryhastwoconnectors(REDandBLACK)tothefrontbatterywiringharness.
Installing
1. Placethewheelchairinawellventilatedareawhereworkcanbeperformedwithout
riskingdamagetocarpetingorfloorcovering.
2. VerifythejoystickOn/OffswitchisintheOFFpositionanddisconnectjoystick.Refer
toDisconnecting/ConnectingtheJoystickonpage 112.
3. Performoneofthefollowing:
• WheelchairswithoutFormulaPTOPlus‐Removetheseat.RefertoRemoving/
InstallingorTiltingtheSeatAssemblyonpage 35.
• WheelchairswithFormulaPTOPlus‐Tilttheseatback.RefertoRemoving/
InstallingorTiltingtheSeatAssemblyonpage 35.
4. Removethetopshroud.RefertoRemoving/InstallingtheShroudsonpage 88.
5. Ifnecessary,disconnectrightandleftmotorleadstoallowaccesstothefrontofthe
batterytray.
6. Moveasidethemotorleadsandcontrollercabletoallowunobstructedaccesstothe
frontofthebatterytray.
NOTE:Performthissectionononebatteryatatimestartingwiththe
rearbattery.RepeatSTEP
6topositiontheremainingbatteryintothebatterytray.
7. Performoneofthefollowingtopositionthebatteryintothebatterytray:
• BatteriesWithBuiltInLiftingStrap‐Usebuiltinliftingstraptopositionbattery
intothebatterytray(Detail“A ” ofFIGURE 11.1).
TOOL QTY COMMENTS
Battery Lifting Strap 1 Supplied
1/2-inch (6 pt) Box Wrench 1 Not Supplied
7/16-inch (6pt) Box Wrench 1 Not Supplied
3/8-inch (6pt) Box Wrench 1 Not Supplied
Diagonal Cutters 1 Not Supplied

 Loading...