SECTION 4—SEAT
Part No. 1125038 35 Pronto
®
M91™and M94™
SECTION 4—SEAT
WARNING
After ANY adjustments, repair or service and BEFORE use, make sure that all
attaching hardware is tightened securely - otherwise injury or damage may result.
Before performing any maintenance, adjustment or service verify that ON/OFF switch
on the joystick is in the OFF position.
Thefollowingacronymsareusedthrougho utthismanual:
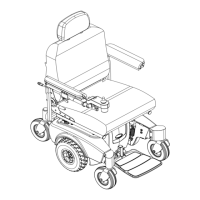
Removing/Installing or Tilting the Seat Assembly
Removing/Installing the Seat Assembly without Powered Seating Systems
NOTE:Forthispr ocedur e, refertoFIGURE 4.1onpage 36.
Removing
1. Disconnectthejoystick.Re fertoDisconnecting/ConnectingtheJoystickonpage 112.
2. M91withFullReclineBackandDriv eLockoutSwitchONLY‐Performthefollowingto
disconnectthedrivelockoutswitch:
A. Openrearshroudbyturningknob90°untildetentisfelt,sliderearshroudtowards
rearcastersandtilttopedgeaw ayfromwheelchair .
B. Disconnectthedriv elockoutswitchcablelocatednexttoth echarger(Detail“A ” of
FIGURE 4.1).
C. Closetherearshroudbytiltingthetopedgetowardsthewheelchair ,slidingtherear
shroudtow ardstheknob,andturningknob90°untildetentisfe lt.
3. Pushdownonthelatchbarunderneathfrontof seat.
4. Tiltfrontedgeofseatup.
5. Slidetheseatassemblyforwardtodisengageseatfromthepiv otbracketslocatedinthe
rear.
Installing
1. P ositiontheseatintherearpivotbrackets.
2. Tiltfrontedgeofseatdown.
3. Whenseatislow ered,engageseatbracketsintoseatclevispins.
WARNING
When reinstalling the seat verify that the seat brackets are engaged with the seat
clevis pins by pulling up on the latch bar.
ACRONYM DEFINITION
ADJUSTABLE ASBA (ADJ ASBA) Adjustable Width, Depth, Seat and Back Angle seat frame.

 Loading...