J
-
High
Toner
(Low
Toner
Lamp
is
NOT
lit)
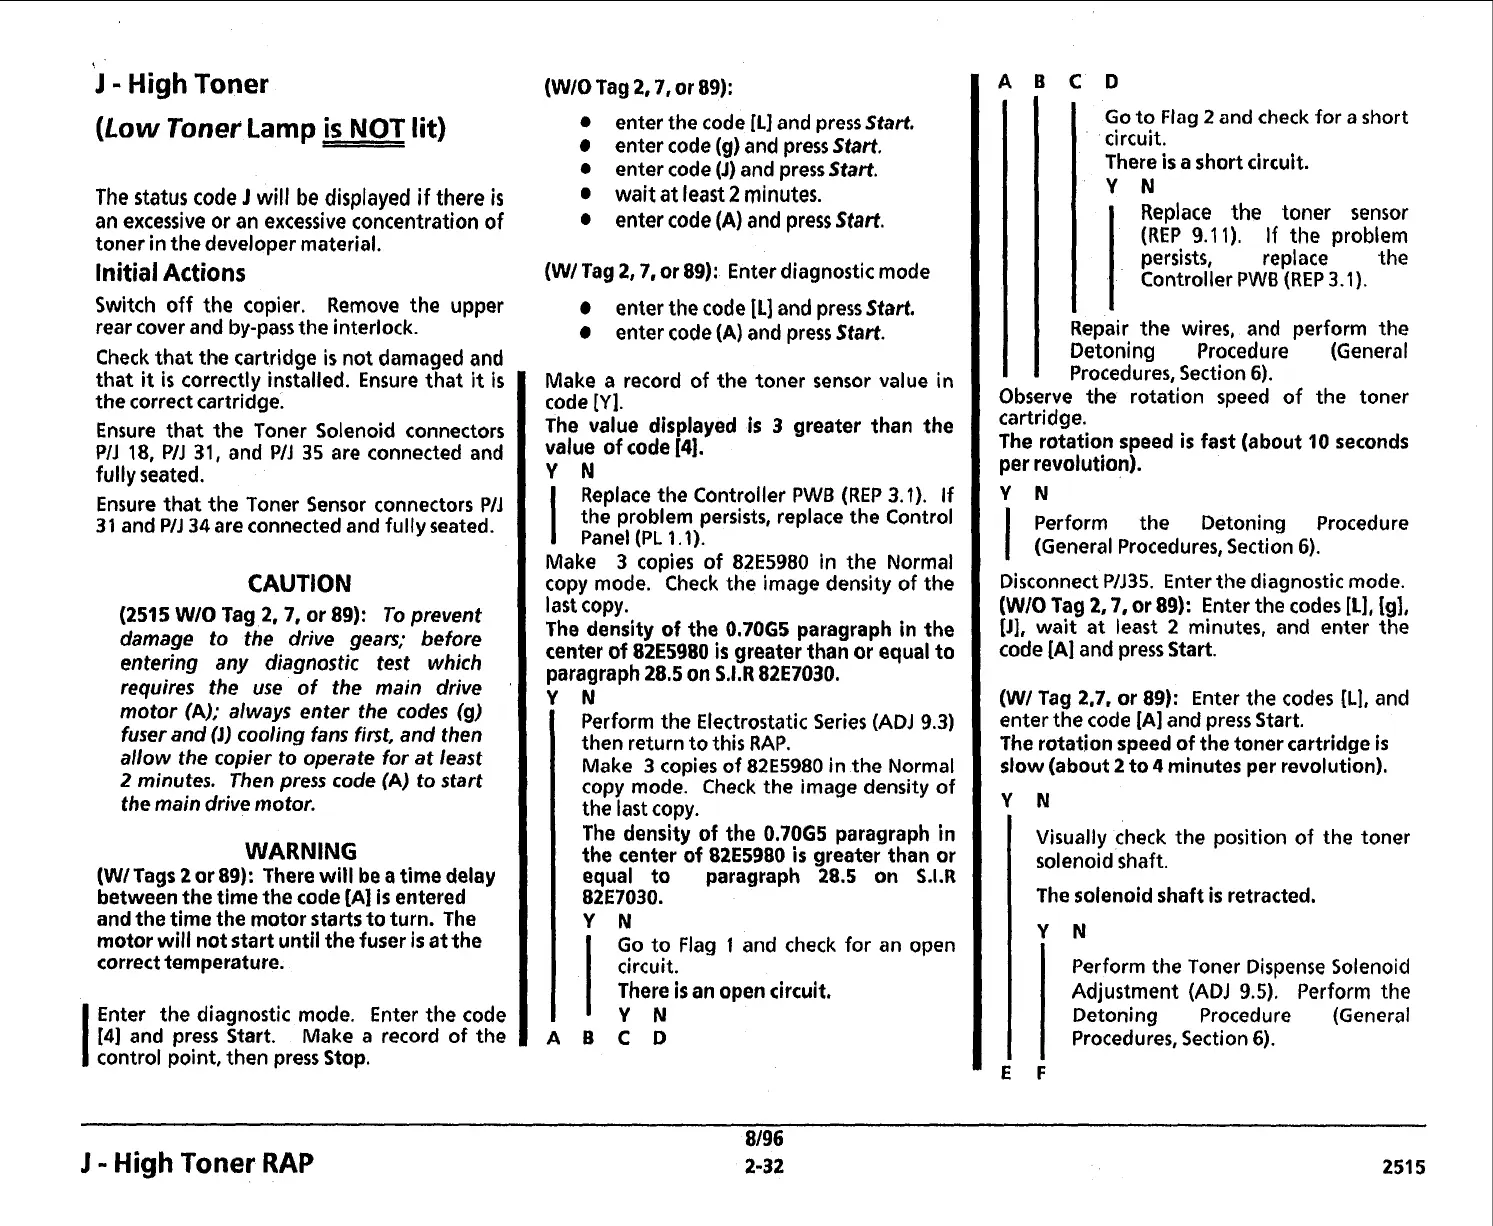
The status code
J
will be displayed
if
there
is
an excessive or an excessive concentration of
toner in the developer material.
Initial Actions
Switch off the copier. Remove the upper
rear cover and by-pass the interlock.
Check that the cartridge
is
not damaged and
that
it
is
correctly installed. Ensure that
it
is
the correct cartridge.
Ensure that the Toner Solenoid connectors
PIJ 18, PIJ
31,
and PIJ
35
are connected and
fully seated.
Ensure that the Toner Sensor connectors
PIJ
31
and P/J
34
are connected and fully seated.
CAUTION
(2515
WIO Tag
2,7,
or 89): To prevent
damage to the drive gears; before
entering any diagnostic test which
requires the use of the main drive
motor
(A);
always enter the codes
(g)
fuser and
(J)
cooling fans first, and then
allow the copier to operate for at least
2
minutes. Then press code
(A)
to start
the main drive motor.
WARNING
(WI Tags
2
or 89): There will
be
a time delay
between the time the code
[A]
is entered
and the time the motor starts to turn. The
motor will not start until the fuser
is
at the
correct temperature.
I
Enter the diagnostic mode. Enter the code
[4]
and press Start. Make a record of the
control point, then press Stop.
(WiO Tag
2,7,
or 89):
0
enter the code
[L]
and press
Start.
enter code (g) and press Start.
0
enter code
(J)
and press
Start.
0
wait at least
2
minutes.
o
enter code
(A)
and press
Start.
(Wl Tag
2,7,
or
89):
Enter diagnostic mode
enter the code
[L]
and press
Start.
enter code
(A)
and press Start.
Make a record of the toner sensor value in
code
[Y].
The value displayed is
3
greater than the
value of code
[4].
Y
N
I
Replace the Controller
PWB
(REP
3.1).
If
the problem persists, replace the Control
Panel (PL
1.1).
Make
3
copies of 82E5980 in the Normal
copy mode. Check the image density of the
last copy.
The density of the
0.7065
paragraph in the
center of
82E5980
is
greater than or equal to
paragraph
28.5
on
S.1.R
82E7030.
Y
N
Perform the Electrostatic Series (ADJ
9.3)
then return to this RAP.
Make
3
copies of
82E5980
in
the Normal
copy mode. Check the image density of
the last copy.
The density of the
0.7065
paragraph in
the center of
82E5980
is greater than or
equal to paragraph
28.5
on
S.1.R
82E7030.
Y
N
Go to Flag
1
and check for an open
circuit.
There
is
an open circuit.
Y
N
ABCD
LCD
Go to
Flag
2
and check for
a
short
circuit.
There is a short circuit.
Y
N
Replace the toner sensor
(REP 9.1
1).
If the problem
persists, replace the
Controller PWB (REP 3.1).
I I
Repair the wires, and perform the
Detoning Procedure (General
Procedures, Section 6).
Observe the rotation speed of the toner
cartridge.
The rotation speed
is
fast (about
10
seconds
per revolution).
Y
N
I
Perform the Detoning Procedure
(General Procedures, Section 6).
Disconnect PlJ35. Enter the diagnostic mode.
(WIO
Tag
2,7,
or
89):
Enter the codes
[L],
[g],
[J],
wait at least 2 minutes, and enter the
code [A] and press Start.
(WI Tag
2,7,
or
89):
Enter the codes
[L],
and
enter the code
[A]
and press Start.
The rotation speed of the toner cartridge
is
slow (about
2
to
4
minutes per revolution).
Visually check the position of the toner
solenoid shaft.
The solenoid shaft is retracted.
Perform the Toner Dispense Solenoid
Adjustment (ADJ
9.5).
Perform the
Detoning Procedure (General
Procedures, Section
6).
J
-
High
Toner
RAP
 Loading...


