11.2 Getting Started
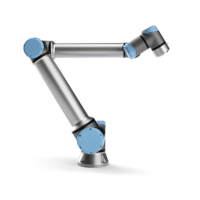
Figure 11.1: Joints of the robot. A: Base, B: Shoulder, C: Elbow and D, E, F: Wrist 1, 2, 3
WARNING:
Tipping hazard. If the robot is not securely placed on a sturdy sur-
face, the robot can fall over and cause an injury.
Detailed installation instructions can be found in the Hardware Installation Manual. Note that a
risk assessment is required before using the robot arm to do any work.
11.2.2 Turning the Control Box On and Off
The control box is turned on by pressing the power button at the front side of the panel with the
touch screen. This panel is usually referred to as the teach pendant. When the control box is turned
on, text from the underlying operating system will appear on the touch screen. After about one
minute, a few buttons appear on the screen and a popup guides the user to the initialization screen
(see 11.5).
To shut down the control box, press the green power button on the screen, or use the Shut Down
button on the welcome screen (see 11.4).
WARNING:
Shutting down by pulling the power cord from the wall socket may
cause corruption of the robot’s file system, which may result in robot
malfunction.
11.2.3 Turning the Robot Arm On and Off
The robot arm can be turned on if the control box is turned on, and if no emergency stop button is
activated. Turning the robot arm on is done in the initialization screen (see 11.5) by touching the
ON button on that screen, and then pressing Start. When a robot is started, it makes a sound and
moves a little while releasing the brakes.
CB3 II-26 Version 3.10
Copyright © 2009–2019 by Universal Robots A/S. All rights reserved.

 Loading...


