Connecting rod bearings:
The steel
and
lead
bearing shells
are
interchangeable
in order to
peÍmit
trueing up the
crankpins.
Four
types
oÍ
bearings
are available, identiÍied
by their thickness
measured
at the centre oÍ the shells.
Original thickness
1 st
oversize
2nd
oversize
3rd oversize
1 .81
9 to
1 .825
mm
1 .969 to 1 .975 mm
2.069 to
2.075 mm
2.219 to 2.225mm
Gudgeon
pins:
The
gudgeon pins
are
fitted
off centre
in the
pistons
and are
held in
place
with
circlips.
The
gudgeon pins
and
pistons
are mated duÍing manufacture and
must
always
be
kept together
to
pÍevent
an overtight
Íit which
could
subsequently cause engine damage.
In the case
of a
'liners
and
pistons'
exchange,
remove
the
gudgeon
pins
from the new
pistons
which are
paired
with the cylinder
liners. Lubricate the
gudgeon pins
and
push
them
by
hand into the
pistons
and connecting
rod
small-ends.
Refit the circlios.
To reÍit the
pistons
and
connecting rod assemblies
to the engine
proceed
as
follows:
1 lf the
old
pistons
are to be used, decarbonize
the
piston
crowns and
the ring
grooves.
2
Check
the
piston
ring
gaps.
Locate the
piston
ring in
the unworn
portion
of
the cylinder liner and check the
ring
gaps
which should be
.4 mm
for both compression
and oil scraper rings.
3 Assemble the
piston
to
the connecting
rod, so that
when assembled in the
engine,
the
oil
squiÍt hole in
the big-end
(see
FIG 1 :24), is
to the side opposite the
camshaft and the
AV
marking and arrow stamped on
the
piston
crown
point
to the front
of
the
engine.
4 Fit
the compression
rings
to the
pistons
with the
reference marks facing
upwards and the
chrome
faced
ring in the top
groove.
5
With
the
ring
gaps
spaced at 120 deg., f it the
piston
and connecting rods to
their
respective
cylinder bores
from which
they were
removed.
Assemble the big-
end bearing
shells and caps, ensuring that the
mating
marks
between the caps and rods are corÍectly Íelated
and that each
assembly
is in the
bore
from which it
was removed
on dismantling. Fit new big-end bolts
and lockwashers
and
tighten the
bolts
to
a
torque
oÍ
30.7 ro 34.3 lb fr.
1 :12 Removing the
crankshaft
and main
bearings
With
the engine removed from
the car
(see
Section
1 :3), remove the
transmission
(see
Section
6), the oil
sump, the clutch and flywheel
(see
Section
1 :9),
and
the timing
chain and sprockets
(see
Section
1 :6).
Remove the
sparking
plugs
and turn the engine upside
down.
First
check the cÍankshaft end Íloat with
a dial
gauge,
levering
the óhaÍt endwise. The
correct clearance should
be
.08
to
.2mm.
Release the
connecting rods and replace the
caps
on
their respective rods.
Remove the main bearing bolts and
remove
the bearing caps.
P404
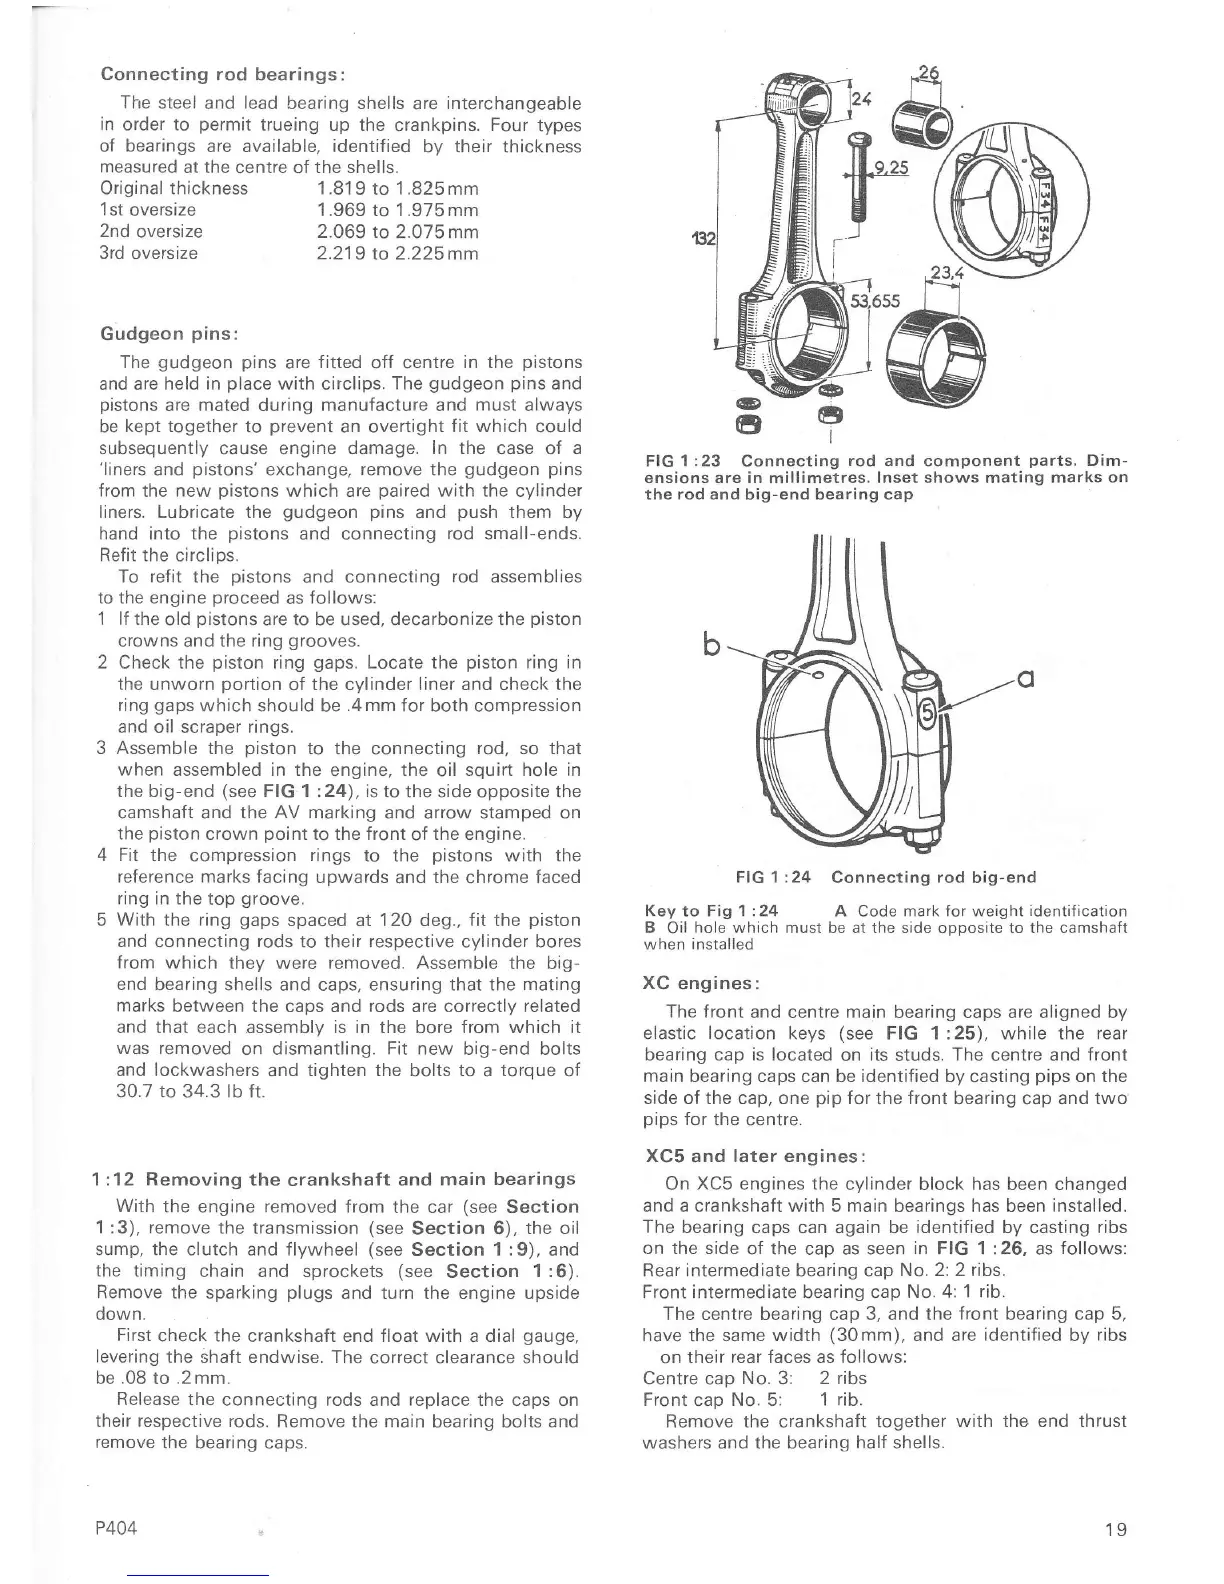
FIG 1:23 Connecting
rod
and component
parts.
Dim-
ensions are in
millimetres.
lnset shows mating marks
on
the rod and
big-end bearing
cap
FIG 1 :24
Connecting
rod
big-end
Key to Fig 1 :24 A Code mark Íor weight
identification
B
Oil
hole which must be at the side ooposite to the camshaÍt
when installed
XC
engines:
The front
and centre
main
bearing caps are aligned by
elastic
location
keys
(see
FIG 1:25), while the rear
bearing cap is located
on
its
studs.
The
centre and
front
main bearing caps can be identified by casting
pips
on the
side of the cap, one
pip
for
the
front
bearing cap and
two
pips
for
the centre.
XC5
and
later engines:
On
XC5
engines
the
cylinder block has been changed
and a crankshaft with 5 main bearings has been
installed.
The bearing caps
can
again
be
identified by
casting
ribs
on the side
of the cap as seen
in FIG 1
:26, as
follows:
Rear intermediate bearing cap
No. 2:2 ribs.
Front
intermediate
bearing cap
No. 4'. 1
rib.
The centre bearing cap 3, and the
front
bearing cap 5,
have
the
same width
(30mm),
and are
identified
by
ribs
on
their rear faces as follows:
Centre cap
No.
3:
2 ribs
FÍont
cao
No. 5: 1
rib.
Remove the crankshaft together
with the end thrust
washers and the bearing half shells.
É
I
(D
a
19

 Loading...


