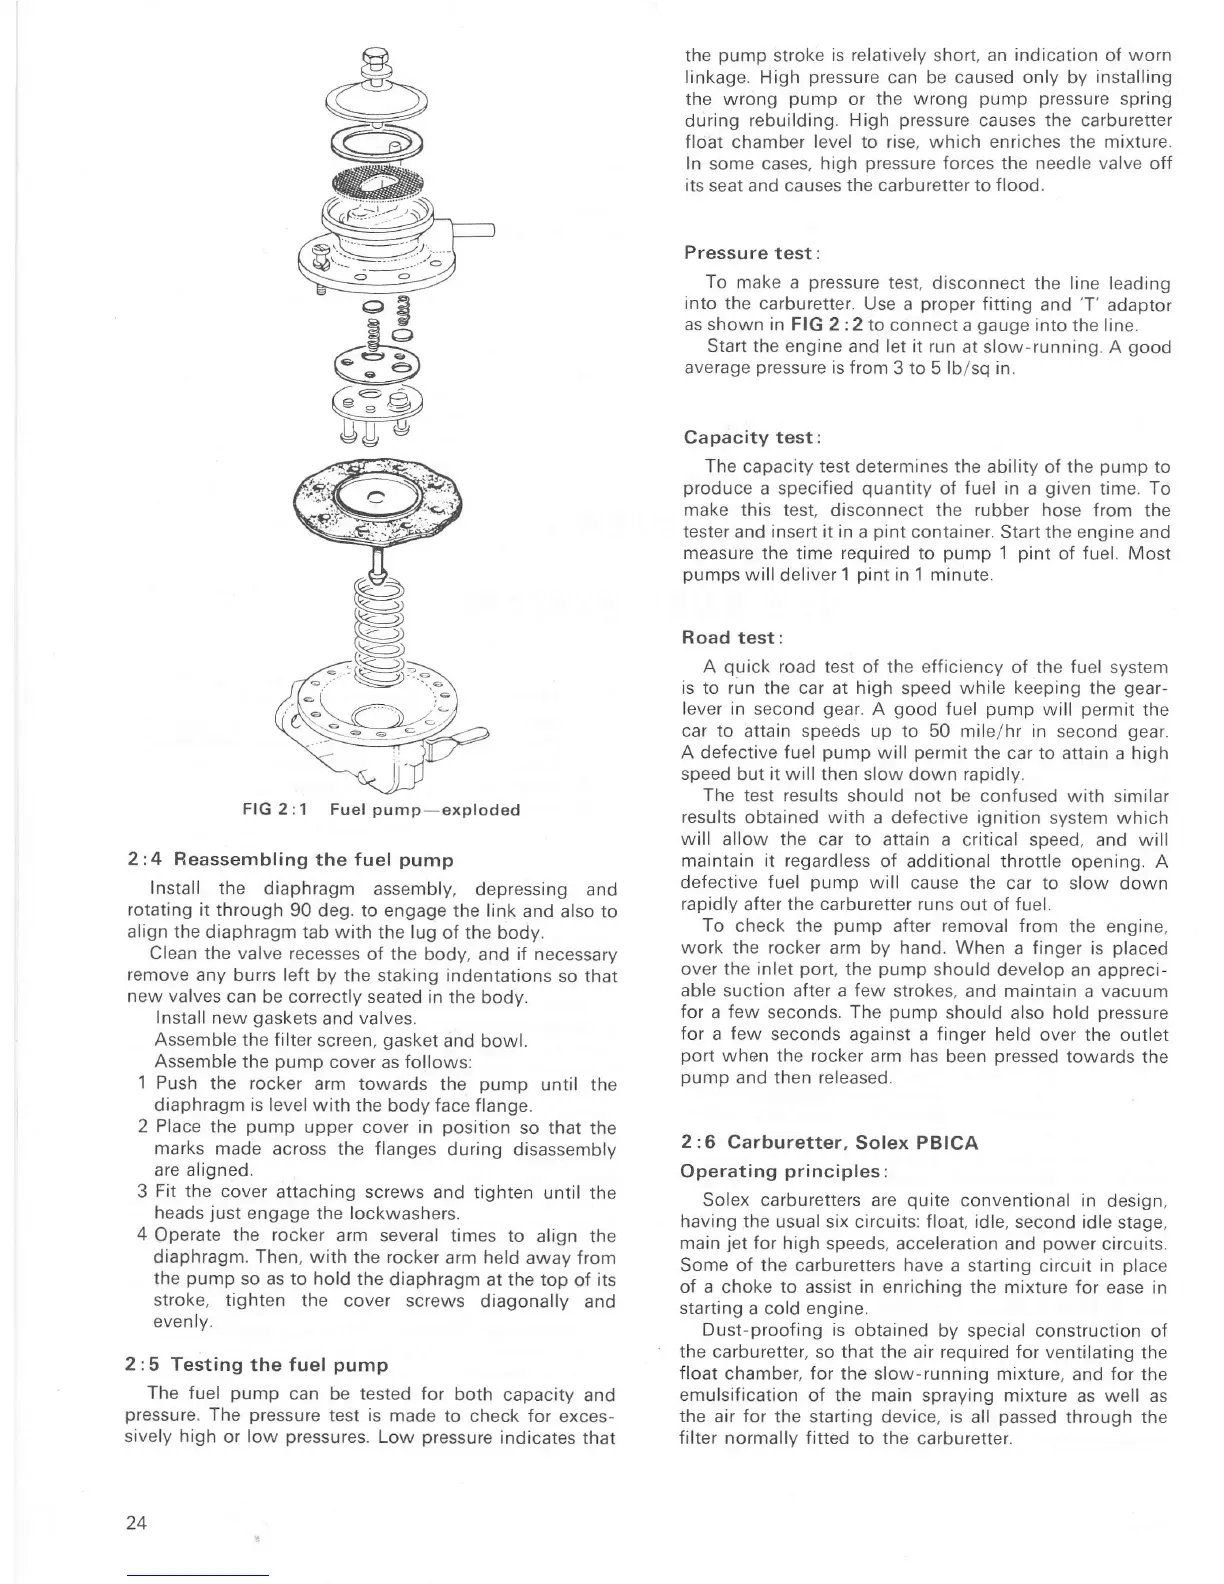
FIG
2:1 Fuel
pump-exploded
2 :4 Reassembling
the
f
uel
pump
Install
the diaphragm
assembly,
depressing and
rotating it through
90 deg. to engage
the link
and also to
align the diaphragm
tab with the lug
of the body.
Clean the
valve
recesses
oÍ
the
body,
and
if necessary
remove
any burrs left
by the staking indentations
so that
new valves can
be correctly seated in
the body.
Install
new
gaskets
and
valves.
Assemble the filter
screen,
gasket
and bowl.
Assemble the
pump
cover
as
follows:
1 Push
the rocker
arm towards
the
pump
until
the
diaphragm
is level
with the body
face flange.
2
Place
the
pump
upper cover in
position
so that
the
marks made
acÍoss the
flanges
during disassembly
are aligned.
3
Fit the cover
attaching screws
and tighten
until the
heads
just
engage
the
lockwashers,
4
Operate the rocker
arm several times
to align the
diaphragm. Then, with
the
rocker
arm
held
away from
the
pump
so as to hold the
diaphragm
at
the top
of
its
stroke, tighten
the cover scÍews
diagonally
and
evenry.
2 :5 Testing
the fuel
pump
Ïhe fuel
pump
can
be
tested for
both
capacity
and
pressure.
The
pressure
test
is
made
to check for exces-
sively high
or
low
pressures.
Low
pressure
indicates
that
z4
the
pump
stroke
is relatively short, an indication oÍ worn
linkage.
High
pressure
can
be
caused only by installing
the wrong
pump
or the
wrong
pump pressure
spring
during
rebuilding. High
pressure
causes the carburetter
Íloat
chamber
level to rise, which enriches the mixture.
In some cases. high
pressure
forces the needle valve
off
its
seat and causes the
carburetter to flood.
Pressure
test:
To
make a
pressure
test, disconnect the
line leading
into the
carburetter. Use
a
proper
Íitting
and
'T'
adaptor
as
shown
in FIG 2 :2 to
connect a
gauge
into
the
line.
Start the engine
and
let
it run
at slow-running. A
good
average
pressure
is from
3 to 5
lb/sq in.
Capacity test:
The capacity test
determines
the
ability oÍ the
pump
to
produce
a specified
quantity
of
fuel in a
given
time.
To
make this test, disconnect the rubber hose from
the
tester and insert it in a
pint
container. Start the engine and
measure
the time
required
to
pump
1
pint
of fuel. Most
pumps
will
deliver
1
pint
in 1 minute.
Road
test:
A
quick
road
test oÍ
the
eÍÍiciency oÍ the fuel
system
is to run
the
car
at
high
speed
while keeping
the
gear-
lever in
second
gear.
A
good
fuel
pump
will
permit
the
car to attain speeds up to 50 mile/hr in
second
gear.
A defective fuel
pump
will
permit
the car to attain
a
high
speed
but
it
will then slow down rapidly.
The
test results should
not be confused with similar
results
obtained
with
a deÍective ignition
system which
will
allow the car to attain
a critical
speed,
and will
maintain it regardless oÍ
additional throttle
opening. A
defective fuel
pump
will cause the
car to slow down
rapidly
after
the carburetter runs
out oÍ
Íuel.
To
check the
pump
aÍter removal from
the engine,
work the rocker
arm by hand. When
a
finger
is
placed
oveÍ the inlet
port,
the
pump
should develop
an appreci-
able suction after a few
strokes, and maintain
a
vacuum
for a few
seconds. The
pump
should
also hold
pressure
íor a few
seconds against a Íinger held
over the outlet
port
when
the
rocker
arm has
been
pressed
towards the
pump
and then released.
2:6
Carburetter,
Solex PBICA
Operating
principles:
Solex carburetters are
quite
conventional in
design,
having
the usual six circuits: float, idle, second
idle stage,
main
jet
for high
speeds, acceleration and
power
circuits.
Some of the carburetters
have
a starting
circuit
in
place
of a choke to assist in enriching
the
mixture
for ease in
starting
a cold
engine.
Dust-proofing is obtained
by special construction
of
the carburetter,
so that the
air
required Íor ventilating
the
Íloat
chamber, Íor the slow-running
mixture,
and
for
the
emulsification
oÍ the main spraying mixture
as well as
the
air
Íor
the starting device, is
all
passed
through the
Íilter
normally fitted to the
carburetter.

 Loading...


