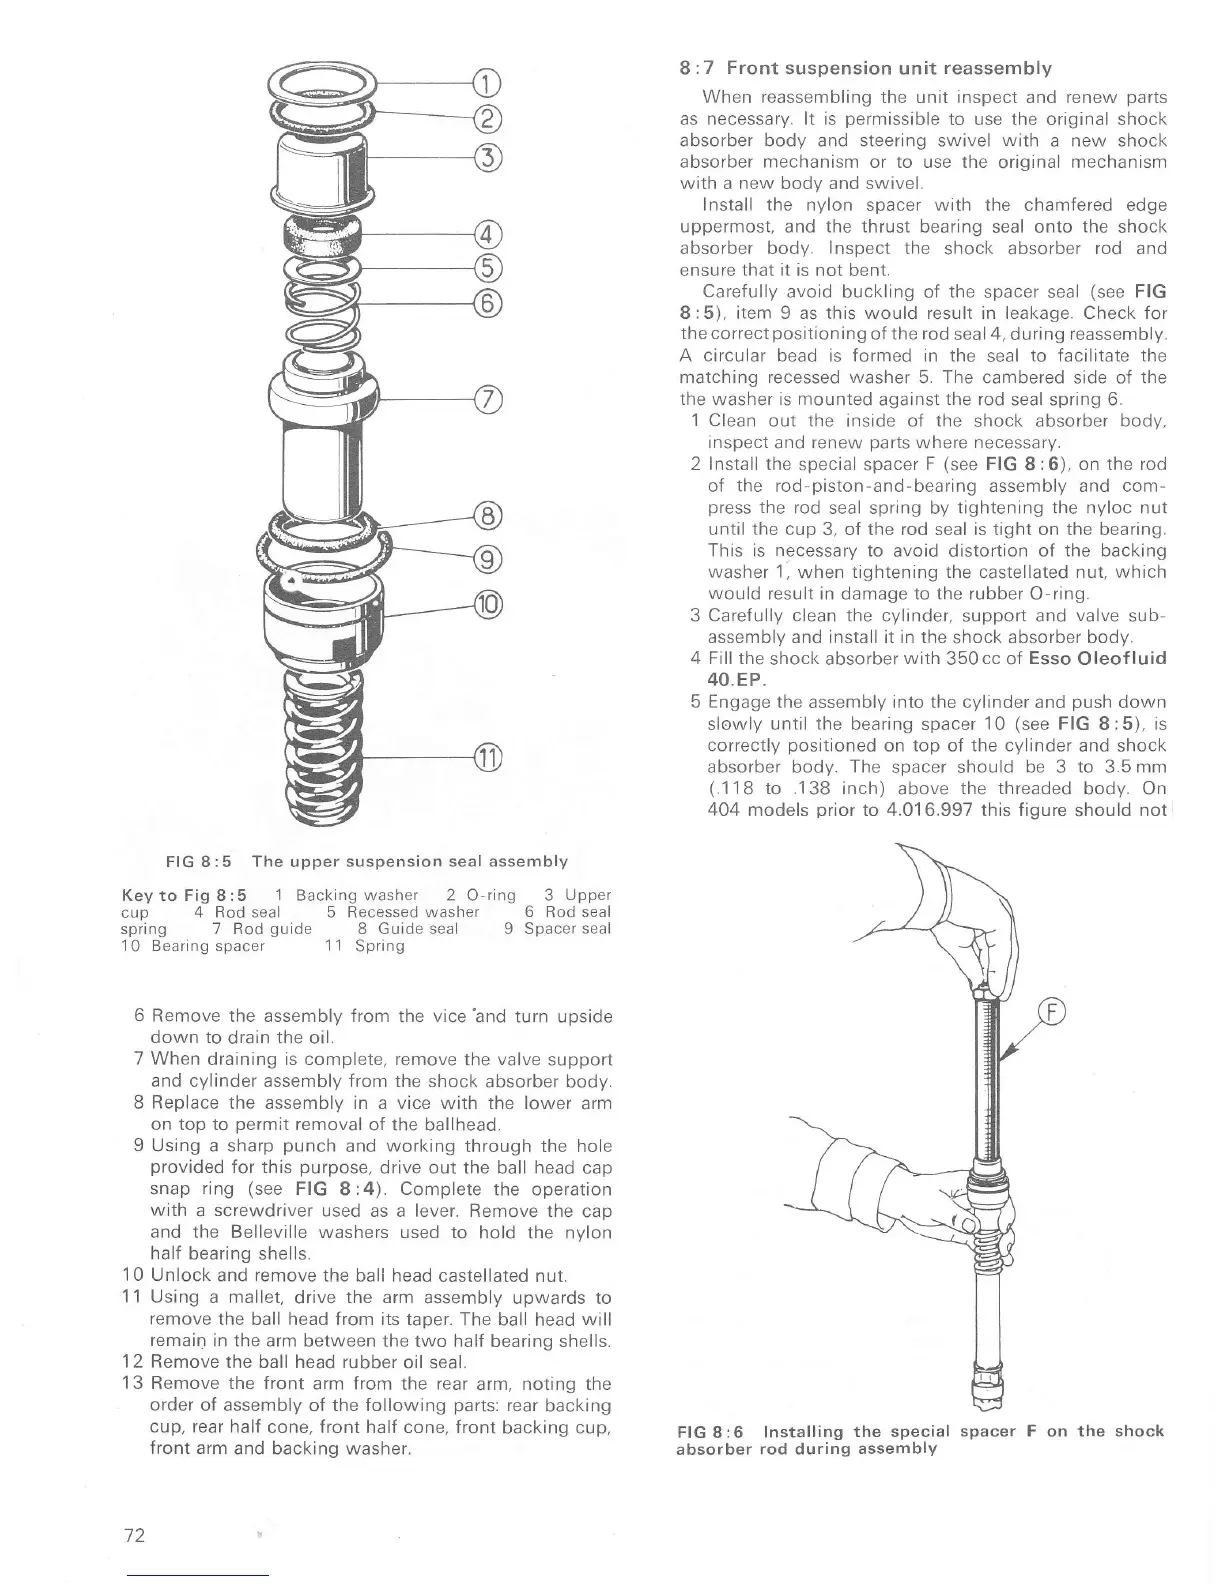
FIG 8:5
The
upper
suspension seal assembly
Key
to
Fig 8:5
1
Backing
washer
2 O-ring 3
Upper
cuD
4 Rod seal 5 Recessed washer
6
Rod
seal
spring 7 Rod
guide
8 Guide seal 9 Spacer
seal
'1
0
Bearing spacer 11
Spring
6
Remove the assembly from
the
vice'and
turn upside
down to
drain the oil.
7 When
draining is complete, remove
the valve support
and cylinder assembly from the
shock absorber body.
B
Replace
the assembly in a vice with the lower
arm
on top to
permit
removal
of the ballhead.
9 Using a sharp
punch
and
working
through the hole
provided
for this
purpose,
drive out the ball head cap
snap
ring
(see
FIG
8:4).
Complete
the operation
with
a
screwdriver
used as a lever. Remove
the cao
and the Belleville washers used
to hold the nylon
half bearing shells.
10
Unlock and remove the ball
head castellated nut.
11 Using
a mallet,
drive
the arm
assembly upwaÍds to
remove
the ball head from its taoer. The
ball head
will
remain
in the arm between
the two half bearing shells.
12 Remove
the ball head rubber
oil seal.
13
Remove the front
arm Írom the rear
arm,
noting
the
order
of assembly
of
the following
parts:
rear
backing
cup, rear halÍ
cone, front half cone, front
backing cup,
front
arm and backing washer.
72
8:7
Front
suspension unit
reassembly
When reassembling
the unit inspect and renew
parts
as necessary.
lt is
permissible
to use the original shock
absorber body and steering swivel
with
a new shock
absorber mechanism or to use the
original
mechanism
with a new body and swivel.
Install the
nylon spacer
with
the chamfered edge
uppermost, and the thrust bearing
seal onto
the
shock
absorber body. Inspect the
shock
absorber rod
and
ensure
that it
is not bent.
Carefully avoid buckling
of
the
spacer seal
(see
FIG
8:5), item 9 as this would result in leakage.
Check
Íor
thecorrectpositioningof
the rod
seal
4,
during
reassembly.
A circular bead is formed in the
seal
to facilitate the
matching recessed
washer
5. The cambered side of the
the
washer
is mounted
against
the
rod seal spring 6.
'1
Clean out the inside of the
shock
absorber body,
Inspect
and renew
parts
where necessary.
2 Install the
special spacer
F
(see
FIG 8:6),
on the rod
oÍ the rod
piston-and-bearing
assembly and com-
press
the rod
seal sprrng by tightening
the
nyloc nut
until the cup 3, of the rod seal is tight on the bearing.
This is necessary to
avoid distortion
oÍ the backing
washer 1,
when
tightening the castellated
nut,
which
would
result in damage to the rubber O-ring.
3 CareÍully clean the cylinder, support and
valve
sub-
assembly and install it in the
shock absorber
body.
4 Fill the
shock absorber
with
350cc of
Esso
Oleofluid
40.EP.
5 Engage the
assembly into the cylinder and
push
down
slowly
until the
bearing spacer
10
(see
FIG 8:5),
is
correctly
positroned
on top of the cylinder and
shock
absorber
bodv.
The
spacer should
be
3
to 3.5 mm
(.11I
to.138 inch)
above
the threaded
body. On
404
models
prior
to 4.01 6.997 this Íigure
should
not
FIG 8:6
Installing
the special
spacer F on the shock
absorber
rod during
assembly

 Loading...