lÍ the
spark
is weak
and
irregular,
check that the
lead
is not
perished
or cracked.
lí it
appears to be defective,
renew it
and
try another test.
lÍ
there is no improvement,
remove
the distributot cap and
wipe
the
ingide clean and
dry.
Examine the carbon button for wear and the seg-
ments Íor burning.
Inspect the caps for cracks
and
tracking burns.
Tracking
will
be
indicated
by a
thin
black
line
between
the
segments.
3:4
Timing
the
ignition
1 With the
engine on
compression stroke
Íor
No. 1
cylinder,
insert
a 8
mm diameter
bar
in
the
timing hole
on the top righthand side oÍ the clutch
housing
(see
FIG 3:4).
2 Holding
light
inward
pressure
on the
end
of the bar,
rotate the
crankshaft
until the
bar drops
into the
timing
recess
in the Ílywheel.
This
is the
firing
point
Íor No.
1
cvlinder.
3
Fit the
distributor,
correctly adjusted, into the
distÍibutor
support
in its approximate
position,
and
pressing
down on the distributoÍ
body,
turn the rotor
to engage the driving slot
in the
drive spindle.
The
vacuum intake to the distributor
should
lie
between
the
petrol pump
outlet
and
the carburetter. Connect
the vacuum advance
pipe
and
the low-tension
terminal to the
coil.
4 Connect
a
timing
light
between
the low-tension
terminal
on the distributor and earth. Switch on
the
ig
n ition,
5
Rotate the
distributor
in
an anticlockwise direction
until
the light
goes
out,
then turn the
distributor
in the
opposite direction until the
light
just
lights. Tighten
the
support
collar
bolt.
Check that the distributor
rotor is
pointing
to the
position
of
No. 1
sparking
plug
terminal in the
distributor
cap when the cap is in
position.
The
ignition
setting can be
altered
slightly
on
road test
by
turning the knurled
adjusting
nut.
3:5 Sparking
plugs
Up
to
the end
of
the
series
with
3
main
bearing engines
the spark
plugs
are of
the
short base
type
and should be
set
with
a
spark
plug gap
of
.6
mm
(.024
inch). Plugs
suitable for
this
engine are Marchal 36.P or 4C.44.F.
On later installations,
with 5
main bearing engines,
the sparking
plugs
are oÍ
the long
base
type. The
spark
plug gap
is the
same. Suitable
plugs
are Marchal 36.HS
or AC.P.44.XL,
The long
base
and short
base
plugs
are
not
interchangeable and the engine may be exten-
sively damaged
iÍ
the
incorrect
type
is f itted.
Inspect, clean
and adjust
the
sparking
plugs
regularly,
The inspection of the electrodes is
particularly
useÍul
because the type and colour of
the
deposit
gives
a clue
to conditions inside the combustion chamber, and is
therefore
helpÍul
when
tuning.
Remove the sparking
plugs
by
loosening
them
a
couple of
turns
and
then
blowing away
loose
dirt
from
the
plug
recesses with compressed air
or
a tyíe
pump.
Store
them rn the order of
removal.
Examine the
plug gaskets.
lf they
are about half
their
original
thickness they may
be
used
again.
Examine the firing
end of
the
plugs
to note
the
type
oÍ deposit.
Normally, it should be
powdery,
and
range
P404
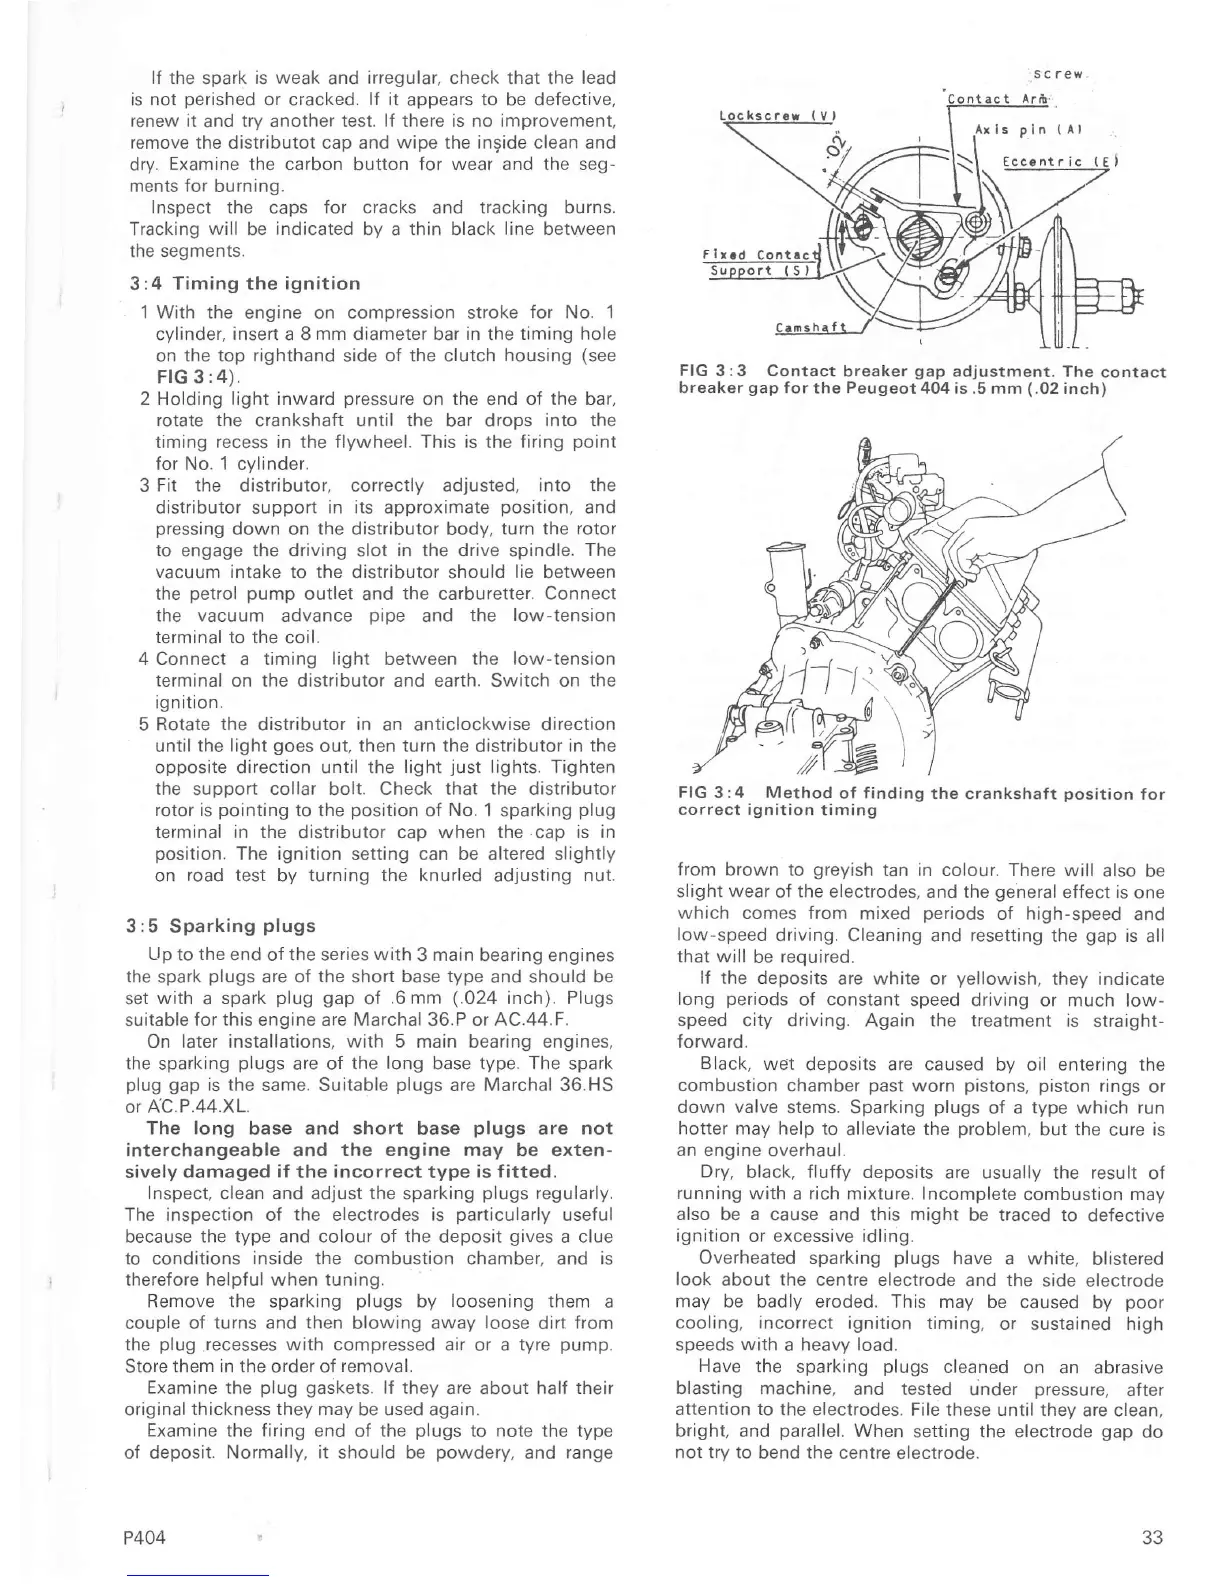
screw
FIG 3:3 Contact
breaker
gap
adjustment. The
contact
breaker
gap
for the Peugeot 404 is
.5
mm
(.02
inch)
)
FIG
3:4 Mêthod
of finding
the crankshaft
position
for
correct ignition
timing
from
brown to
greyish
tan in colour. There will
also
be
slight
wear
of the electrodes,
and the
general
effect is
one
which comes from
mixed
periods
of high-speed
and
low-speed
driving. Cleaning
and
resetting
the
gap
is
all
that will
be
reouired.
lÍ the deposits
are
white
or
yellowish,
they indicate
long
periods
oÍ constant
speed driving or much low-
speed
city driving. Again the treatment is
straight-
forward.
Black,
wet
deposits are caused
by oil
entering
the
combustion
chamber
past
woÍn
pistons, piston
rings
or
down valve
stems. Sparking
plugs
of a type
which
run
hotter may help
to
alleviate
the
problem,
but the
cure
is
an engine overhaul.
Dry,
black, fluffy deposits
are usually the result
of
running
with
a
rich mixture. Incomplete
combustion
may
also be a cause
and this
might
be traced
to
defective
ignition
or excessive idling.
Overheated sparking
plugs
have
a white,
blisteÍed
look
about
the
centre electrode
and
the
side
electrode
may be badly eroded. This
may be caused
by
poor
cooling, incorrect
ignition timing,
or sustained high
speeds with
a
heavy load.
Have
the
sparking
plugs
cleaned
on an abrasive
blasting machine,
and tested
under
pressure,
after
attention to the
electrodes. File these until they
are clean,
bright, and
parallel,
When
setting the electrode
gap
do
not try to bend the
centre electrode.
l<.
11
/l
33

 Loading...