Front
brake hoses:
Front
brake hoses
are
connected to
the fÍont
braKe
cylinders
by
means
of
a
swivel
connector and
when
replacing
or
renewing
a hose
the following
procedure
should
be adopted:
1 The
hose
connector
should
be
at
the lower
part
oÍ
the
front
cylinder,
and slanted
about 45
deg. above the
horizontal
(see
item
1
oÍ FIG 10:15).
2 The
connecting
tube, item
2. should
be
installed
as
snown.
3
The
bleed screw,
item
3, should
be
srtuated
at
the top
of the rear
cylinder.
10:6
Handbrake adjustment
The handbrake
is
adjusted automatically
with the foot-
brake, and normally
no
other adjustment
is required. lÍ
there is still
too much
travel after
adjustment
of the
brakes,
suspect worn
brake linings
or
a
stretched hand-
brake cable. Examine
the linings
and fit
replacement
shoes iÍ they
are
worn. Check the
action
of
the handbrare
again and if there
is still
too much movement
before
tne
brakes are applied, it
may
be adjusted as follows:
1
Chock
the
front
wheels,
jack
up the rear
of the car and
check
the adjustment
of the rear
brake shoes with
the
handbrake
in the
off Dosition.
2 Remove
the
clevis
pins
from
both
rear
brake cables
at the equalizer
bar
at
the front end
of the rear
cables.
3 Set the equalizeí
bar
parallel
to the cross
centre
line
oÍ
the
car with the handbrake
in
the Íully
off
position.
4 Release
the locknuts
and
adjust both
cables
(see
FIG
10:16),
so that the
clevis
pins
will
engage
their
respective
holes in
the
equalizer
bar without
altering
the
position
of the
bar, or imposing
a strarn on the
cables.
Tighten
the locknuts
and fit new
splitpins
in
the
clevis oins.
I
t
5
Check that the rear
shoes are not
dragging on the
rear
brake drums and lower the rear
oÍ the car to the
grouno.
10:7 Bleeding
the
hydraulic
system
This is not routine maintenance and should only be
necessary
iÍ
air
has
entered the
hydraulic system
because
parts
have
been dismantled, or because the
fluid level
in
the
masteÍ
cylinder reservoir has
dropped
so low that
air
has been drawn
in.
BeÍore bleeding the hydraulic system, the following
points
should be
observed.
1 Examine the
master
cylinder reservoir cap and ensure
that the
vent
hole
is
clear.
2 The fluid in
the reservoir
should be up to the'Maxi'
marK.
3
All
unions and connections
should be
checked
for
tightness and Íreedom
from leaks, Also
check the
condition oÍ
Ílexible
hoses.
Bleeding
the system:
1 Clean the area around the
bleed
valves. The
bleed
valves
on
the rear
wheel
cylinders are
the
easier to
reach
and it
is
suggested that these should be bled
first.
lf these are thoroughly done
it
may
not
be
necessarv
to do
the front wheels.
2 Remove the rubber cap
on
the bleed
valve
and
fit a
rubber
or transoarent
tube
on the
valve.
3
Place the
end oÍ
the tube in
a
jar
containing clean
brake
fluid. Keeo the end of the tube beneath the
surÍace of the fluid
during
the
bleeding
operation.
4
Open the bleed
valve
half a
turn
and depress
the
brake
pedal
Íully
to the
Íloo1
ensuring
that the move-
ment is not
restricted
by any undue
thickness
of
floor
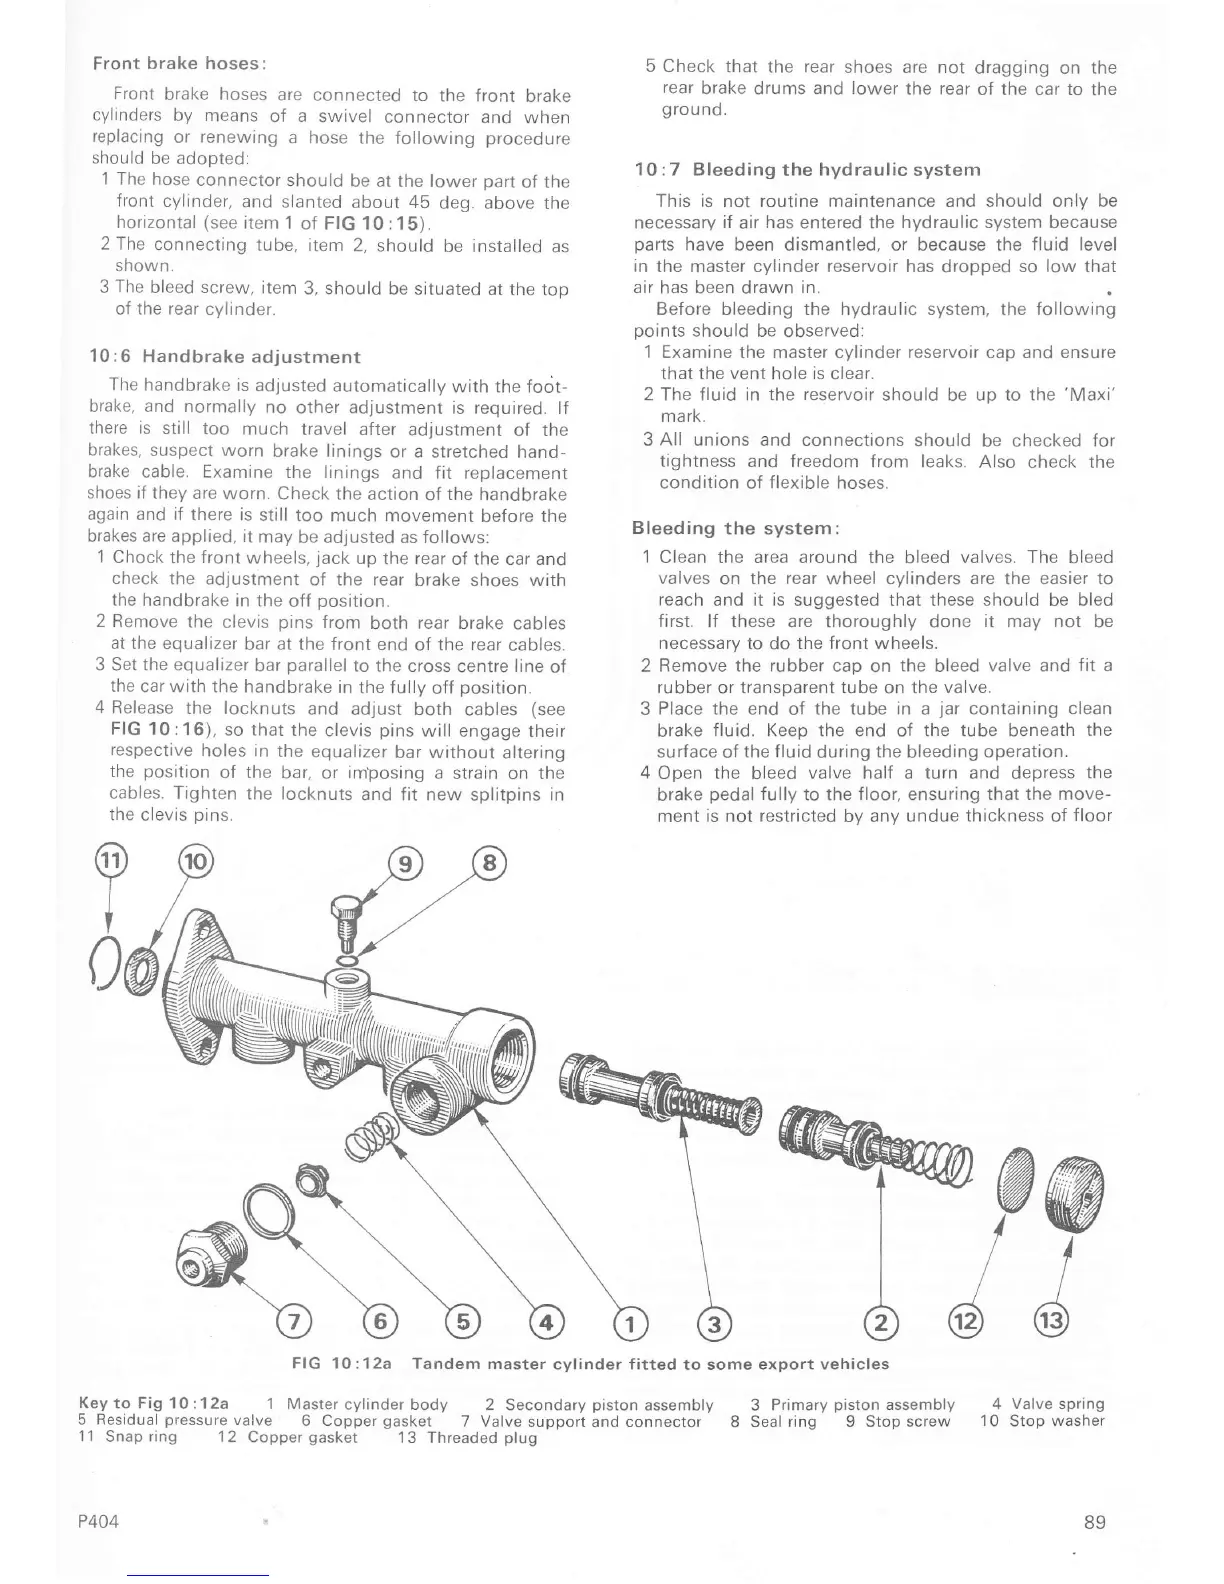
Tandem master
cylinder fitted to some export vehicles
3 Primary
piston
assembly
4
Valve spring
8 Seal
ring 9 Stop screw
10 Stop
washer
@
1O:12aFIG
Key to Fig 1
0
: 1
2a 1 Masreí
cylinder body
2 Secondary
piston
assembly
5
Besidual
pressure
valve
6
Copper
gasket
7
Valve support and connector
1 1
Snap ring 1
2 Copper
gasket
1 3 Threaded
plug
P404
89

 Loading...


