O2IHANDLEBAR,
INSTRUMENTS
36
r
Handlebar
p'osition
Warning
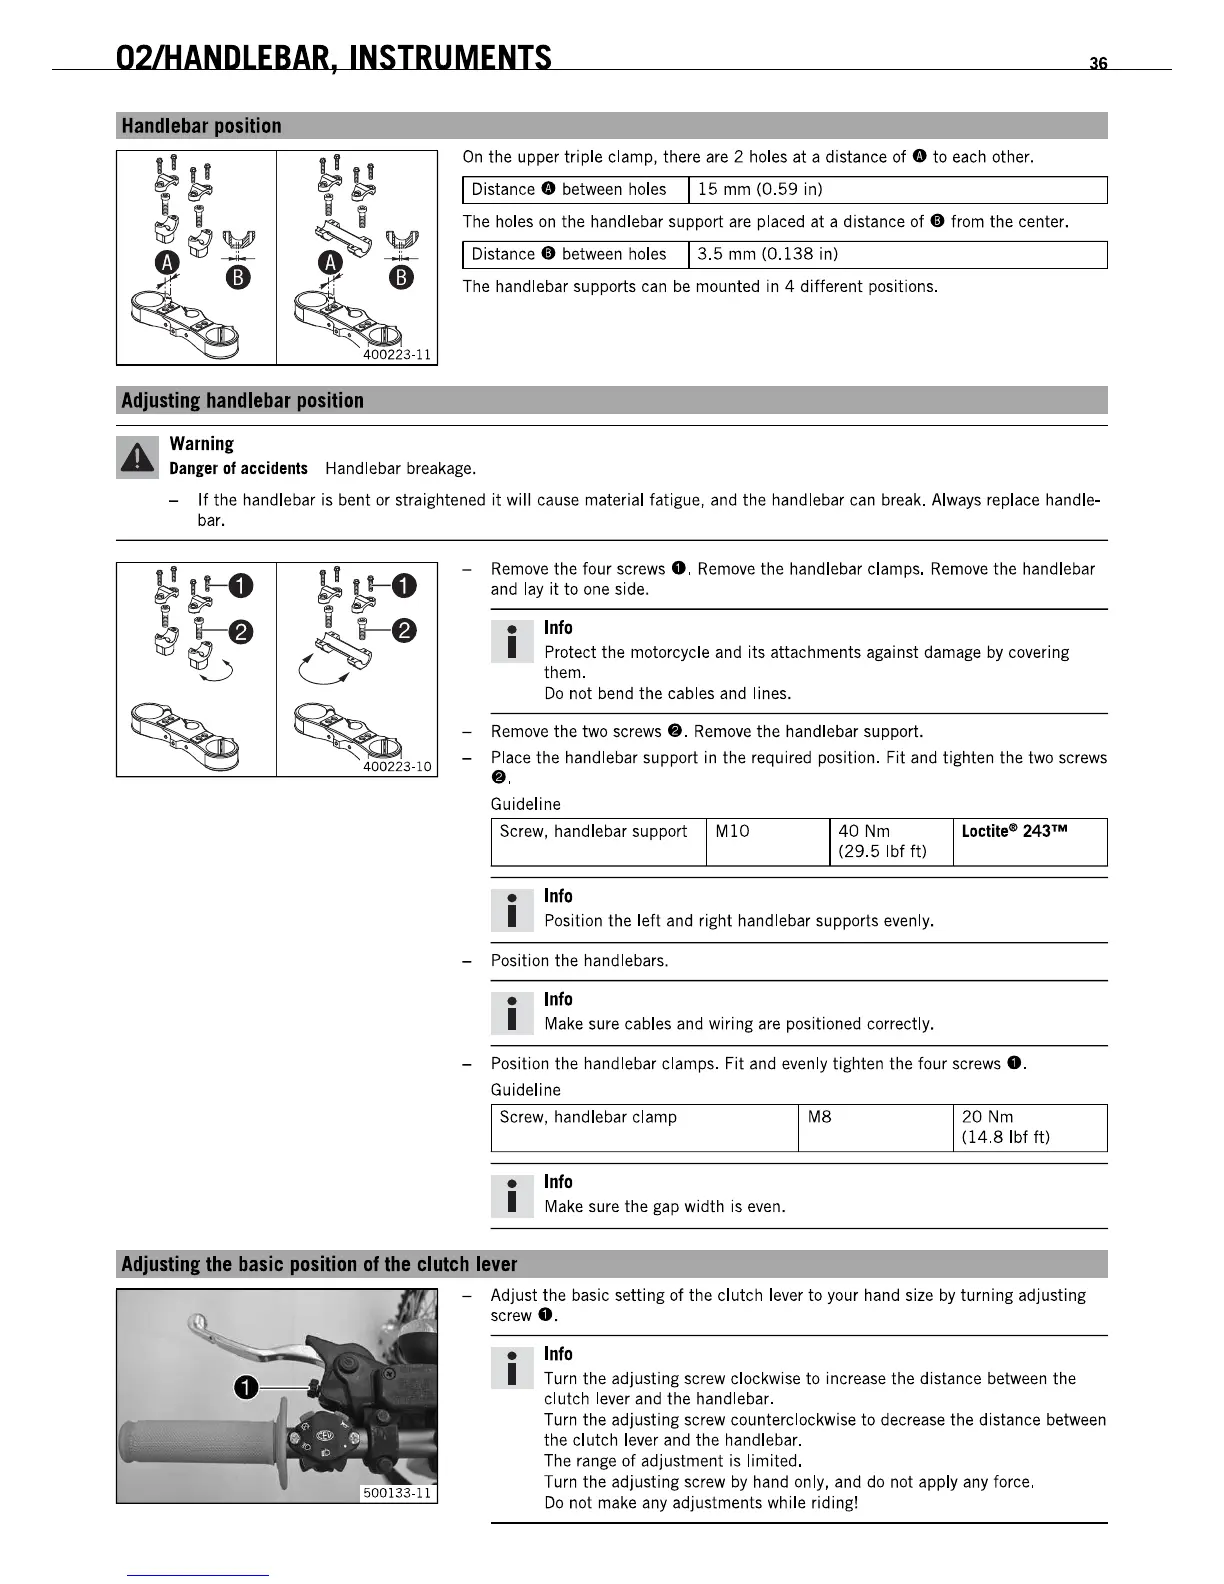
On
the upper triple clamp, there are 2 holes at a distance of •
to
each other.
I
Distance.
between holes
115
mm
CO.59
in)
The holes
on
the handlebar support
are
placed at a distance of • from the center.
I
Distance.
between holes
13.5
mm
(0.138
in)
The handlebar supports can
be
mounted in 4 different positions.
I
Danger
01
accidents
Handlebar breakage.
- If the handlebar is bent or straightened
it
will cause material fatigue, and the handlebar
can
break. Always replace handle-
bar.
~~o
~~-O
i-8
~-8
~
~
'
3-10
-
Remove
the four screws
•.
Remove
the handlebar clamps.
Remove
the handlebar
and lay
it
to one side.
•
Info
I Protect the motorcycle and its attachments against damage
by
covering
them.
Do
not bend the cables
and
lines.
-
Remove
the two screws
•.
Remove
the handlebar support.
- Place the handlebar support in the required position. Fit and tighten the two screws
••
Guideline
Screw, handlebar support
MI0
•
Info
40
Nm
(29.5
Ibf
ftl
I Position the left and right handlebar supports evenly.
- Position the handlebars.
•
Info
I Make sure cables and wiring are positioned correctly.
Loctit" 243
111
- Position the handlebar clamps. Fit and evenly tighten the four screws O.
Guideline
Screw, handlebar clamp
•
Info
I Make sure the gap width is even.
M8
20
Nm
(14.8
Ibf
ft)
Adjultinl
the
basic
p'osition
of
the
clutch
lever
- Adjust the basic setting of the clutch lever to your hand size by turning adjusting
screw
•.
•
Info
I Turn the adjusting screw clockwise
to
increase the distance between the
clutch lever and the handlebar.
Turn the adjusting screw counterclockwise
to
decrease the distance between
the clutch lever and the handlebar.
The range
of
adjustment is limited.
Turn the adjusting screw
by
hand only, and do not apply any force.
Do
not make any adjustments while riding!
O2IHANDLEBAR,
INSTRUMENTS
36
r
Handlebar
p'osition
Warning
On
the upper triple clamp, there are 2 holes at a distance of •
to
each other.
I
Distance.
between holes
115
mm
CO.59
in)
The holes
on
the handlebar support
are
placed at a distance of • from the center.
I
Distance.
between holes
13.5
mm
(0.138
in)
The handlebar supports can
be
mounted in 4 different positions.
I
Danger
01
accidents
Handlebar breakage.
- If the handlebar is bent or straightened
it
will cause material fatigue, and the handlebar
can
break. Always replace handle-
bar.
~~o
~~-O
i-8
~-8
~
~
'
3-10
-
Remove
the four screws
•.
Remove
the handlebar clamps.
Remove
the handlebar
and lay
it
to one side.
•
Info
I Protect the motorcycle and its attachments against damage
by
covering
them.
Do
not bend the cables
and
lines.
-
Remove
the two screws
•.
Remove
the handlebar support.
- Place the handlebar support in the required position. Fit and tighten the two screws
••
Guideline
Screw, handlebar support
MI0
•
Info
40
Nm
(29.5
Ibf
ftl
I Position the left and right handlebar supports evenly.
- Position the handlebars.
•
Info
I Make sure cables and wiring are positioned correctly.
Loctit" 243
111
- Position the handlebar clamps. Fit and evenly tighten the four screws O.
Guideline
Screw, handlebar clamp
•
Info
I Make sure the gap width is even.
M8
20
Nm
(14.8
Ibf
ft)
Adjultinl
the
basic
p'osition
of
the
clutch
lever
- Adjust the basic setting of the clutch lever to your hand size by turning adjusting
screw
•.
•
Info
I Turn the adjusting screw clockwise
to
increase the distance between the
clutch lever and the handlebar.
Turn the adjusting screw counterclockwise
to
decrease the distance between
the clutch lever and the handlebar.
The range
of
adjustment is limited.
Turn the adjusting screw
by
hand only, and do not apply any force.
Do
not make any adjustments while riding!
 Loading...