365
A pop-up window appears.
3
Press the button for the signal format to set.
The status area shows the selected signal format.
To clear the signal format setting
Press [Clear].
• You cannot clear the setting after using [Execute].
• Using [Execute] initializes the memory, clearing
part of the data.
4
Press [Execute].
5
Check the message, then press [Yes].
Enabling Passage of 59.94 (2×)
Format Signals on an AUX Bus
When the signal format is 1080i/59.94 or 1080PsF/29.97,
passage of other format (59.94 (2×)) signals can be enabled
on the AUX bus only.
You can output signals from a connector for which any of
the following is assigned.
Preset, Edit Preview, AUX1 to 48
1
In the Engineering Setup >System >Format menu
(7313), press [AUX Signal Format].
The AUX Signal Format menu (7313.5) appears.
2
Select the target data to set.
For each group, four outputs are selected together.
3
In the <AUX Signal Format> group, press
[59.94Hz(2×)].
To block passage of 59.94 (2×) signals on the AUX
bus, select [59.94Hz] or [29.97Hz].
4
Press [Execute].
5
Check the message, then press [Yes].
Switching the Input Reference
Signal
SWR1 and DME1 (and SWR2 and DME3) input reference
signal settings are linked.
1
In the Engineering Setup >System >Format menu
(7313), select the target device to set.
2
In the <Ref Input Format> group, select one of the
following.
Tri Sync: HD tri-level sync
BB: Black burst or sync
3
Press [Execute].
4
Check the message, then press [Yes].
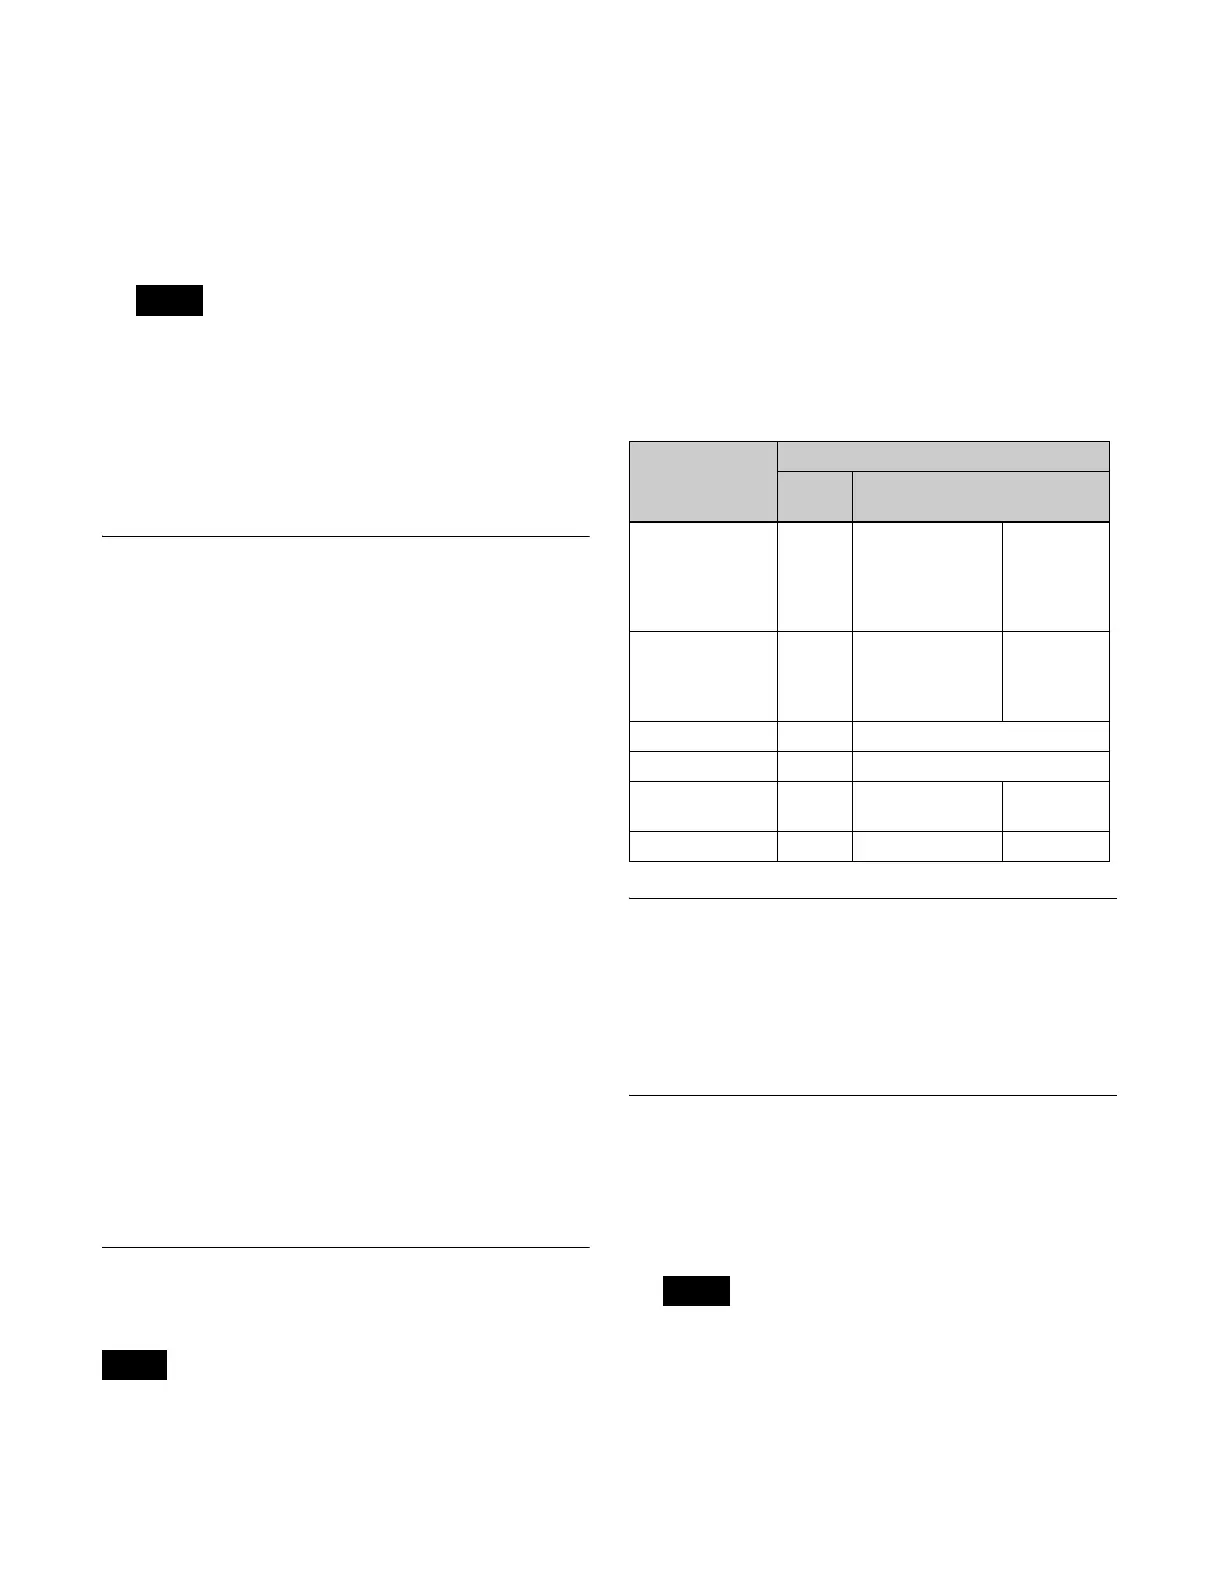
The following table shows the relationship between signal
format and the supported input reference signal frequency.
Adding a Payload ID
When the signal format is 1080PsF, 1080i, or 720P, a
payload ID can be added to the output signal.
To add a payload ID, in the Engineering Setup >System
>Format menu (7313), press [Payload ID], turning it on.
Setting the Screen Aspect Ratio
The screen aspect ratio can be set to 16:9 or 4:3.
1
In the Engineering Setup >System >Format menu
(7313), select the target device to set.
• The screen aspect ratio cannot be selected when a
control panel is selected.
• In 4K format, the screen aspect ratio is fixed to 16:9.
2
In the <Screen Aspect> group, select one of the
following.
Notes
Note
Signal format Input reference signal
Tri
Sync
BB
3840×2160P/
59.94
1080P/59.94
1080PsF/29.97
1080i/59.94
59.94 Black Burst
59.94
Sync 59.94
3840×2160P/50
1080P/50
1080PsF/25
1080i/50
50 Black Burst 50 Sync 50
1080PsF/24 48 –
1080PsF/23.98 47.952 –
720P/59.94 59.94 Black Burst
59.94
Sync 59.94
720P/50 – Black Burst 50 Sync 50
Notes

 Loading...