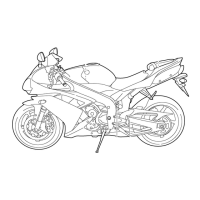
HANDLEBARS
4-42
EAS22870
REMOVING THE HANDLEBARS
1. Stand the vehicle on a level surface.
WARNING
EWA13120
Securely support the vehicle so that there is
no danger of it falling over.
2. Remove:
• Handlebar grip “1”
NOTE:
Blow compressed air between the handlebar
and the handlebar grip, and gradually push the
grip off the handlebar.
EAS22890
CHECKING THE HANDLEBARS
1. Check:
• Left handlebar
• Right handlebar
Bends/cracks/damage → Replace.
WARNING
EWA13690
Do not attempt to straighten a bent handle-
bar as this may dangerously weaken it.
EAS22900
INSTALLING THE HANDLEBARS
1. Stand the vehicle on a level surface.
WARNING
EWA13120
Securely support the vehicle so that there is
no danger of it falling over.
2. Install:
• Front brake master cylinder “1”
• Front brake master cylinder holder “2”
NOTE:
• Install the brake master cylinder holder with the
“UP” mark “a” facing up.
• Align the mating surfaces of the brake master
cylinder holder with the punch mark “b” on the
handlebar.
• First, tighten the upper bolt, then the lower bolt.
3. Install:
• Right handlebar switch “1”
• Right handlebar switch bracket “2”
NOTE:
Align the projection “a” on the right handlebar
switch with the hole “b” on the right handlebar.
4. Install:
• Throttle grip
• Throttle cables
• Throttle cable housings “1”
NOTE:
Align the projection “a” on the throttle cable
housing with the hole “b” in the right handlebar.
5. Install:
• Right grip end “1”
T
R
.
.
Front brake master cylinder hold-
er bolt
13 Nm (1.3 m·kg, 9.4 ft·lb)
1
2
a
b
a
1
2
b
 Loading...