139
Connecting External MIDI Devices
6.
Use the cursor [ ] [ ] buttons to select the
parameter you want to edit, and then use the [DEC]
[INC] buttons or the VALUE dial to edit the value.
7.
When you have finished making the settings, press
the [EDIT] button, extinguishing its indicator.
You are returned to the Tone screen.
The settings for recording to the external sequencer are
now selected.
With Rec Mode set to ON, you cannot change the
EXTERNAL Zone settings (p. 96). Pressing the
[EXTERNAL/INTERNAL] button does not call up the
External screen when Rec Mode is set to ON.
Use the following procedure when recording to an external
sequencer.
1.
Turn on the external sequencer’s Thru function.
For details, refer to the following section “About Local
Switch.”
Refer to your sequencer owner’s manual for instructions
on how to carry out this procedure.
2.
Select the Setup for the performance to be
recorded.
For instructions on selecting the Setup, refer to p. 65.
3.
Set the Rec Setting and Local Control.
Use the procedure described in the previous section
“Settings for Recording” to make the following settings.
Rec Mode: ON
Local Switch: OFF
4.
Begin recording with the external sequencer.
5.
Bulk Dump the Setup.
Using the Utility Bulk Dump in Edit mode, transmit the
contents of the selected Setup to the external sequencer.
For instructions on carrying out this operation, refer to
“Transmitting Setup Data to an External MIDI Device
(Bulk Dump)” (p. 135).
6.
Perform on the RD-700GX.
7.
When the performance is finished, stop recording
with the external sequencer.
Recording is now complete.
You can then listen to the recorded performance by
playing it back on the external sequencer.
When Rec Mode is set to ON, you cannot change the
EXTERNAL settings. When you have finished recording the
performance, use the procedure described in the previous
section “Settings for Recording” to set Rec Mode to OFF.
The settings made in Rec Setting cannot be saved.
Rec Setting automatically switch to “Rec Mode: OFF,
Local Switch: ON” when the power is turned on.
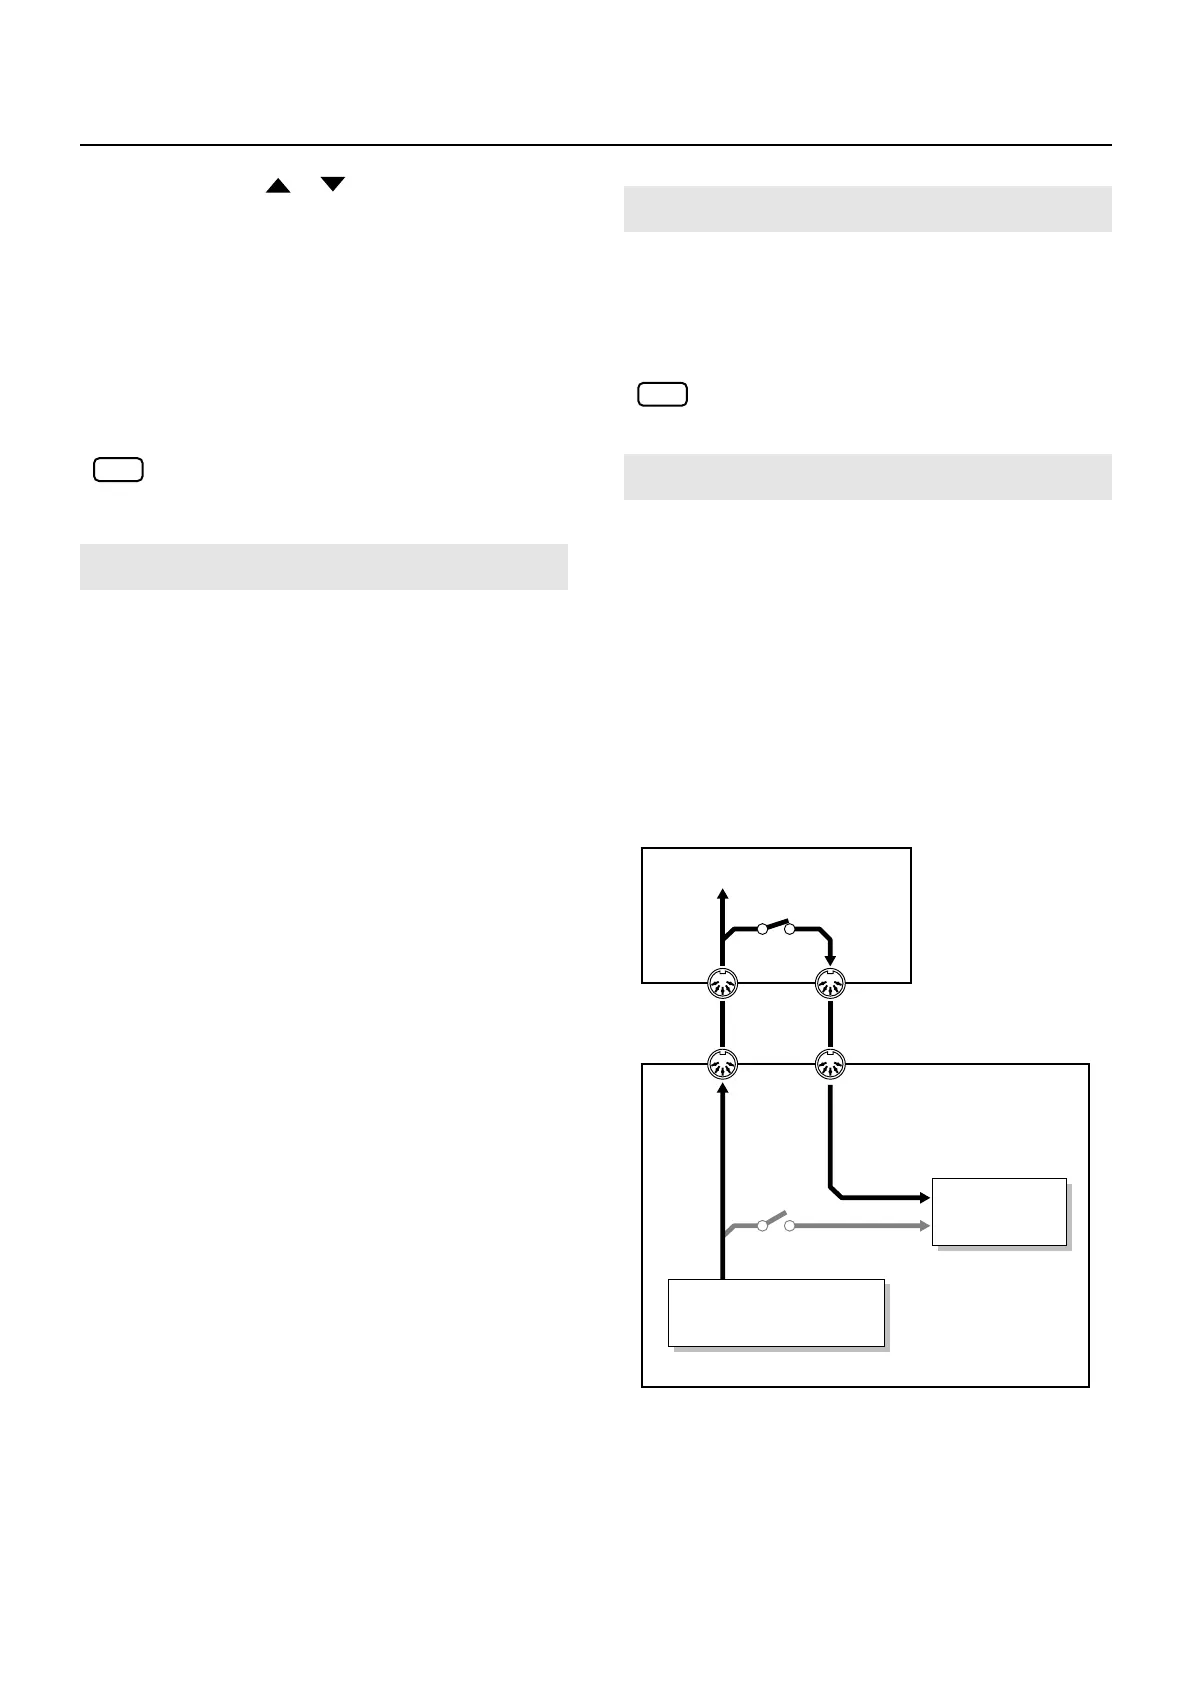
The switch that connects and disconnects the MIDI connection
between the keyboard controller section and the sound
generator section (p. 28) is called the Local switch. Since
essential information describing what is being played on the
keyboard won’t reach the sound generator if the Local switch
is set to OFF, the Local switch should normally be left ON.
However, if while performing you want to send that
performance data to an external sequencer as MIDI messages
to be recorded, you then perform with the externally
connected MIDI sequencer set to MIDI Thru (whereby data
received from MIDI IN is then output from the MIDI OUT with
no changes made to the data).
fig.06-05e
In this case, the data sent over two paths, i.e., the data sent
directly from the keyboard controller section and the data sent
from the keyboard controller section via the external
sequencer, ends up being sent to the sound generator section
simultaneously. Thus, for example, even when you play a “C”
key only once, the note “C” cannot be sounded correctly, as
the sound is played by the sound generator section twice.
Recording the Performance
NOTE
Exiting Rec Mode
About the Local Switch
NOTE
MIDI OUT MIDI IN
MIDI IN MIDI OUT
RD-700GX
Sequencer
Recording
MIDI Thru: On
Local Switch: Off
Keyboard Controller
Section
Sound
Generator
Section
RD-700GX_e.book 139 ページ 2008年2月13日 水曜日 午後5時49分
 Loading...