91
Making Detailed Settings for Tones
You can make changes in tones by adjusting the settings of the
following five elements.
Attack Time:
The time it takes after the key is pressed for a
sound to reach full volume.
Release Time:
This is the time over which the sound decays to
silence after you release the key.
Cutoff:
Adjusts how much the filter is opened.
Resonance:
Emphasizes the overtones in the region of the
cutoff frequency, adding character to the sound.
Excessively high settings can produce
oscillation, causing the sound to distort.
Decay Time:
The time it is to take following the attack for the
volume to decrease.
Making abrupt changes in the settings values may
cause the sound to become distorted or overly
loud. Carefully monitor volume levels while making
the settings.
With some Tones, the effect does not work as
intended.
If you’ve selected a tone from the Piano category, you’ll
be able to edit the following parameters.
String Resonance (p. 78)
Key Off Resonance (p. 78)
Hammer Noise (p. 79)
Micro Tune Edit (p. 80)
The sixteen Parts played by the RD-700GX’s internal sound
generator are referred to as “Internal Parts.”
Of the sixteen Internal Parts, you can select four of them to
function as the four Parts (UPPER 1, UPPER 2, LOWER 1, and
LOWER 2) which can be freely controlled with the RD-
700GX’s buttons and keyboard. These four Parts are
collectively known as the “Zone.”
You can perform operations like Split with the INTERNAL Zone
very simply using the RD-700GX’s keyboard (p. 43), and you
can make more detailed settings for the Zone as well.
Depending on the tone selected, there may be
parameters that cannot be altered.
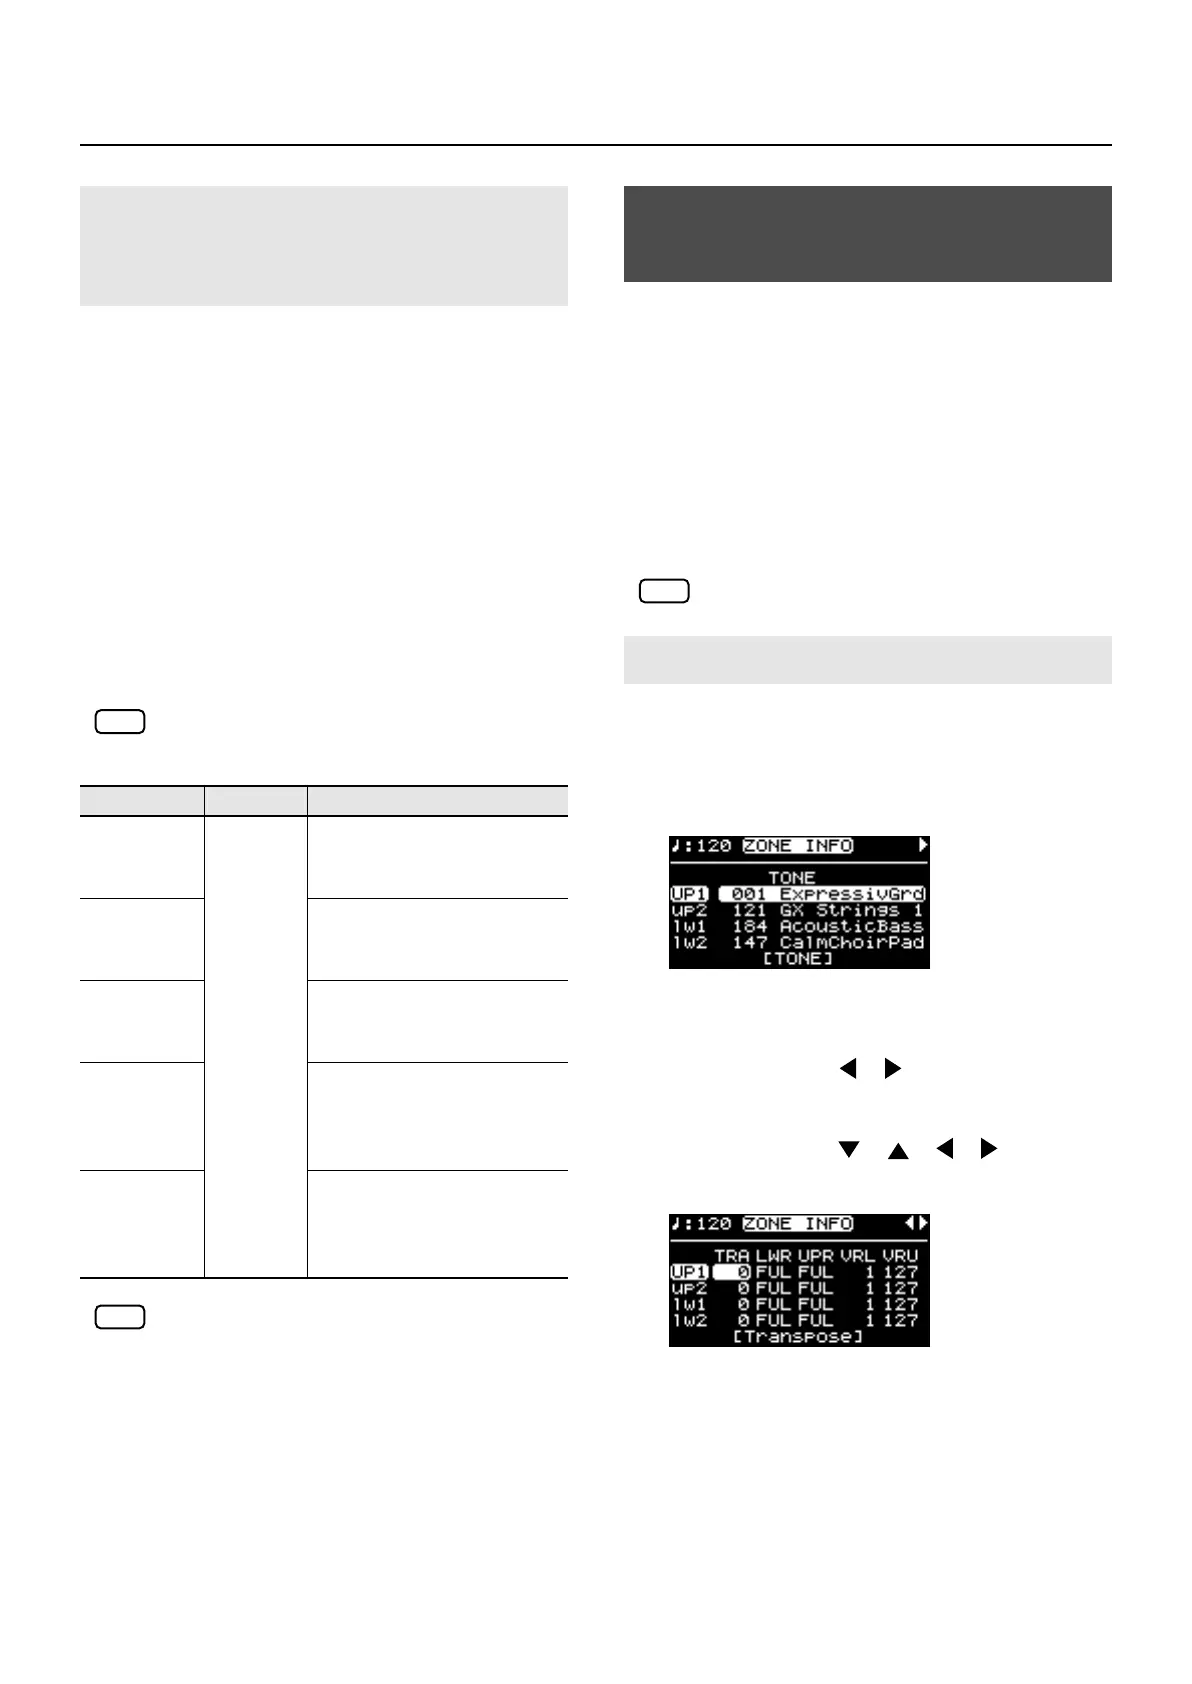
1.
In the Tone screen, press the [F2 (ZONE INFO)]
button.
The [F2] button will blink, and the ZONE INFO screen
will appear.
fig.04-01g
The names of zones that have ZONE SWITCH set to
OFF are shown in lowercase letters.
2.
Press the Cursor [ ] [ ] buttons to switch
screens.
3.
Press the Cursor [ ] [ ] [ ] [ ] buttons to
move the Cursor to the parameter to be set.
fig.04-02g
4.
Use the [DEC] [INC] buttons or the VALUE dial
to edit the value.
Pressing the [DEC] and [INC] buttons simultaneously sets
that parameter to the standard default value.
5.
When you finish making settings, press the
[F2] button, extinguishing its indicator.
You are returned to the Tone screen.
Changing Tone Elements
(Attack Time/Release Time/Cutoff/
Resonance/Decay Time)
Parameter
Value Description
Attack Time
(Offset)
-64–+63
Higher values produce a
milder attack; lower values
produce a sharper attack.
Release Time
(Offset)
Higher values produce longer
decay; set lower values for a
clear-cut sound.
Cutoff
(Offset)
Higher values brighten the
sound; lower values make the
sound seem darker.
Resonance
(Offset)
Higher value makes the
special quality of the sound
stronger; lower value reduce
these characteristics.
Decay Time
(Offset)
The time it takes for the volume
to fall increases as the value is
raised; lowering the value
decreases the decay time.
NOTE
NOTE
Making Zone Settings
(ZONE INFO)
How to Make Settings
NOTE
RD-700GX_e.book 91 ページ 2008年2月13日 水曜日 午後5時49分
 Loading...