17
5
6
5
A
8
7
7
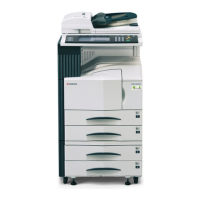
17.Insert base slider A (F) that was disassem-
bled in step 5 and base slider V (W) under
the assembly base (X) and hook the tabs (4).
18.Fix base slider A (F) with four M4 × 10 tap
Tight S screws (I) and fix base slider V (W)
with four M4 × 10 tap Tight S screws (Y)
respectively.
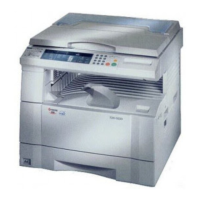
Removing the cover
19.Open the front cover of the document fin-
isher (A).
20.Remove two screws (5) to remove the lower
front cover (6).
21.Close the front cover of the document fin-
isher (A).
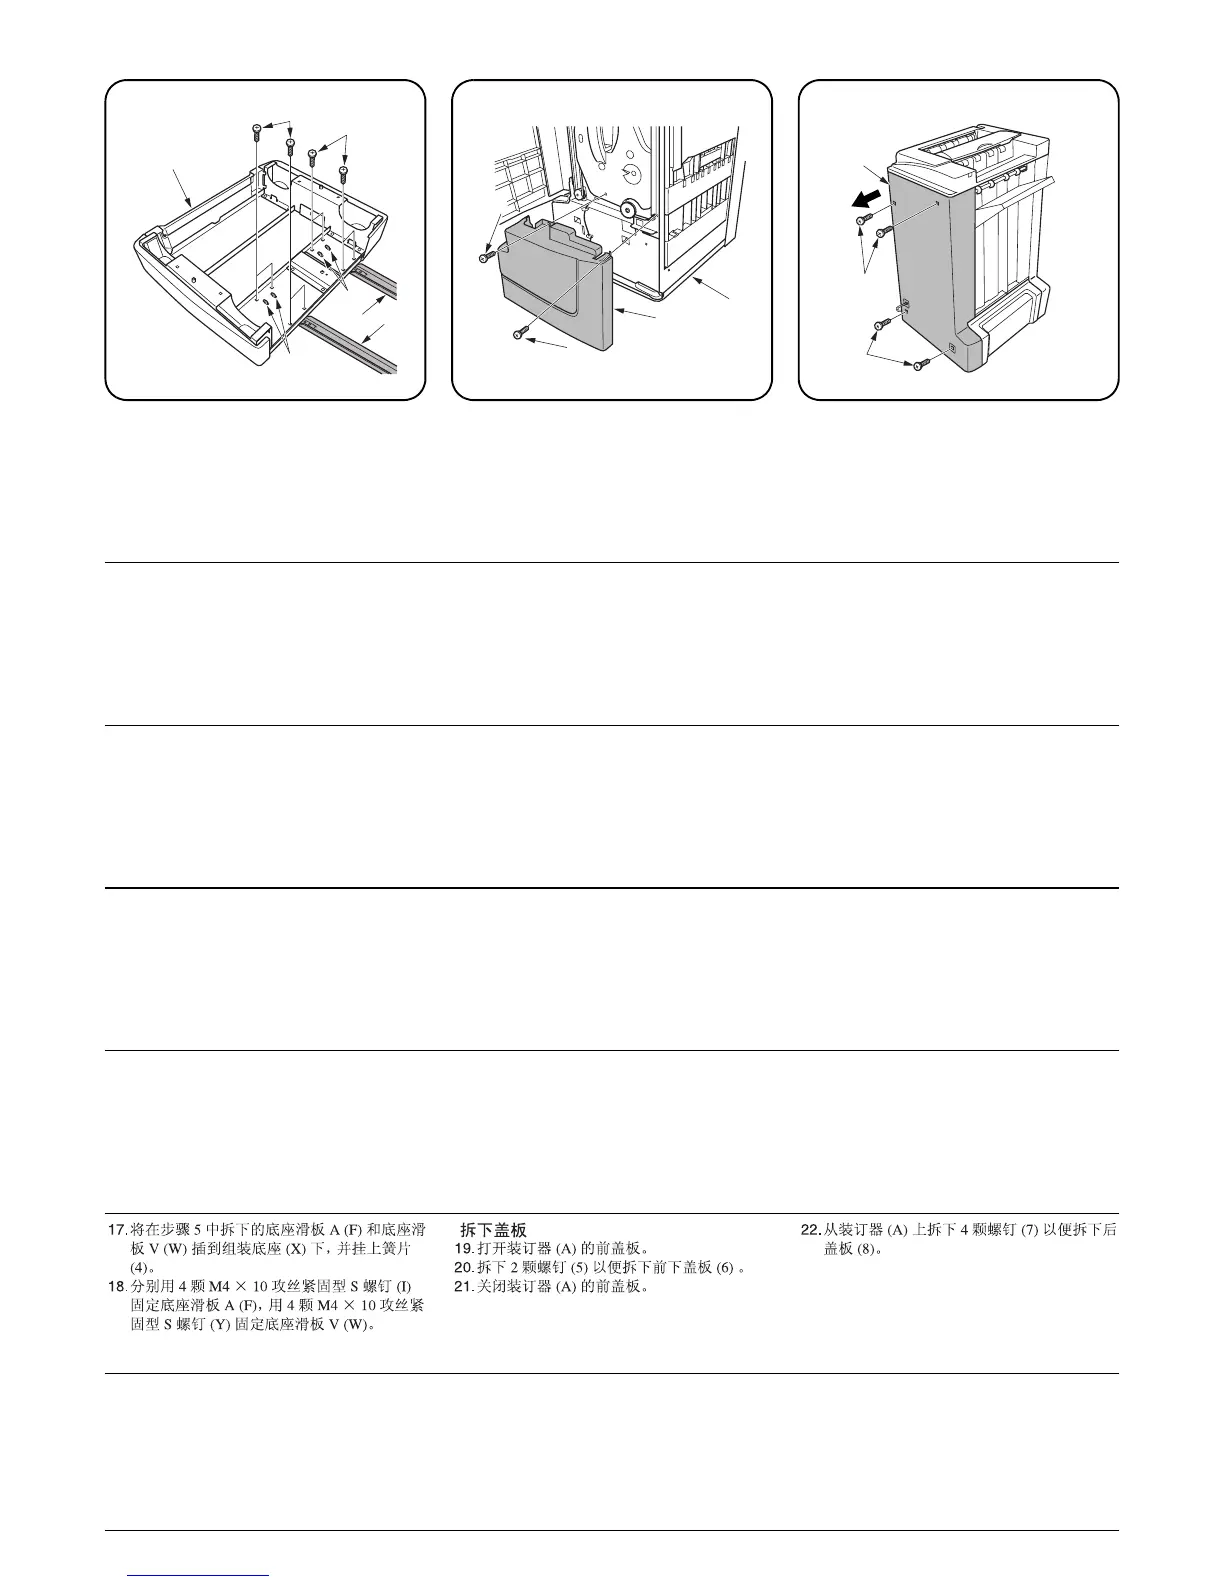
22.Remove four screws (7) to remove the back
cover (8) from the document finisher (A).
17.Insérer la règle de base A (F) démontée à
l’étape 5 et la règle de base V (W) sous la
base d’ensemble (X) et accrocher les
onglets (4).
18.Fixer la règle de base A (F) à l’aide de qua-
tre vis S taraudées M4 × 10 (I) et fixer la
règle de base V (W) à l’aide de quatre vis S
taraudées M4 × 10 (Y) respectivement.
Enlèvement du capot
19.Ouvrir le capot avant du retoucheur de docu-
ment (A).
20.Retirer les deux vis (5) pour retirer le capot
inférieur avant (6).
21.Refermer le capot avant du retoucheur de
document (A).
22.Retirer quatre vis (7) pour retirer le capot
arrière (8) du retoucheur de document (A).
17.Inserte el deslizador A (F) que fue desmon-
tado en el paso 5 y el deslizador de base V
(W) debajo de la base del conjunto (X) y
enganche las lengüetas (4).
18.Fije el deslizador A (F) con cuatro tornillos
de ajuste M4 × 10 (I) y el deslizador de base
V (W) con cuatro tornillos de ajuste M4 × 10
(Y) respectivamente.
Extracción de la cubierta
19.Abra la cubierta delantera del finalizador de
documentos (A).
20.Quite los dos tornillos (5) para quitar la
cubierta delantera inferior (6).
21.Cierre la cubierta delantera del finalizador de
documentos (A).
22.Quite los cuatro tornillos (7) para quitar la
cubierta trasera (8) del finalizador de docu-
mentos (A).
17.Führen Sie den im Schritt zerlegten Basis-
Schieber A (F) und den Basis-Schieber V
(W) unter die Bauteile-Basis (X), und rasten
Sie die Laschen (4) danach ein.
18.Befestigen den Basis-Schieber A (F) mit den
vier M4 × 10 Passstift-Verbundschrauben (I),
und befestigen Sie danach den Basis-Schie-
ber V (W) mit den vier M4 × 10 Passstift-Ver-
bundschrauben (Y).
Entfernen der Abdeckung
19.Öffnen Sie die vordere Abdeckung am Doku-
ment-Finisher (A).
20.Entfernen Sie die beiden Schrauben (5), um
die untere vordere Abdeckung (6) zu entfer-
nen.
21.Schließen Sie die vordere Abdeckung des
Dokument-Finishers (A).
22.Entfernen Sie die vier Schrauben (7), um die
hintere Abdeckung (8) vom Dokument-Fini-
sher (A) abzunehmen.
17.Inserire lo scivolo di base A (F) smontato al
punto 5 e lo scivolo di base V (W) sotto la
base di assemblaggio (X) e agganciare le
linguette (4).
18.Fissare rispettivamente lo scivolo di base A
(F) con quattro viti con testa a croce S M4 ×
10 (I) e lo scivolo di base V (W) con quattro
viti con testa a croce S M4 × 10 (Y).
Rimozione del pannello
19.Aprire il pannello anteriore della finitrice di
documenti (A).
20.Togliere due viti (5) per rimuovere il pannello
anteriore inferiore (6).
21.Chiudere il pannello anteriore della finitrice di
documenti (A).
22.Togliere quattro viti (7) per rimuovere il pan-
nello posteriore (8) dalla finitrice di docu-
menti (A).
17.組立ベース (X) の下に手順 5 で分解した
ベーススライダ A(F) とベーススライダ V(W)
を差込み、ツメ (4) を引っ掛ける。
18.ベーススライダ A(F) をビス M4 × 10 タップ
タイト S(I)4 本で、ベーススライダ V(W) を
ビス M4 × 10 タップタイト S(Y)4 本でそれ
ぞれ固定する。
カバーの取り外し
19.ドキュメントフィニッシャ(A) の前カバーを
開く。
20.ビス (5)2 本外し、前下カバー(6) を取り外
す。
21.ドキュメントフィニッシャ(A) の前カバーを
閉じる。
22.ビス (7)4 本を外し、ドキュメントフィニッ
シャ(A) の後カバー(8) を取り外す。
X
4
F
W
I
Y
4

 Loading...