11
11
11
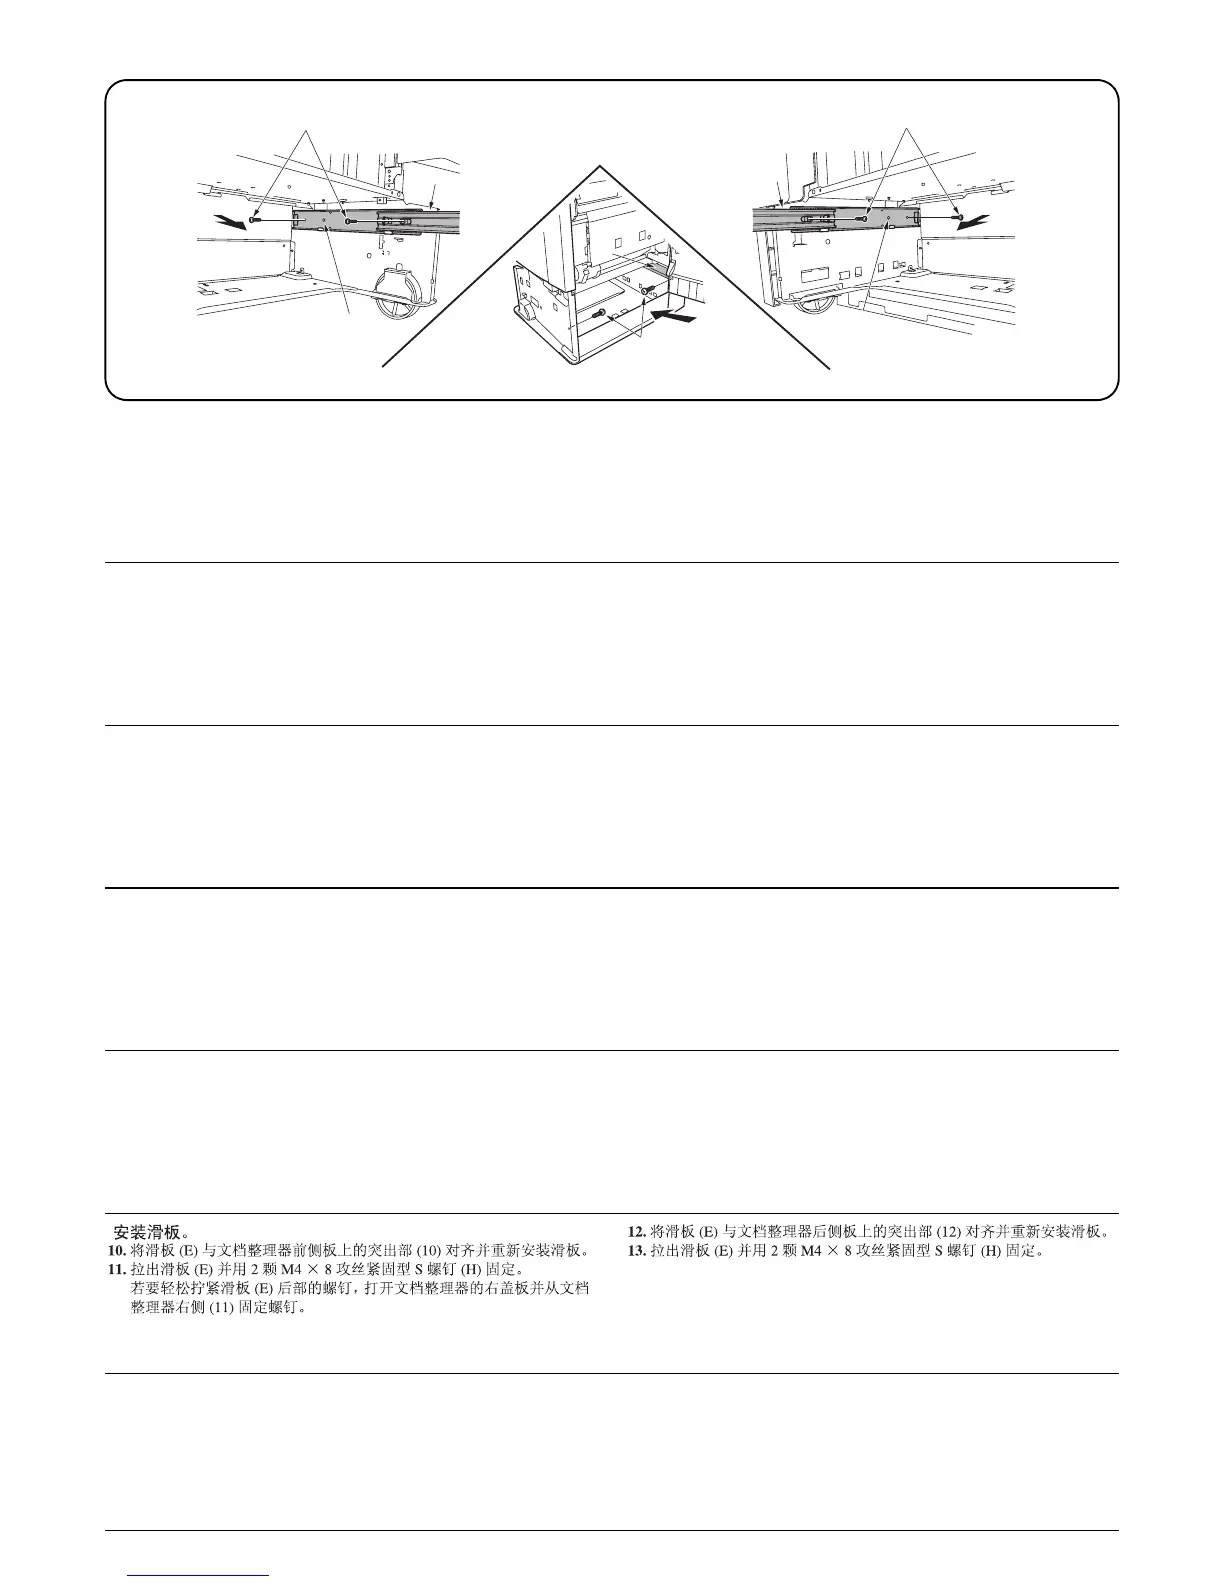
Installing the slider.
10.Align slider (E) with projection (10) on the front-side plate of the docu-
ment finisher and install the slider.
11. Pull out slider (E) and secure it with two M4 × 8 tap-tight S screws (H).
To tighten the screw at the rear side of slider (E) easily, open the right
cover of the document finisher and secure the screw from the right side
(11) of the document finisher.
12.Align slider (E) with projection (12) on the back-side plate of the docu-
ment finisher and install the slider.
13.Pull out slider (E) and secure it with two M4 × 8 tap-tight S screws (H).
Installation de la règle.
10.Aligner la règle (E) sur la saillie (10) de la plaque avant du finisseur de
document et installer la règle.
11. Faire ressortir la règle (E) et la fixer à l’aide de deux vis S taraudées
M4 × 8 (H).
Pour pouvoir serrer facilement la vis à l’arrière de la règle (E), ouvrir le
capot de droite du finisseur de document et fixer a vis depuis le côté
droit (11) du finisseur de document.
12.Aligner la règle (E) sur la saillie (12) à l’arrière de la plaque latérale du
finisseur de document et installer la règle.
13.Faire ressortir la règle (E) et la fixer à l’aide de deux vis S taraudées
M4 × 8 (H).
Instalación del deslizador.
10.Alinee el deslizador (E) con el resalto (10) de la placa del lado frontal
del finalizador de documentos e instale el deslizador.
11. Saque el deslizador (E) y asegúrelo con dos tornillos de ajuste M4 × 8
(H).
Para apretar fácilmente el tornillo del lado posterior del deslizador (E),
abra la cubierta derecha del finalizador de documentos y asegure el
tornillo desde el lado derecho (11) del finalizador de documentos.
12.Alinee el deslizador (E) con el resalto (12) de la placa del lado posterior
del finalizador de documentos e instale el deslizador.
13.Saque el deslizador (E) y asegúrelo con dos tornillos de ajuste M4 × 8
(H).
Anbringen des Schiebers.
10.
Richten Sie den Schieber (E) mit dem Vorsprung (10) auf der vorderen Seiten-
platte des Dokument-Finishers aus und bringen Sie dann den Schieber an.
11. Ziehen Sie den Schieber (E) heraus und befestigen Sie ihn mit den bei-
den M4 × 8 Passstift-Verbundschrauben (H).
Um die Schraube auf der Rückseite des Schiebers (E) ohne Problems
festzuziehen, öffnen Sie die rechte Abdeckung des Dokument-Fini-
shers und ziehen Sie die Schraube von der rechten Seite (11) des
Dokument-Finishers her an.
12.Richten Sie den Schieber (E) mit dem Vorsprung (12) auf der hinteren
Seitenplatte des Dokument-Finishers aus und bringen Sie dann den
Schieber an.
13.Ziehen Sie den Schieber (E) heraus und befestigen Sie ihn mit zwei M4
× 8 Passstift-Verbundschrauben (H).
Installare lo scivolo.
10.Installare lo scivolo (E) allineandolo alla parte sporgente (10) sulla
lastra anteriore della finitrice.
11. Fare uscire lo scivolo (E) e fissarlo con due viti con testa a croce S M4
× 8 (H). Per fissare con facilita la vite alla parte posteriore dello scivolo
(E), aprire il pannello destro della finitrice e serrare la vite dal lato
destro (11) della finitrice.
12.Allineare lo scivolo (E) alla parte sporgente (12) sulla lastra posteriore
della finitrice e installarlo.
13.Far fuoriuscire lo scivolo (E) e fissarlo con due viti con testa a croce S
M4 × 8 (H).
スライダの取り付け
10.スライダ (E) をドキュメントフィニッシャ前側板の突起 (10) に合わ
せて取り付ける。
11.スライダ (E) を引き出し、M4 × 8 タップタイト S(H)2 本で固定する。
スライダ (E) 後側のビスは、ドキュメントフィニッシャの右カバーを
開き、ドキュメントフィニッシャの右方向 (11) から作業すると締めや
すい。
12.スライダ (E) をドキュメントフィニッシャ後側板の突起 (12) に合わ
せて取り付ける。
13.スライダ (E) を引き出し、M4 × 8 タップタイト S(H)2 本で固定する。

 Loading...