8
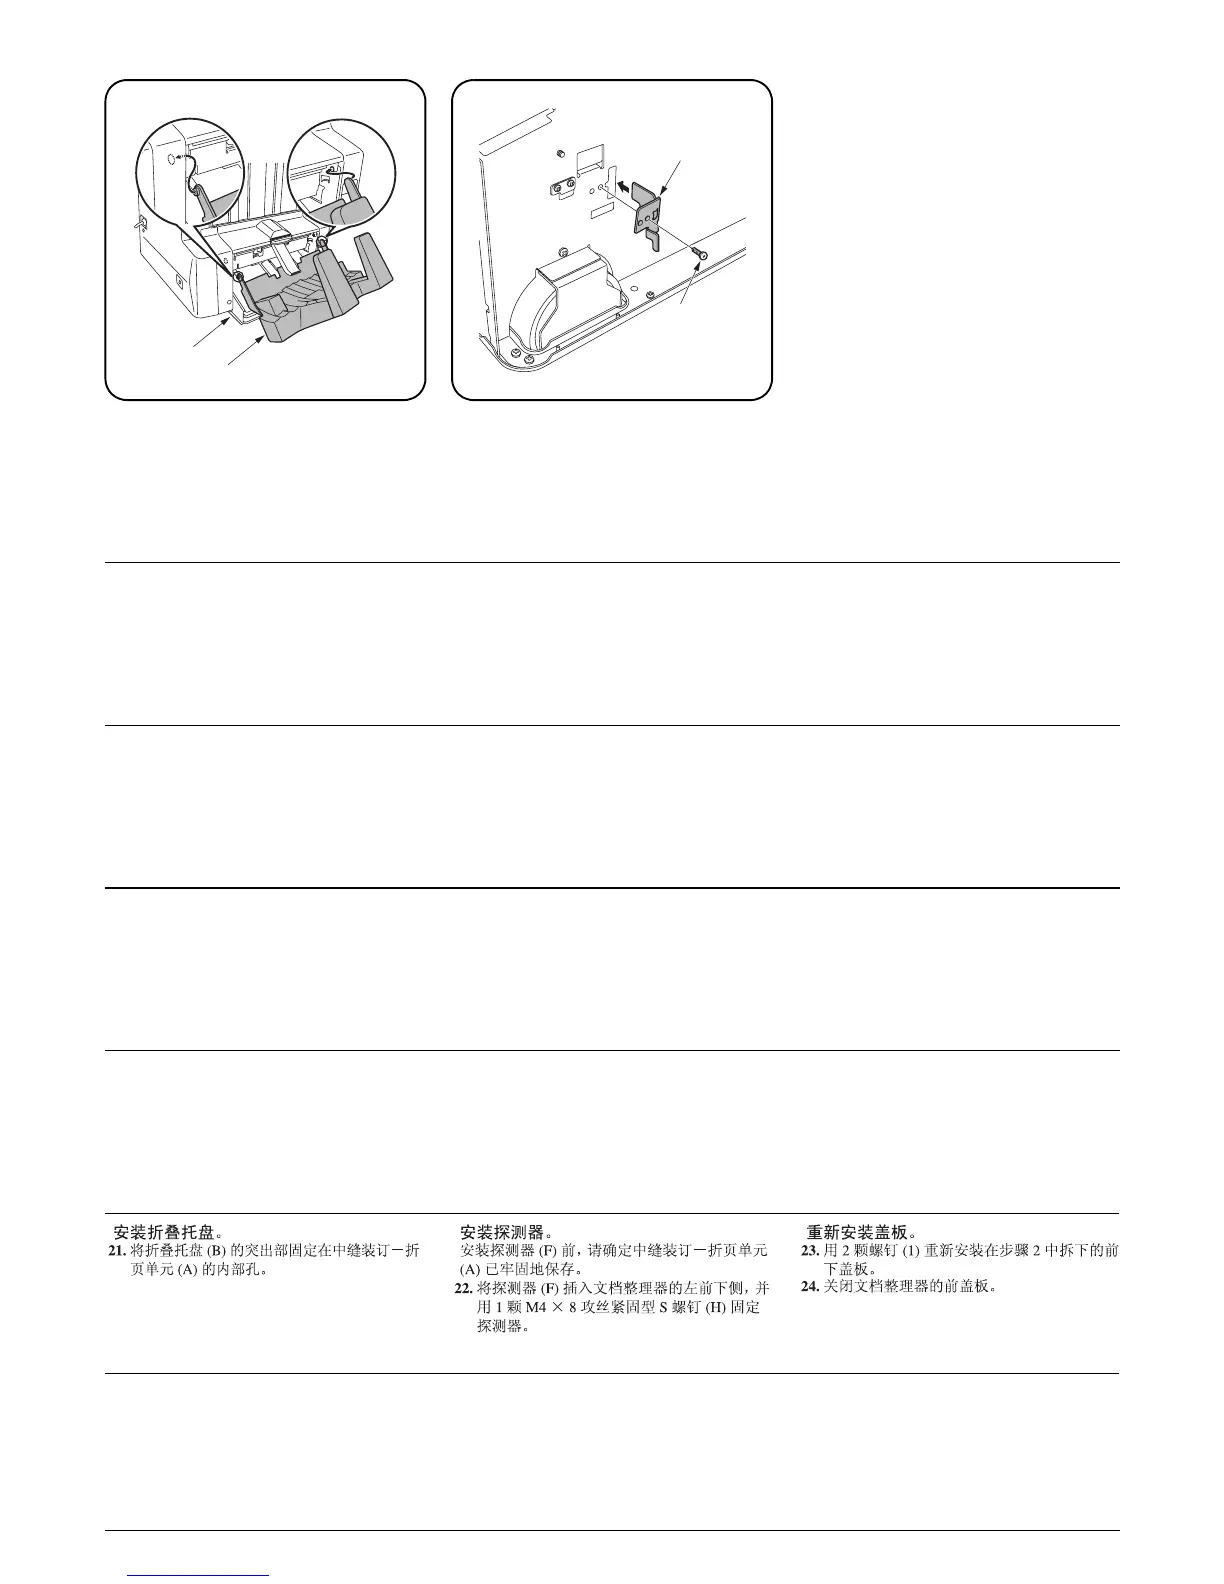
B
A
H
F
Installing the folding tray.
21.
Fit the projection of folding tray (B) into the
inside hole of center-folding unit (A).
Installing the douser.
Before installing the douser (F), make sure
that center-folding unit (A) is securely stored.
22.Insert douser (F) into the lower front left of
the document finisher and secure the douser
with a M4 × 8 tap-tight S screw (H).
Reinstalling the cover.
23.Reinstall the lower front cover that was
removed in step 2 in place with two screws
(1).
24.Close the front cover of the document fin-
isher.
Installation du bac de pliage.
21.
Ajuster la saillie du bac de pliage (B) dans
l’orifice intérieur de la plieuse (A).
Installation de l’ombreur.
Avant d’installer l’ombreur (F), s’assurer que la
plieuse (A) est bien rangée.
22.Insérer l’ombreur (F) dans l’avant gauche
inférieur du finisseur de document et fixer
l’ombreur à l’aide d’une vis S taraudée M4 ×
8 (H).
Remontage du capot.
23.Remonter le capot avant inférieur retiré à
l’étape 2 à l’aide de deux vis (1).
24.Refermer le capot avant du finisseur de
document.
Instalación de la bandeja plegable.
21.Coloque el resalto de la bandeja plegable
(B) dentro del agujero de la unidad de ple-
gado (A).
Instalación de la pantalla paraluz.
Antes de instalar la pantalla paraluz (F), ase-
gúrese de que la unidad de plegado (A) esté
firmemente metida.
22.Introduzca la pantalla paraluz (F) en la parte
frontal inferior izquierda del finalizador de
documentos y asegure la pantalla paraluz
con un tornillo de ajuste M4 × 8 (H).
Reinstalación de la cubierta.
23.Reinstale en su lugar con dos tornillos (1) la
cubierta frontal inferior que fue quitada en el
paso 2.
24.Cierre la cubierta frontal del finalizador de
documentos.
Anbringen des Faltfachs.
21.Führen Sie den Vorsprung des Faltfachs (B)
in das innere Loch der Mittenfalteinheit (A)
ein.
Anbringen der Abschirmung.
Vor dem Anbringen der Abschirmung (F) ist
sicherzustellen, dass die Mittenfalteinheit (A)
sicher eingesetzt ist.
22.Stecken Sie die Abschirmung (F) in die
untere linke Vorderseite des Dokument-Fini-
shers ein, und ziehen Sie die Abschirmung
danach mit einer M4 × 8 Passstift-Verbund-
schraube (H) fest.
Anbringen der Abdeckung.
23.Bringen Sie die in Schritt 2 entfernte untere
Frontabdeckung wieder an und verwenden
Sie hierfür die beiden Schrauben (1).
24.Schließen Sie die Frontabdeckung des
Dokument-Finishers.
Installare il vassoio di piegatura.
21.Inserire la parte sporgente del vassoio di pie-
gatura (B) nel foro interno dell’unità di piega-
tura centrale (A).
Installare il dispositivo di attenuazione
della luce (douser).
Prima di procedere all’installazione del dispositivo di atte-
nuazione della luce (douser) (F), assicurarsi che l’unità di
piegatura centrale (A) sia perfettamente inserita.
22.
Installare il dispositivo di attenuazione della luce
(douser) (F) nella facciata inferiore a sinistra della
finitrice e fissarlo con una vite con testa a croce S
M4
×
8 (H).
Reinstallare il pannello.
23.Reinstallare nella sua posizione originale il
pannello anteriore inferiore rimosso nel
passo 2 con due viti (1).
24.Chiudere il pannello anteriore della finitrice.
中折りトレイの取り付け
21.中折りトレイ (B) の突起を中折りユニット
(A) の内側の穴にはめ、取り付ける。
遮光板の取り付け
遮光板 (F) を取り付ける前に、中折りユニット
(A)が確実に収納されていることを確認するこ
と。
22.遮光板 (F) をドキュメントフィニッシャ正
面の左下へ差し込み、M4 × 8 タップタイト
S(H)1 本で固定する。
カバーの取り付け
23.手順 2 で外した前下カバー(2) をビス (1)2
本で元通り取り付ける。
24.ドキュメントフィニッシャの前カバーを閉
じる。

 Loading...