6
A
J
H
14
H
E
A
H
13
15
A
13
14
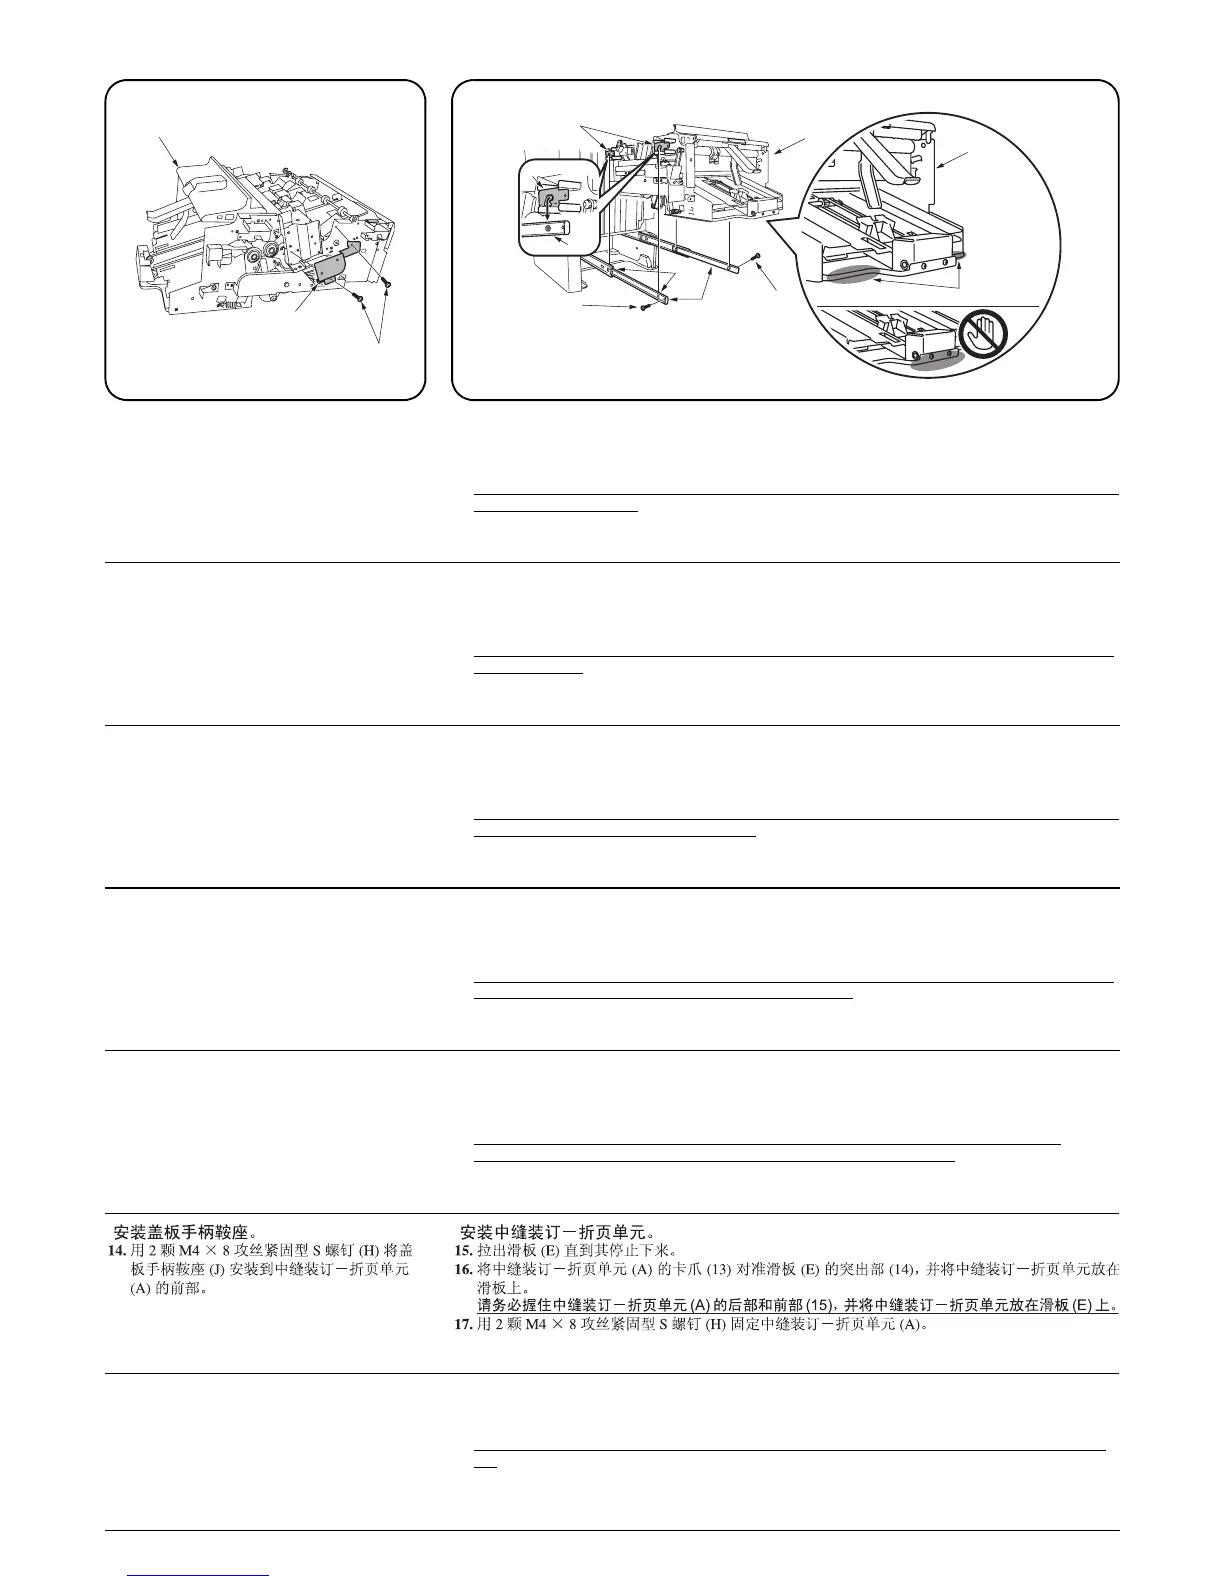
Installing the cover handle saddle.
14.Install cover handle saddle (J) on the front
side of center-folding unit (A) with two M4 ×
8 tap-tight S screws (H).
Installing the center-folding unit.
15.Pull out sliders (E) till they stop.
16.Align pawl (13) of center-folding unit (A) with projection (14) of slider (E) and place the center-
folding unit onto the slider.
Be sure to hold both the rear bottom and front side (15) of center-folding unit (A) and place
the unit onto slider (E).
17.Secure center-folding unit (A) with two M4 × 8 tap-tight S screws (H).
Installation de la poignée de capot à
cheval.
14.Installer la poignée de capot à cheval (J) sur
l’avant de la plieuse (A) à l’aide de deux vis
S taraudées M4 × 8 (H).
Installation de la plieuse.
15.Faire ressortir les règles (E) jusqu’à ce qu’elles s’arrêtent.
16.Aligner le cliquet (13) de la plieuse (A) sur la saillie (14) de la règle (E) et mettre la plieuse en
place sur la règle.
Veiller à tenir le fond arrière et l’avant (15) de la plieuse (A) et à mettre la plieuse en place
sur la règle (E).
17.Fixer la plieuse (A) à l’aide de deux vis S taraudées M4 × 8 (H).
Instalación de la placa de manilla de
cubierta.
14.Instale la placa de manilla de cubierta (J) en
el lado frontal de la unidad de plegado (A)
con dos tornillos de ajuste M4 × 8 (H).
Instalación de la unidad de plegado.
15.Saque los deslizadores (E) hasta que se paren.
16.Alinee el trinquete (13) de la unidad de plegado (A) con el resalto (14) del deslizador (E) y colo-
que la unidad de plegado en el deslizador.
Asegúrese de sujetar el lado inferior posterior y el central (15) de la unidad de plegado (A)
y colocar la unidad en el deslizador (E).
17.Asegure la unidad de plegado (A) con dos tornillos de ajuste M4 × 8 (H).
Anbringen des Abdeckungshalters.
14.Bringen Sie den Abdeckungshalter (J) auf
der Vorderseite der Mittenfalteinheit (A) mit
den beiden M4 × 8 Passstift-Verbundschrau-
ben (H) an.
Anbringen der Mittenfalteinheit.
15.Ziehen Sie die Schieber (E) soweit heraus, bis Sie anschlagen.
16.Richten Sie die Sperrklinke (13) der Mittenfalteinheit (A) mit dem Vorsprung (14) des Schiebers
(E) aus, und setzen Sie danach die Mittenfalteinheit auf den Schieber.
Halten Sie die untere Hinter- und Vorderseite (15) der Mittenfalteinheit (A) fest und setzen
Sie die Mittenfalteinheit danach auf den Schieber (E).
17.Ziehen Sie die Mittenfalteinheit (A) mit den beiden M4 × 8 Passstift-Verbundschrauben (H) fest.
Installare la slitta coprimanopola.
14.Installare la slitta coprimanopola (J) sul lato
anteriore dell’unità di piegatura centrale (A)
per mezzo di due viti con testa a croce S M4
× 8 (H) .
Installare l’unità di piegatura centrale.
15.Tirare in fuori gli scivolo (E) finché si bloccano.
16.Allineare il dentello (13) dell’unità centrale di piegatura (A) alla parte sporgente (14) dello scivolo
(E) e posarvi sopra l’unità stessa.
Assicurarsi di reggere bene sia la parte posteriore bassa che quella anteriore (15)
dell’unità di piegatura centrale (A) e posare l’unità sullo scivolo (E).
17.Fissare l’unità di piegatura centrale (A) con due viti con testa a croce S M4 × 8 (H).
カバーハンドルサドルの取り付け
14.カバーハンドルサドル (J) を中折りユニッ
ト (A) 前側にビス M4 × 8 タップタイト
S(H)2 本で取り付ける。
中折りユニットの取り付け
15.スライダ (E) を最後まで引き出す。
16.中折りユニット (A) のツメ (13) をスライダ (E) の突起 (14) に合わせて乗せる。
中折りユニット
(A) は、必ず後側の底部と前側の (15) の部分を持ってスライダ (E) に乗せるこ
と。
17.M4 × 8 タップタイト S(H)2 本で中折りユニット (A) を固定する。

 Loading...