Copyright 2013 Baker Hughes Company.
10 | DPI620G Instruction Manual–English
Chapter 1. Overview
3. Put the battery [2] into the charger body at a slight angle, then push and click into place.
Tighten the thumb screws [3] to prevent accidental disconnection.
4. Switch on the mains power supply. LED1 and LED2 on the charger will show the different
operation conditions, as shown in Figure 1-7 below.
Figure 1-7: Battery Charge & Charger Status
If the charger has a malfunction, disconnect the power supply and connect it again to remove the
m
a
lfunction. If the malfunction continues contact the Druck Tech Support for instructions.
1.14.3 Battery Charging Times
For DPI620G & DPI620G-B: 6.5 hours for charge by DC Power supply or by the External Battery
Ch
arger.
For DPI620G-IS: 8 hours for charge by External Battery Charger.
1.15 Power On
1.15.1 DPI620G or DPI620G-B
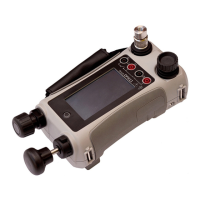
Figure 1-8: DPI620G Power Button and Ports
To energize the instrument when it is de-energized (power is off), push in the power button
(Figure 1-8) until the display screen flashes and shows the Druck launch screen. The screen will
go blank for a few seconds and then show the Dashboard screen.
Both off - no
power
Green on - no battery
connected
Green on, red flashes
- battery health check
Green flashes, red on
- battery on charge
Green on - red on
- charge complete
Green and red flashing
- battery malfunction
LED 1 LED 2
Power
Button
 Loading...