P
r
o
t
e
c
t
e
d
b
y
c
o
p
y
r
i
g
h
t
.
C
o
p
y
i
n
g
f
o
r
p
r
i
v
a
t
e
o
r
c
o
m
m
e
r
c
i
a
l
p
u
r
p
o
s
e
s
,
i
n
p
a
r
t
o
r
i
n
w
h
o
l
e
,
i
s
n
o
t
p
e
r
m
i
t
t
e
d
u
n
l
e
s
s
a
u
t
h
o
r
i
s
e
d
b
y
V
o
l
k
s
w
a
g
e
n
A
G
.
V
o
l
k
s
w
a
g
e
n
A
G
d
o
e
s
n
o
t
g
u
a
r
a
n
t
e
e
o
r
a
c
c
e
p
t
a
n
y
l
i
a
b
i
l
i
t
y
w
i
t
h
r
e
s
p
e
c
t
t
o
t
h
e
c
o
r
r
e
c
t
n
e
s
s
o
f
i
n
f
o
r
m
a
t
i
o
n
i
n
t
h
i
s
d
o
c
u
m
e
n
t
.
C
o
p
y
r
i
g
h
t
b
y
V
o
l
k
s
w
a
g
e
n
A
G
.
– Immediately attach the cover and tighten the bolts.
Note
Tighten the bolts -1 and 4- with an additional turn after installing
the vibration damper. The bolts must be removed again to install
the vibration damper.
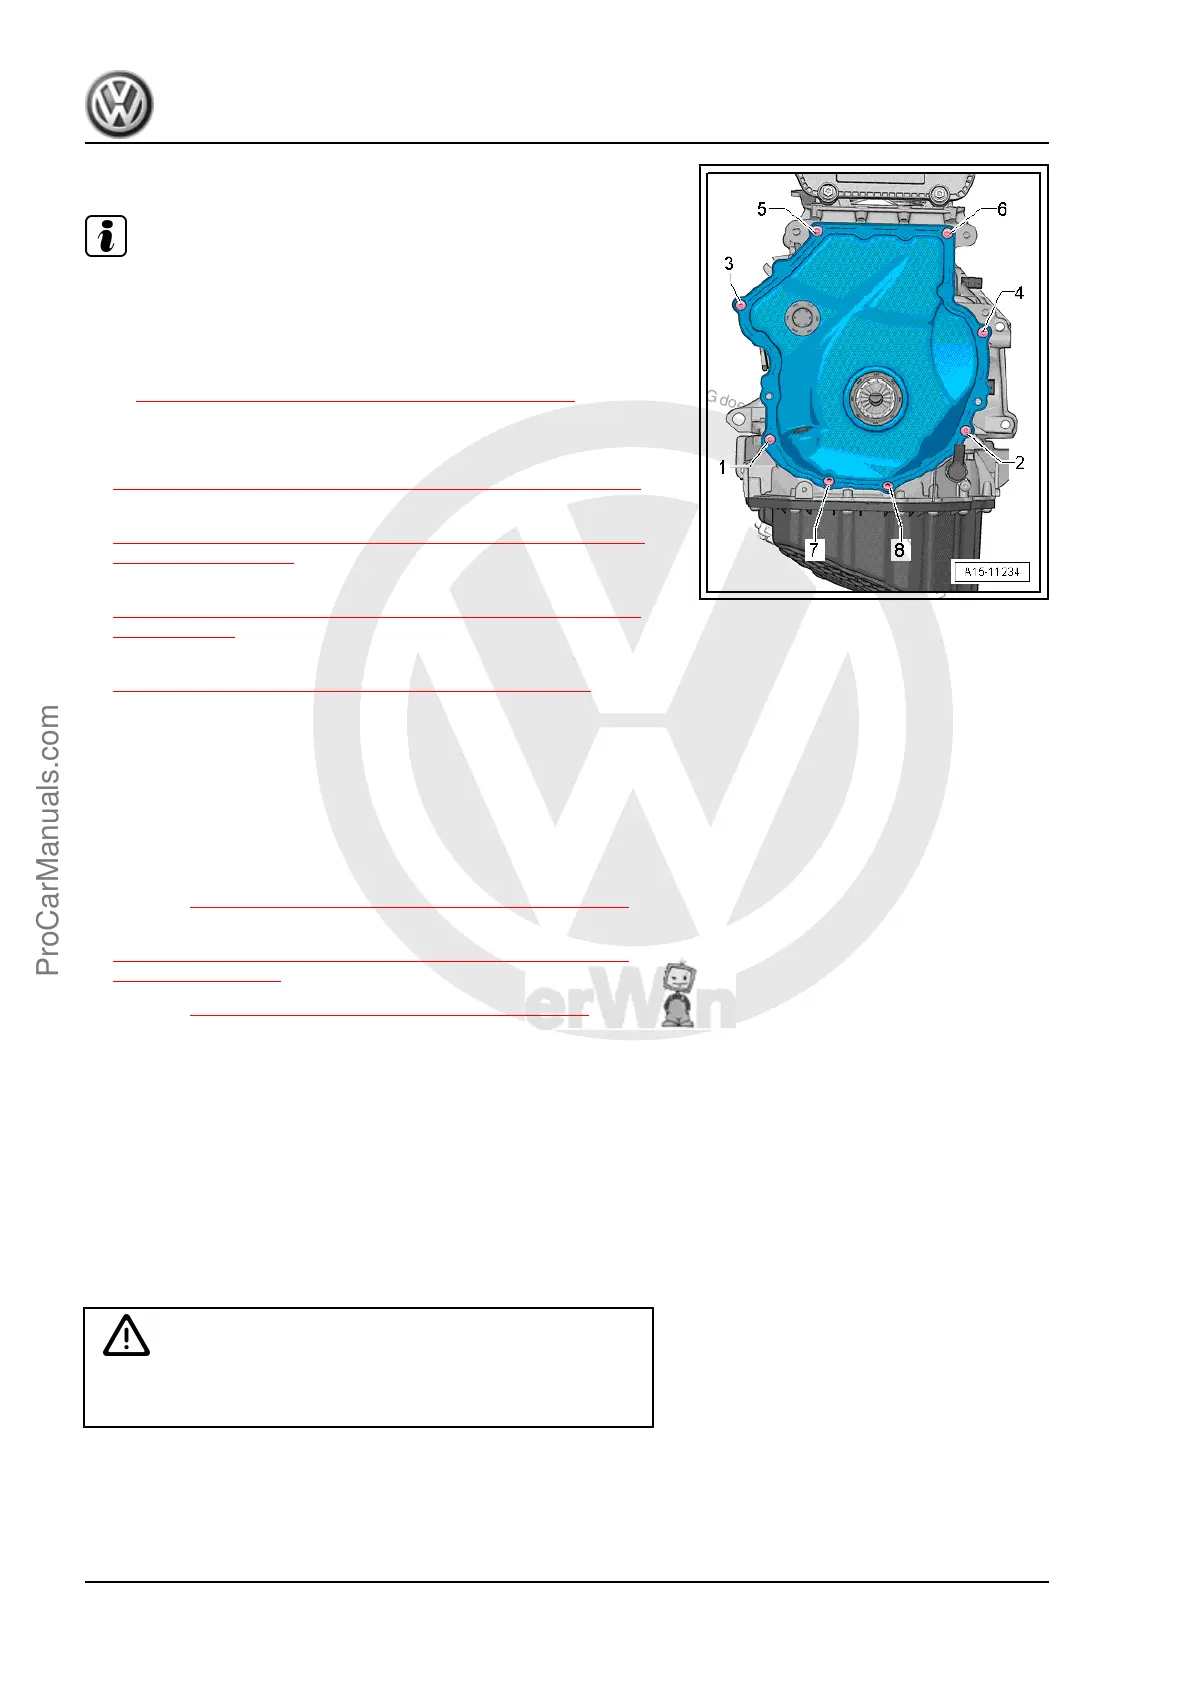
– Tighten the bolts -1 through 8- in the sequence shown. Refer
to ⇒ 2.1 Overview - Timing Chain Cover, page 104 .
Continuation for Both Versions
– Install the vibration damper. Refer to
⇒ 1.4 Vibration Damper, Removing and Installing, page 47 .
– Install the Oil Pressure Regulation Valve - N428- . Refer to
⇒ 4.8 Oil Pressure Regulation Valve N428 , Removing and
Installing, page 206 .
– Install the ribbed belt tensioning damper. Refer to
⇒ 1.5 Auxiliary Components Bracket, Removing and Instal‐
ling, page 53 .
– Install the ribbed belt. Refer to
⇒ 1.2 Ribbed Belt, Removing and Installing, page 46 .
– Install the right front wheel housing liner. Refer to ⇒ Body
Exterior; Rep. Gr. 66 ; Wheel Housing Liner; Front Wheel
Housing Liner, Removing and Installing .
– Fill with engine oil and then check the level. Refer to ⇒ Main‐
tenance ; Booklet 36.1 ; Procedure Descriptions; Engine Oil,
Draining, Replacing Oil Filter, and Filling .
Tightening Specifications
♦ Refer to ⇒ 2.1 Overview - Timing Chain Cover, page 104
♦ Refer to
⇒ Fig. Engine Support - Tightening Specification and Se‐
quence , page 56
♦ Refer to ⇒ 2.1 Overview - Subframe Mount, page 29
2.3 Vibration Damper Sealing Ring, Replac‐
ing
Special tools and workshop equipment required
♦ Seal Installer - Crankshaft - T10354-
♦ Press Piece - Gearbox - T10375-
♦ Assembly Tool - Knurled Nut - T10531/4- from the Assembly
Tool - T10531-
♦ Seal Installer - Crankshaft - T40274-
Caution
This procedure contains mandatory replaceable parts. Refer
to component overview prior to starting procedure.
Mandatory Replacement Parts
♦ Bolt - Vibration Damper
♦ O-ring - Oil Dipstick Tube
Golf 2015 ➤ , Golf Variant 2015 ➤
Engine Mechanical, Fuel Injection and Ignition - Edition 04.2015
112 Rep. Gr.15 - Cylinder Head, Valvetrain
ProCarManuals.com
 Loading...


