P
r
o
t
e
c
t
e
d
b
y
c
o
p
y
r
i
g
h
t
.
C
o
p
y
i
n
g
f
o
r
p
r
i
v
a
t
e
o
r
c
o
m
m
e
r
c
i
a
l
p
u
r
p
o
s
e
s
,
i
n
p
a
r
t
o
r
i
n
w
h
o
l
e
,
i
s
n
o
t
p
e
r
m
i
t
t
e
d
u
n
l
e
s
s
a
u
t
h
o
r
i
s
e
d
b
y
V
o
l
k
s
w
a
g
e
n
A
G
.
V
o
l
k
s
w
a
g
e
n
A
G
d
o
e
s
n
o
t
g
u
a
r
a
n
t
e
e
o
r
a
c
c
e
p
t
a
n
y
l
i
a
b
i
l
i
t
y
w
i
t
h
r
e
s
p
e
c
t
t
o
t
h
e
c
o
r
r
e
c
t
n
e
s
s
o
f
i
n
f
o
r
m
a
t
i
o
n
i
n
t
h
i
s
d
o
c
u
m
e
n
t
.
C
o
p
y
r
i
g
h
t
b
y
V
o
l
k
s
w
a
g
e
n
A
G
.
4 Balance Shaft
⇒ 4.1 Overview - Balance Shaft, page 69
⇒ 4.2 Balance Shaft, Removing and Installing, page 70
⇒ 4.3 Balance Shaft Sealing Ring, Replacing, Intake Side, page
75
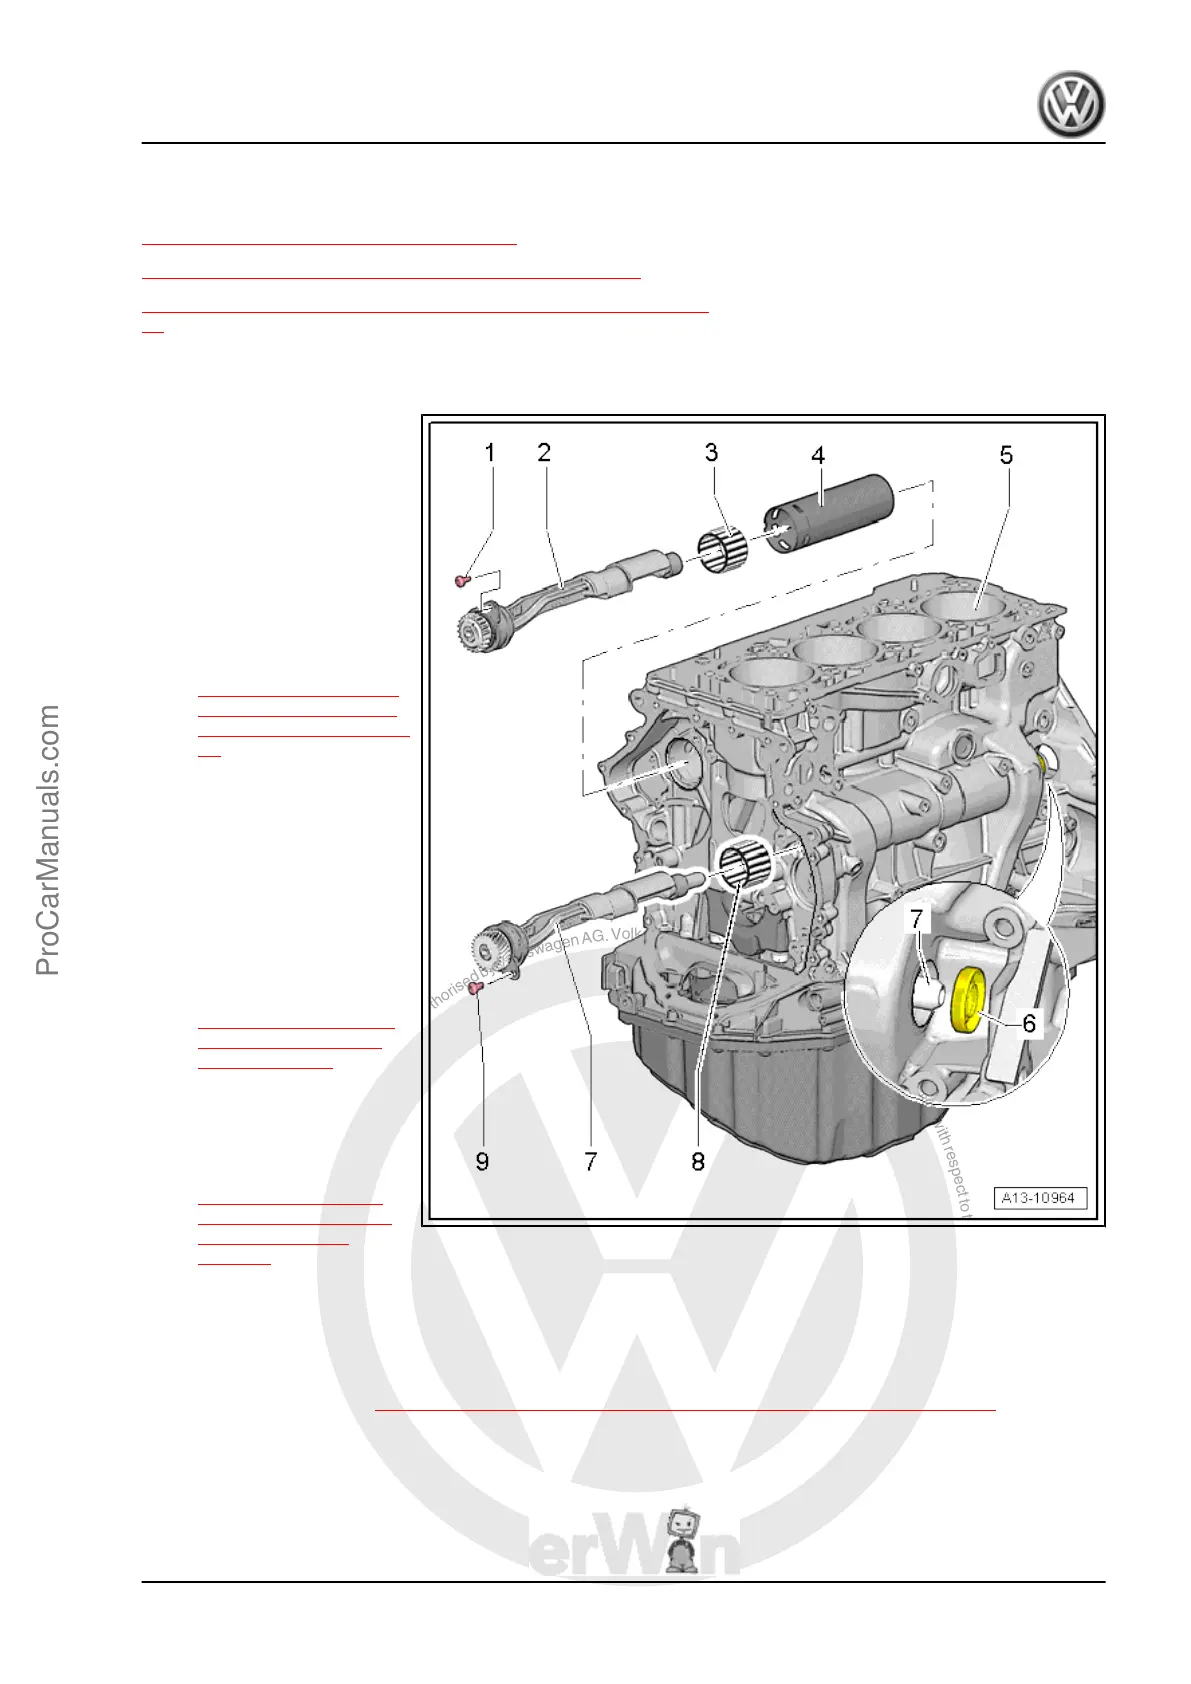
4.1 Overview - Balance Shaft
1 - Bolt
❑ 4 Nm 45°
❑ Replace after removing
2 - Balance Shaft
❑ Exhaust side
❑ Must be replaced after
removing
❑ Lubricate the bearing
with engine oil
❑ Replacing. Refer to
⇒ 4.2.2 Balance Shaft
Exhaust Side, Remov‐
ing and Installing, page
73 .
3 - Needle Bearing Rim
❑ Replace the balance
shaft after each remov‐
al.
❑ Install a new needle
bearing with the same
color identification
4 - Pipe for Balance Shaft
❑ Installed position. Refer
to
⇒ Fig. Balance Shaft
Pipe - Installed Posi‐
tion , page 70
5 - Cylinder Block
6 - Balance Shaft Seal Intake
Side
❑ Replacing. Refer to
⇒ 4.3 Balance Shaft
Sealing Ring, Replac‐
ing, Intake Side,
page 75 .
7 - Balance Shaft
❑ Intake side
❑ Must be replaced after removing
❑ Lubricate the bearing with engine oil
❑ Replacing. Refer to ⇒ 4.2.1 Balance Shaft Intake Side, Removing and Installing, page 70 .
8 - Needle Bearing Rim
❑ Replace the balance shaft after each removal.
❑ Install a new needle bearing with the same color identification
Golf 2015 ➤ , Golf Variant 2015 ➤
Engine Mechanical, Fuel Injection and Ignition - Edition 04.2015
4. Balance Shaft 69
ProCarManuals.com
 Loading...


