TPI Configuration Pages
60
TPI-PRO-DVI - Instruction Manual
Conf iguring Incoming Video Signals
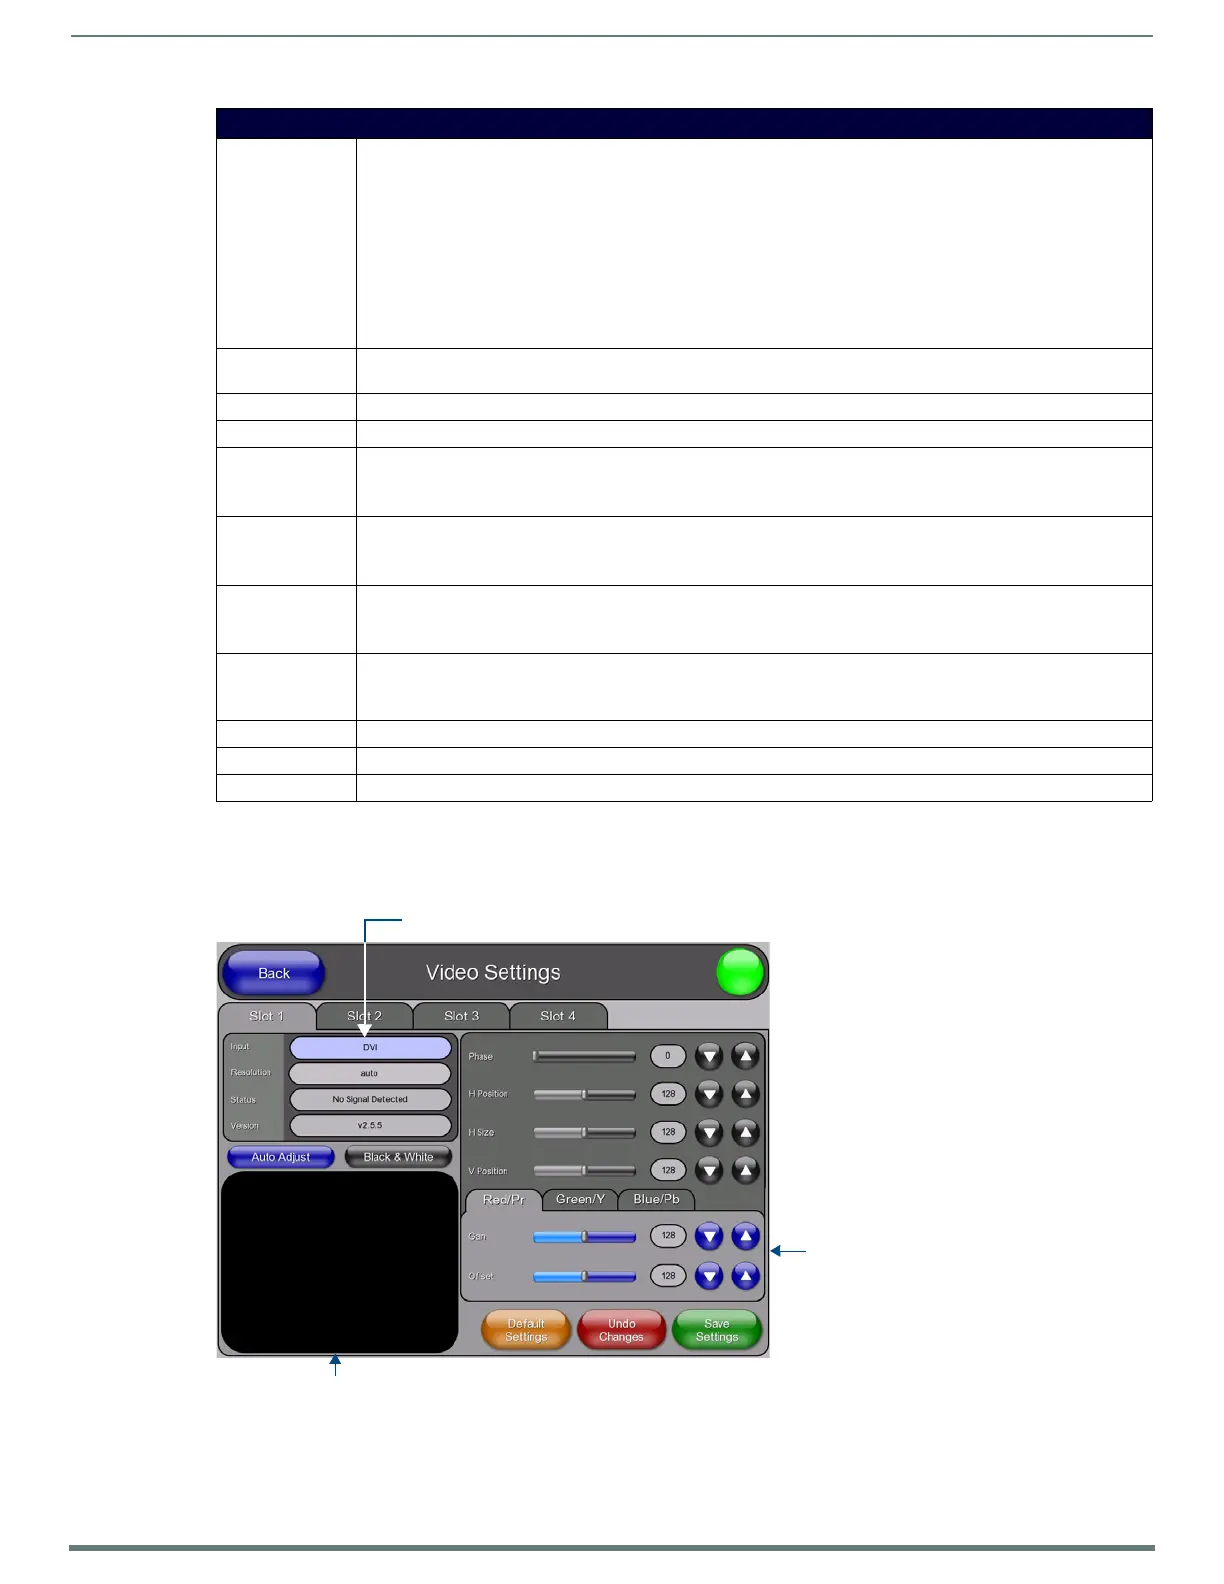
In the Video Settings page, you can select any of the available source inputs by selecting the corresponding tab (Slot 1 - Slot 4) at
the top of the page. If the selected source input is receiving a video signal, this video is displayed in the Incoming Video Signal
Window. Use the video settings on the right side of the page to adjust the incoming video signal (FIG. 63).
When using a a non-touch enabled monitor, the incoming video image often must be adjusted to fit into the visible screen area.
Refer to the Setting the Output Resolution section on page 38 for instructions on adjusting the position and size on a non-touch
enabled monitor.
Setup - Video Settings Page
Input: Press to cycle through the options for video input types: Composite 1/2/3, S-Video, Computer (VGA), Component
(YPrPb), and DVI.
Composite 1/2/3:
• Composite 1 = Corresponds to a signal connected to the Red connector on the DVI-to-3RCA Male adapter cable.
• Composite 2 = Corresponds to a signal connected to the Green connector on the DVI-to-3RCA Male adapter cable.
• Composite 3 = Corresponds to a signal connected to the Blue connector on the DVI-to-3RCA Male adapter cable.
Default = Composite 1
Note When using a DVI source, set the input to DVI before attaching the DVI cable to the TPI. If a DVI source is attached
before setting the input to DVI, you may need to reboot the source for it to recognize the DVI input description
information required by the DVI standard.
Resolution: Press to open the Input Resolution Popup Page, to adjust the TPI’s Input Resolution setting (see the Configuring the
Input Resolution (VGA & Component only) section on page 62).
Status: This read-only field indicates whether a video-sync signal is detected.
Version: This read-only field indicates the firmware version currently loaded on the TPI.
Auto Adjust: Press to toggle between Auto detection and Manual setup.
• This option is only valid for VGA and Component Input signal types.
•Default = Auto
Black & White: Press to toggle Black & White display mode.
• This option is only valid for Composite and S-Video Input signal types.
•Default = Off
Incoming Video
Signal Window:
The video signal on the TPI Input that corresponds to the open tab is displayed in this video button (Input 1 is
displayed on the Slot 1 tab, Input 2 is displayed on the Slot 2 tab, etc).
Press inside the Incoming Video Signal Window to open the Full Screen Settings page.
Video Parameters: The Video Parameters (i.e. Brightness, Contrast, Saturation, etc.) presented on this page depend on the Input Type
assigned to the selected Input.
See the Video Parameters section on page 61 for descriptions of all possible Video Parameters.
Default Settings: Press to reset all video settings to their default values.
Undo Changes: Press to disregard any changes made on the page since the last settings were saved.
Save Settings: Press to save all changes made on this page.
FIG. 63 Video Settings page (Slot 1 tab)
Video settings will vary
depending on the
source input type
Incoming video signal window
Press to cycle through the Input Types

 Loading...


