Version 5.2 41 September 2007
SIP User's Manual 3. Installation
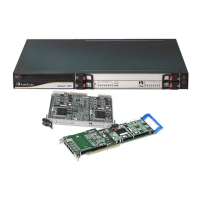
3.2.2 Package Contents
Ensure that in addition to the TP-1610, the package contains:
An RTM blade (optional)
CD (software and documentation)
This User’s Manual
Release Notes
3.2.3 Installing the TP-1610
The TP-1610 cPCI blade is hot-swappable and can therefore be removed from a slot (and
inserted into a slot) while the chassis is under power. It is recommended though that you
power down the chassis and read the notes below before replacing the components.
Notes:
• Before removing or inserting blades from / to the chassis, attach a wrist
strap for electrostatic discharge (ESD) and connect it to the rack frame
using an alligator clip.
• Do not set components down without protecting them with a static bag.
3.2.3.1 Inserting Blades
The TP-1610 blade (and its associated Rear Transition Module -- RTM -- blade) is
designed to be hosted in chassis (i.e., Mediant 2000 and third-party chassis) that comply
with form factor 6U PICMG 2.0 single cPCI slots.
¾ To insert the TP-1610 blade into the chassis, take these 2 steps:
1. Choose an available slot in a compactPCI™ chassis and gently insert the TP-1610
blade into it; as the TP-1610 blade is inserted, the black plastic handles, at both ends
of the blade’s front panel, must engage with the chassis. When the TP-1610 blade is
firmly mounted into the correct position inside the chassis, the red plastic latches
within each handle self-lock (this also ensures that the TP-1610 blade is properly
earthed via the chassis).
2. Fasten the screws on the front panel of the blade to secure the blade to the chassis.
¾ To insert the TP-1610 RTM into the chassis, take these 2 steps:
1. Choose an available slot in a compactPCI™ chassis and gently insert the TP-1610
RTM into it; as the TP-1610 RTM is inserted, the black plastic handles, at both ends of
the blade’s panel, must engage with the chassis. When the TP-1610 RTM is firmly
mounted into the correct position inside the chassis, the red plastic latches within each
handle self-lock (this also ensures that the TP-1610 blade is properly earthed via the
chassis).
2. Fasten the screws on the front panel of the blade to secure the blade to the chassis.
 Loading...