February 2013
6-3
ColorQube® 9303 Family
GP 1
General Procedures/Information
GP 1 Service Mode
Purpose
This procedure describes the following items:
• How to Enter Service Mode.
• How to Boot/Power Up Directly into IME Diagnostics Mode.
• Service Info Tab.
• Diagnostics Tab.
• Adjustments Tab.
• Maintenance Tab.
• Call Closeout Tab.
• User Interface Diagnostics.
• Service Copy Mode.
NOTE: When service mode is entered, all existing copy jobs are cancelled. The network con-
troller will stop accepting jobs and a ‘Offline’ screen message is displayed. When exiting ser-
vice mode an ‘Online’ screen message is displayed.
NOTE: Machines with software version 071.XXX.XXX.XXX only. To log into service mode
remotely refer to GP 47.
How to Enter Service Mode
1. Switch on the machine, GP 14.
2. When the machine is ready, press and hold the # key, * key and the Stop key.
3. Enter the passcode 1991. Touch the Enter button on the UI.
NOTE: . An invalid passcode causes a delay of five seconds before another passcode
can be entered.
4. Select the required tab from the service mode screen.
5. To return to Ready to scan, select Exit Only or Exit and Reboot.
How to Boot/Power Up Directly into IME Diagnostics Mode
This mode will allow the system controller to boot but not the IME. The IME will have power but
will not go through initialization, POST or PEST. The IME will not initiate movement of compo
-
nents until commanded to do so via Service Mode DC routines (e.g. component control) or
rebooted into normal customer mode. The IME will be dormant and the heaters are not
switched on. The drum will not rotate and the print head carriages remain parked. The machine
has no marking capabilities.
1. Switch off the machine, GP 14.
2. Open the left hand upper door assembly, PL 70.30.
3. Open the front door.
4. Remove the waste tray.
5. Switch on the machine, GP 14.
6. Follow the on screen instructions, install the waste tray, close the front door and close the
left hand upper door.
7. The UI displays Ready to scan and an error code 000-000 (takes a few minutes).
8. Press and hold the # key, * key and the Stop key.
9. Enter the passcode 1991. Touch the Enter button on the UI.
NOTE: . An invalid passcode causes a delay of five seconds before another passcode
can be entered.
10. Select the required tab from the service mode screen.
11. To return to Ready to scan, select Exit Only or Exit and Reboot.
Service Info Tab
The service info routines are used to track faults that have occurred in the machine. Refer to
Table 1.
Diagnostics Tab
The diagnostic routines are used to test specific areas of the machine. Refer to Table 2.
Adjustments Tab
Adjustment routines are used to modify the set-up or to calibrate specific areas of the machine.
Refer to Table 3.
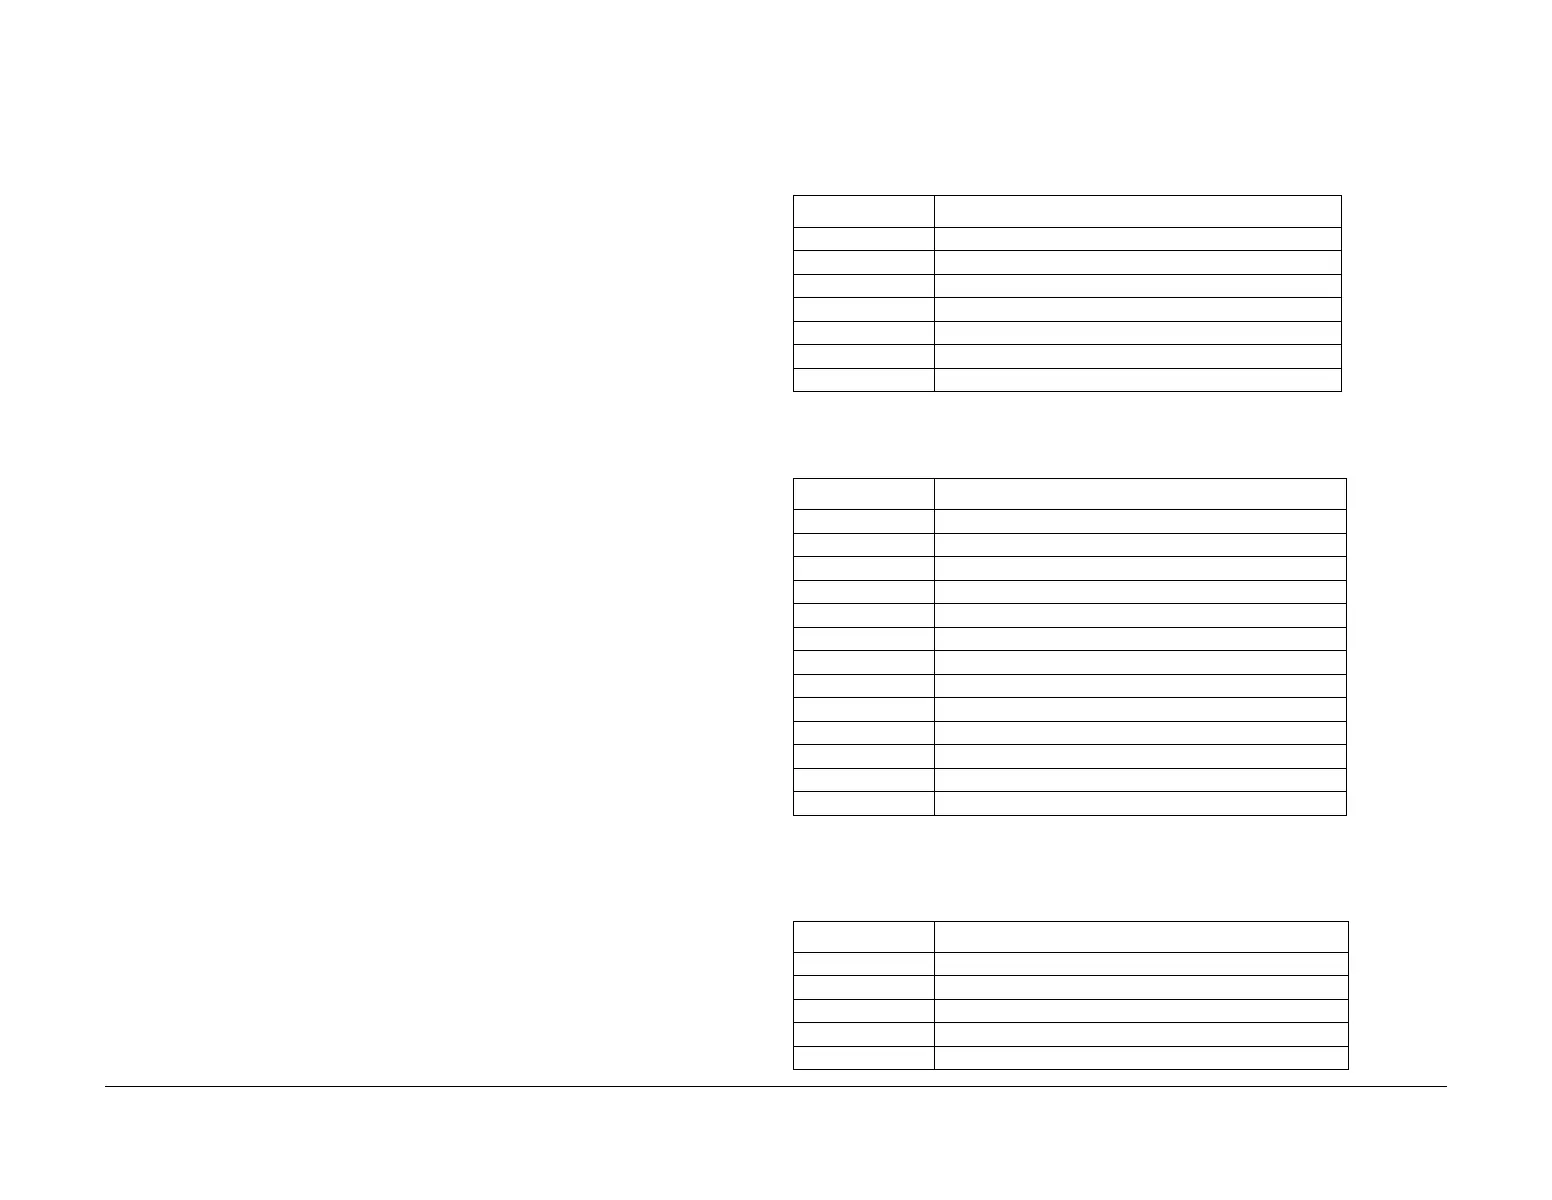
Table 1 Service Info Tab
Routine Description
dC104 Usage Counters
dC108 Software Version
dC113 Fast Time to Ready
dC120 Fault Counters
dC122 Fault History
dC123 PEST Fault History
dC135 CRU/HSFI Status
Table 2 Diagnostics Tab
Routine Description
dC140 Analog Monitor
dC312 Network Echo Test
dC330 Component Control
dC335 Heater Monitor and Exerciser
dC612 Print Test Pattern
dC640 Video Path Integrity
dC708 Drum Drive Control Test
dC715 Active Registration Control
dC914 Head to Head Alignment Test
dC959 Cleaning Unit Exerciser
dC962 Transfix Load Test
dC965 Printhead Maintenance Cycle Test
dC967 Head to Drum Spacing Check
Table 3 Adjustments Tab
Routine Description
dC131 NVM Read / Write
dC301 NVM Initialization
dC361 NVM Save and Restore
dC608 Document Feeder Registration
dC609 Document Glass Registration
 Loading...


